Introduction
Welcome to our Sword & Shield Greatsword Build guide for Throne and Liberty. Learn everything you need to know about the powerhouse bruiser set-up here.
Skills & Passives
Below are the Active, Passive, and Defensive Skills for the Sword & Shield Greatsword Build. For insight on which order to level these Skills up, Check our Skill Upgrade Progression Section below. It’s important to note that there is a few good options and paths you can take with the build. As a result, the freedom truly is yours to explore past our own recommendations.
Active Skills
Immortal Pride | Strategic Rush | ||
Ascending Slash | Counter Barrier | ||
Guillotine Blade | Chain Hook | ||
DaVinci’s Courage | Stalwart Bastion | ||
Precision Dash | Stunning Blow | ||
Valiant Brawl | Strike Shield |
Passives
Skillful Evasion | Robust Constitution | ||
Gerad’s Patience | Vital Force | ||
Impenetrable | Indomitable Armor | ||
Aegis Shield | Cold Warrior |
Defensive Skill
Shield Survival Technique (Sword and Shield Defensive Skill) provides an easy-to-use Defensive skill that restores health, gives a short-ranged counter-attack, and (once fully upgraded) grants you a Barrier equal to 14% of your Max Health for 3 seconds.
Skill Upgrade Progression
Next, Let’s look at the order to prioritize upgrading your skills. We’ve prioritized the most important skills to help guide you through skill progression to help get you started. It’s important to note that you will upgrade all skills to max eventually and that some Skills start at Rare or Epic Quality
ACTIVE SKILL UPGRADE ORDER
- S&S- Shield Strike (Uncommon to Rare)
- S&S- Strategic Rush (Uncommon to Rare)
- Shield Survival Technique (Defensive Skill (Uncommon to Rare)
- S&S- Counter Barrier (Uncommon to Epic)
- Greatsword- Stunning Blow (Uncommon to Rare)
- Greatsword- Precision Dash (Uncommon to Rare)
- Greatsword- Valiant Brawl (Uncommon to Rare)
- Greatsword- Stunning Blow (Rare to Epic)
- Greatsword- Precision Dash (Rare to Epic)
- S&S- Shield Strike (Rare to Epic)
- S&S- Chain Hook (Rare to Epic)
- S&S- Strategic Rush (Rare to Epic)
PASSIVE SKILL UPGRADE ORDER
- Greatsword- Robust Constitution (Uncommon to Rare)
- Greatsword- Vital Force (Uncommon to Rare)
- S&S- Skillful Evasion (Uncommon to Rare)
- S&S- Aegis Shield (Uncommon to Rare)
- Greatsword- Cold Warrior (Rare to Epic)
- Greatsword- Robust Constitution (Rare to Epic)
- S&S- Aegis Shield (Rare to Epic)
- S&S- Skillful Evasion (Rare to Epic)
- Greatsword- Vital Force (Rare to Epic)
Attributes, Weapon Mastery, and Guardians
Attributes
In this section, we will go over recommended Attribute allocation, as well as the Weapon Mastery and Guardian usage for the build.
For this build, the main attribute is actually split between Strength and Perception. Dexterity can be sprinkled in due to the increased Maximum damage threshold, Critical Hit Chance, Evasion and Attack Speed it provides. Wisdom similarly plays an minor role, granting Mana Regen, Cooldown Speed and more. High Perception allows you to hit targets with higher levels of Evasion, allowing for consistent disruption while tanking. Strength is powerful in the Sword & Shield Greatsword set-up. Strength provides increased resistances, more Maximum Health (which synergizes with Vital Force) and powerful stat thresholds. For example, at 50 Strength, you’re granted 100 Heavy Attack Chance!
Starting out, however, we recommend the following:
NOTE: This Information does not include gear Bonuses
- STRENGTH – 30
- DEXTERITY – 10
- WISDOM – 19
- PERCEPTION – 30
Weapon Mastery
You can level up your Weapon Mastery by simply using the weapon during gameplay. The Weapon Mastery Trees for each weapon are as follows.
NOTE – Your first Weapon Mastery Point will be used to select the first node in each weapon.
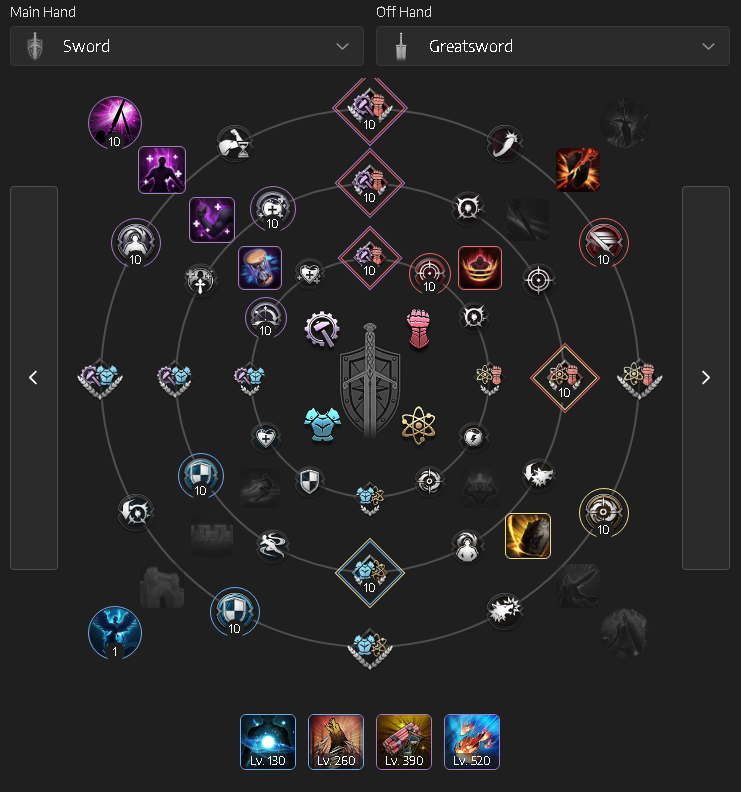
Sword & Shield
- Provoke & Counter – 9 points
- Collision – 3 points
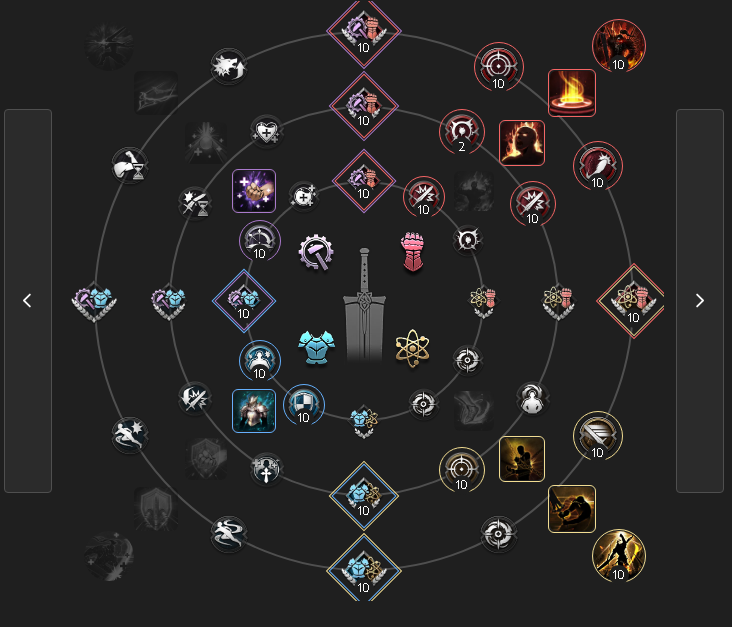
Greatsword
- Incapacitate – 6 points
- Face Off – 6 points
Guardian – Green Ranger Elowen
Green Ranger Elowen is perfect for any Sword and Shield combination. As a result of being in the frontline and exceptionally tanky, it has never been easier to land AoE on nearby enemies! Activating Green Ranger Elowen has a high chance to root all nearby targets, increasing the chance of landing critical strikes on the rooted targets. Using Green Ranger Elowen on an engage is essential for winning GvG fights. With the S&S Greatsword combination, you can utilize your mobility skills to unexpectedly dive deep and activate the Guardian.
Gear
NOTE – Most Elite Resistance gear ALSO has a chance to drop from Precious Blessing Pouches that can be purchased daily from your Contract Vendor and the completion of some level 50 Contracts.
Weapons
IMPORTANT – You will want to level up RARE gear to 9+ before transferring progress to EPIC quality Gear.
Level 1-50+
Name | Trait 1 | Trait 2 | Trait 3 | How to Acquire | |
Main Hand | Elite Resistance Sword | Heavy Attack Chance | Hit | Critical Hit | Crafted – Lithograph from Various Sources |
Off-Hand | Elite Resistance Greatsword | Heavy Attack Chance | Hit | Critical HIt | Crafted – Lithograph from Various Sources |
End Game (BIS)
Name | Trait 1 | Trait 2 | Trait 3 | How to Acquire | |
Main Hand | Nirma’s Corrupt Sword | Heavy Attack Chance | Hit | Mana Cost Efficiency | Raid Boss – Nirma |
Off-Hand | Adentus’s Barbaric Blade | Heavy Attack Chance | Hit | Critical Hit | Raid Boss- Adentus |
NOTE – you can also use Queen Bellandir’s Blade in the S&S slot. The item is difficult to acquire/Trait, but due to the Weapon Skill it is better than Nirma’s Corrupt Sword. This drops from the World Boss Worm – Queen Bellandir
Armor
IMPORTANT – You will want to level up RARE gear to 9+ before transferring progress to EPIC quality Gear.
Level 1-50+
Name | Trait 1 | Trait 2 | Trait 3 | How to Acquire | |
Helm | Elite Resistance Visor | Max Health | Ranged Evasion | Melee Evasion | Crafter – Lithograph drops from Various location |
Cloak | Elite Assassin’s Cloak | Max Health | Skill Damage Resistance | Bind Resistance | Crafter – Lithograph drops from Orc Spearmaster and Executioners (Akidu Valley) |
Chest | Elite Resistance Plate Armor | Max Health | Melee Evasion | Ranged Evasion | Crafted – Lithographs Drop from Ruins of Turayne Zone from Gallu Mobs |
Gloves | Blessings of Mother Nature Cloth | Max Health | Melee Evasion | Magic Evasion | Crafted – Lithograph Drops from Cave of Destruction |
Pants | Elite Resistance Leather Pants | Max Health | Ranged Evasion | Magic Evasion | Crafted – Lithograph drops from Mitran or Pirate King’s Chest Crab |
Boots | Elite Resistance Plate Boots | Ranged Evasion | Melee Evasion | Move Speed | Crafted – Lithograph drops from Grayclaw Butcher |
End Game (BIS)
Name | Trait 1 | Trait 2 | Trait 3 | How to Acquire | |
Helm | General’s Fury Headgear | Max Health | Melee Evasion | Ranged Evasion | Drops from Cave of Destruction Dungeon |
Cloak | Hermit’s Shroud | Max Health | Skill Damage Resistance | Enfeeble Resistance | Drops from Abyssal Specter |
Chest | Special Resistance Tactical Armor | Max Health | Melee Evasion | Ranged Evasion | Crafted – Drops from Specral Wizard and Watchers |
Gloves | General’s Frenzy Gloves | Max Health | Ranged Evasion | Attack Speed | Drops from Demonhoof Berserkers & Butchers (Floor 5 & 6 Syleus’s Abyss Dungeon) |
Pants | Special Resistance Ancient Dragon Pants | Max Health | Ranged Evasion | Magic Evasion | Drops from Orc Brawlers, Lithograph Book, Special Resistance Commendations Crafting |
Boots | Resonance of Mother Nature’s Boots | Magic Evasion | Melee Evasion | Max Health | Dungeon – Butcher’s Canyon |
Accessories
IMPORTANT – You will want to level up RARE gear to 9+ before transferring progress to EPIC quality Gear.
Level 1-50+
Name | Trait 1 | Trait 2 | Trait 3 | How to Acquire | |
Necklace | Shock Trooper’s Resistance Necklace | Max Health | Skill Damage Boost | Buff Duration | Drops From Skeleton Lancer (Ruins of Turayne Zone) |
Bracelet | Wild Resistance Bracelet | Max Health | Skill Damage Reduction | Stun Resistance | Dungeons – Roaring Temple and Cursed Wasteland |
Ring | Brawler’s Ring | Max Health | Skill Damage Boost | Buff Duration | Crafted – Lithograph drops from Death’s Abyss (Dungeon |
Ring | Crude Wind Band | Max Health | Skill Damage Boost | N/A | Uncommon Accessory Chest |
Belt | Crude Vigor Belt | Bind Resistance | Skill Damage Resistance | N/A | Uncommon Accessory Chest |
End Game (BIS)
Name | Trait 1 | Trait 2 | Trait 3 | How to Acquire | |
Necklace | Slaughterer’s Collar | Max Health | Skill Damage Boost | Buff Duration | World/Guild Raid Boss – Cornelius |
Bracelet | Wild Resistance Bracelet | Max Health | Skill Damage Reduction | Stun Resistance | Dungeons – Roaring Temple and Cursed Wasteland |
Ring | Eternal Ring of Dimension | Max Health | Skill Damage Boost | Buff Duration | Crafted with Dimensional Crystals x 20 |
Ring | Transcendent Magic Ring | Max Mana | Skill Damage Boost | Buff Duration | Crafted – Lithograph from Morokai (Raid Boss) |
Belt | Duke Magna’s Belt | Max Mana | Skill Damage Resistance | Stun Resistance | Dungeon – Butcher’s Canyon |
Tier 2 Gearing
Tier 2 Epic gear is a step up from the Tier 1 Epics you’ll find early on in Throne and Liberty. After obtaining your Tier 1 BIS gear, you’ll need to work towards your Tier 2 gear grind. Most Tier 2 gear comes as a reward from the new Tier 2 Dungeons, along with a Tier 2 specific upgrade material – Precious Growth Schema’s. There is a lot of powerful Tier 2 gear options, with powerful 2-set or 4-set bonuses. In terms of weapons, there is also game-changing options available to most weapon types. Below is our recommended Tier 2 pieces to target farm for the Sword & Shield Greatsword:
Weapons
Name | Trait 1 | Trait 2 | Trait 3 | How to Acquire | |
Main Hand | Penance Knight’s Annihilator | Heavy Attack Chance | Hit | Critical Hit | Tier 2 Dungeons or Crafted via Soul Shards |
Off-Hand | Chief Executor’s Earthquake Blade | Heavy Attack Chance | Hit | Critical HIt | Tier 2 Dungeons or Crafted via Soul Shards |
Penance Knight’s Annihilator provides a fantastic passive to turn Chain Hook into an even more fearsome threat. Chain Hook with this Tier 2 weapon equipped pulls in an additional 3 close-by targets. Chief Executor’s Earthquake Blade turns Gaia Crash into a point-of-impact burst AoE tool. As a result, this is perfect for frontline PVP.
Armor
Name | Trait 1 | Trait 2 | Trait 3 | How to Acquire | |
Tier 2 Piece (Chest) | Wraith Knight’s Execution Armor | Max Health | Ranged Endurance | Melee Endurance | Tier 2 Dungeons or Crafted via Soul Shards |
Tier 2 Piece (Legs) | Wraith Knight’s Invincibility Gaiters | Max Health | Ranged Endurance | Melee Endurance | Tier 2 Dungeons or Crafted via Soul Shards |
Wraith Knight’s 2-set bonus provides 2000 Max Health which is fantastic for a Sword and Shield build. Additionally, the stats on each of these Tier 2 pieces above provides great benefit to the build through Strength, Evasion and Heavy Attack Chance.
How to Play the Sword & Shield Greatsword Build
The Sword & Shield Greatsword build is heavily focused around frontline tanking in PvP, general tanking in PvE and sports a “bruiser” gameplay style. The build plays off of an incredibly high Health pool while dealing considerable amount of damage and Crowd Control.
PVE
In PVE, this weapon combination is best served as a Tank for any dungeon party. The mixture of decent damage output from the Greatsword and provoking tools from the Sword & Shield helps the combination to hold a lot of threat during a boss fight. As with most PVE encounters, make sure to block every Fury Attack from a mob or boss (indicated by the purple closing circle overlaid on the monster). Additionally, timing your longer survivability cooldowns such as Stalwart Bastion & Immortal Pride with dangerous mechanics ensures a higher chance of survival and less stress on your healer.
Finally, make sure of the Chain Hook skill and Strategic Rush skill to group mobs together or pull them off of a player taking aggro.
PVP
In PVP, this build is used as a first line of contact between your army and the enemy. As a result, having confidence in your survivability and pushing up to gain space and pressure is key to succeeding in the role. Having access to the Sword and Shield gives you plenty of agency to disrupt and control situations. For example, Chain Hooking healers into your frontline can prove devastating to the enemies sustain. To add to this, having access to stuns and knockdowns from the Greatsword extends the pressure further. As a result, note down and make use of the small rotation below:
- Stalwart Bastion
- DaVinci’s Courage
- Engage with Precision Dash or pull in with Chain Hook
- Stunning Blow
- Valiant Brawl
- Shield Strike
- Knock over your target with Ascending Slash near the end of the stun duration
- Guillotine Blade
While there is many moments any of these skills can be woven into a rotation, this general rotation is enough to catch out a player and lock them down. However, this combo can kill certain players too, due to the huge amount of damage you deal. The amount of damage you can deal as a tank with this build is far higher than expected, this is due to “Adentus’s Barbaric Blade” scaling damage with your Maximum Health. If you are using Tier 2 weapons, try your best to group up as many players as possible with Strategic Rush and Chain Hook to blast your opponents with Gaia Crash.
Finally, remember to time your Defensive Skill (your block) with enemies engaging on you. The chances are, you’ll defend a Fury Attack, giving you a shield and more survivability.
Conclusion
That Concludes our Sword & Shield Greatsword Build! For more Throne and Liberty content, news and guides, be sure to check out our Throne and Liberty Home Page