
Introduction
In this guide, we will walk you through everything you need to know to heal any PVE activity in NE and more in our New World PVE Healer Build Guide.
Mastery Points
Life Staff
There are two options for Mastery Points for the Life Staff: AOE HEALING (better for all Melee DPS) and Single Target (Good for groups with Ranged DPS).
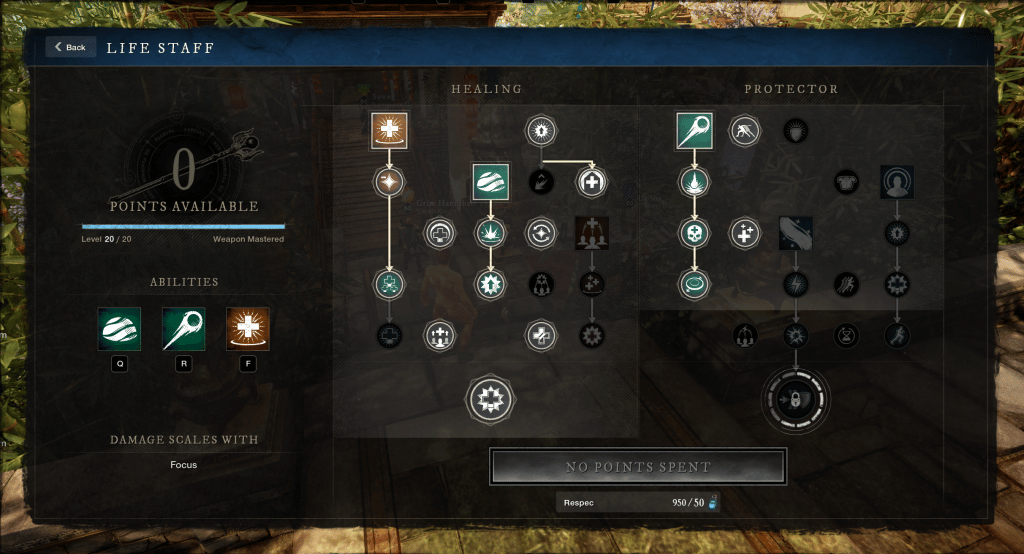
SINGLE TARGET HEALING
Sacred Ground – Orb of Protection – Divines Embrace
Your Life Staff Setup is focused around the Sacred Ground/Orb of Protection combo with Divines Embrace’s single target healing.
Below is the full setup of your Mastery Points for Group Healing.
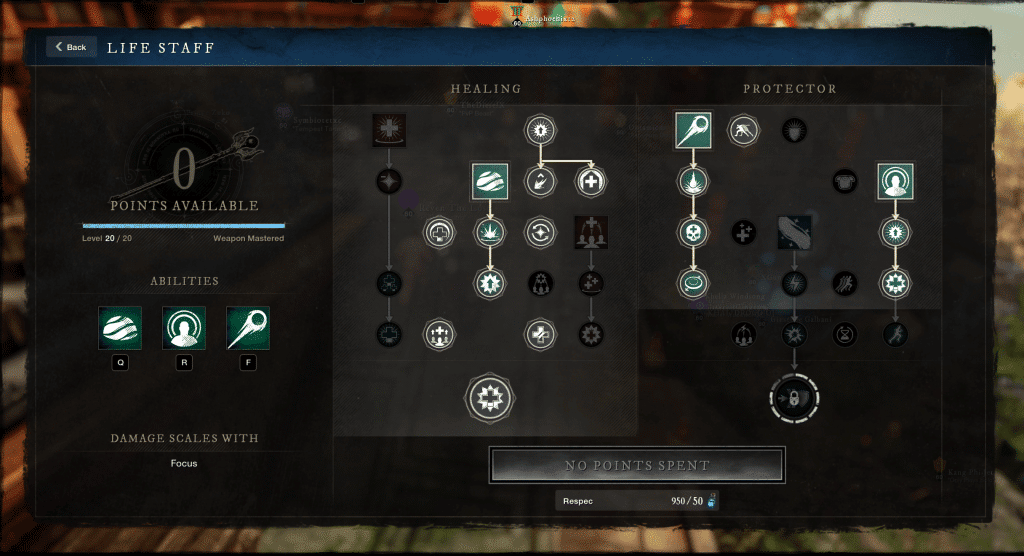
AOE HEALING
Sacred Ground – Beacon – Orb of Protection
Sacred ground is the primary cooldown and needs to be used when your group engages in any fight. Casting Beacon and Orb of Protection in your Sacred Ground creates the best defensive environment in New World. Not only will your targets receive massive amounts of Healing over time, but they will also receive 26% fortification (with the Fortifying Sacred Ground Perk).
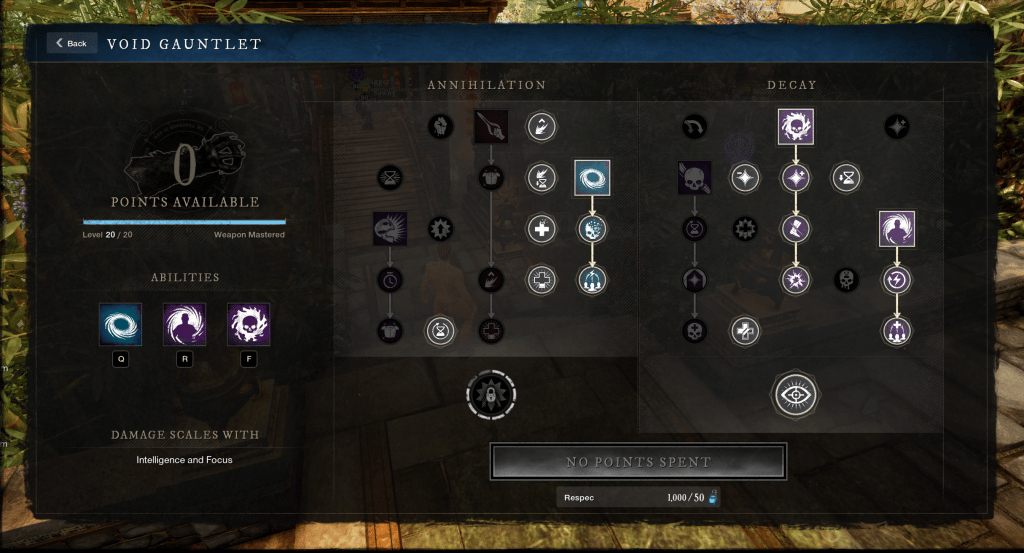
Void Gauntlet
Oblivion, Orb of Decay, Essence Rupture
Oblivion is the ultimate support ability that grants your teammates empowerment and weakens your enemies. It can also help the tank manage stamina with Invigorating Oblivion. Orb of decay is large projectile skill shot heal that can be used to deal a little bit of damage while also healing your group members. Essence Rupture is the final ability Take. Essence Rupture attaches to an enemy and grants healing and stamina to those who damage it. It also has an AOE heal around the enemy onces Essence Rupture ends.
Attributes
The Attribute spread for this build will be 150 INT 300 Focus and 150 Con. This grants you to a Great Amount of healing while giving you some cushion in your health as you will inevitably get aggro of mobs with your healing. Once you feel comfortable with the build you can go down to 100 CON and put 50 more into focus
Equipment
For this build you will stay in the light equip load. You will receive an increase to healing by 30% in the light equip load, which is to good to pass up. Below is the armor weight set up you’ll need to reach the optimal Light Equip Load.
1.) MED CHEST, LIGHT HEAD, PANTS, GLOVES, BOOTS
2.) LIGHT CHEST, MEDIUM PANTS, (2 LIGHT, 1 MED) HEAD, GLOVES, and BOOTS
Armor
Your armor perks should resemble the list below. The perks are listed in order of importance from top to bottom. Priority is from top to bottom
- Fortifying Sacred Ground
- Refreshing Divine Embrace or Keen Beacon (depending on what spell is equipped)
- Voracious Blade (Orb of Decay)
- Refreshing Rupture
- Nullifying Oblivion
- Refreshing (5)
- Health (5)
Weapons
LIFE STAFF
For the Life Staff, we will need Blessed and Refreshing Move as the base to perks. You can use the Corrupt Progenitor Life Staff and add the Fortifying Sacred Ground perk at the Gypsum Kiln.
- Blessed
- Refreshing Move
- Sacred Ground
For your Void Gauntlet, you will want the following perks. We will move from top to bottom in order of importance, so if you need to use an Epic or 2 perk item to get by, you can do so.
- Keen
- Refreshing Move
- Lifestealing
Jewelry
Below are the recommendations for Jewelry. To get buy, prioritize two perk Jewelry until you can find access to Legendary gear. The 2 perk versions are Perfectly fine in almost every situation since there are really only 2 strong perks on each piece when it comes to healing. The perks are listed from left to right in order of importance.
Amulet – Health, (damage protection perk), Divine
- For Mutations and other PVE activities you want Amulets with Protection on them for the Mutation Type. For Example, using an Amulet with Ice Protection during an Ice Bound Mutation. With this method you can place Opals or Malachite’s in your gear and swap Amulets instead of Gems.
Ring – Sacred, Hearty, Leeching
Earing – Refreshing Toast, Brilliant, Healthy Toast
Gems
The Gems in your armor should be used to balance out the types of mitigation you have on your armor.
For Weapon Gems, You will use a Runeglass of Siphoning Diamond in both your LIfe Staff and your Void Gauntlet
Runeglass Gem Upgrades
You can upgrade your standard gems to the Siphoning Runeglass gem variant to increase your mana sustain. For Example, when running the Hellfire Mutation, you can upgrade the gems in your armor to a Runeglass of Siphoning Ruby.
Heartgem Rune
For this build, you’ll use the Stalwart Grasping Vines Rune. This allows you to apply Weaken to targets and adds some extra group utility. Grasping Vines can also help you escape bad situations such as pulling aggro by rooting the mobs around you and giving you a 20% fortify buff.
Consumables
Potions
Consumables on this build are pretty Strait forward. You will want one of each type of Infused potion on your bar (Health, Mana, and Regeneration Serum) and a Stack of Hearty Meals. You will want to save your health pot cooldowns for the windows you get pressure from enemies. When your Health pots are on cooldown, you should use an Infused Regeneration Potion and Hearty Meal together.
Mana Potions are pretty straightforward, just make sure to not potion during your burst window with Void Blade as you get 10% increased damage below 50% mana.
Food and Utility
The food slot for most builds is flexible. You should use the cheapest Attribute food possible that allows you to hit your Attribute benchmarks.
For Utility, make sure you bring Gem Stone Dust to Mutations and you can use Weapon coatings to optimize damage from your Life Staff light attacks, Orb of Decay, and Oblivion.
How to Use the Expedition Healer Build
Healing and Support
Using the Healer build is pretty straightforward. Once the tank has stopped taunting mobs, make sure to cast sacred ground on them. This will be your main healing ability for both the tank and Melee DPS of the group. It also intensifies the rest of the heals you cast on allies while in Sacred Ground.
Next, cast Orb of Protection on the tank/melee group as well. This should create a constant stream of healing for the group at large.
Once your healing is set up, swap to Void Gauntlet, cast Oblivion and apply essence rupture to a target. You can also throw out an Orb of decay into the group of trash mobs to deal damage and give a little bit of Extra healing to your group.
Finally, Use Orb of Protection and Divine Embrace to keep the group topped off. Reapply Sacred Ground to the tank when its cooldown is up. Rinse and repeat until the boss is down or the trash is dead!
Cooldown management
The Best way to manage your cooldowns, and ensure that your Sacred ground is always up, is to weave light attacks in with all of your abilities. This uses the Refreshing Move perk on your life staff to actively reduce your life staff cooldowns. If fight with a lot of damage, you’ll want to stay on your life staff and reduce your cooldowns as much as possible to improve the uptime of your healing abilities.
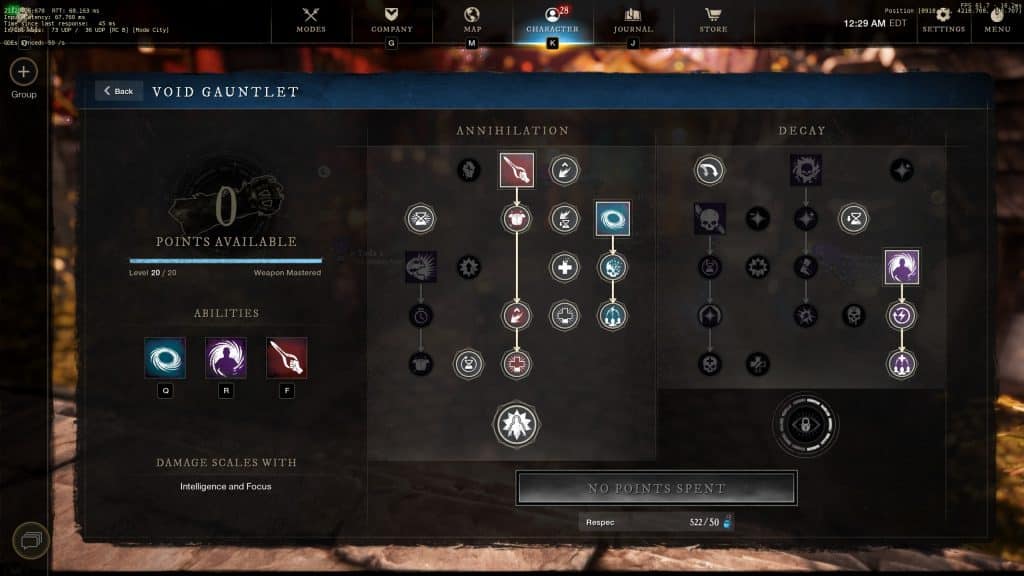
Advanced Build
Once you get good at healing and feel comfortable providing more utility/damage for your group, you can swap out Orb of Decay for Void Blade and Jump into the Fray! Below is the set Mastery Tree for the Void Gauntlet for this approach. We will be using the “AOE” healing set up listed above with the Advanced Build.
Before we get started on how to play the Advanced Version, let’s look at the benefits of running the Advanced Version of the build.
- Increase Damage of the Group, decreasing the time it takes to clear expeditions/mutations
- Allows you to play in Melee Range, getting access to Sacred Ground benefits
- Allows you to drop Oblivion directly underneath Boss mobs and Trash Groups consistently.
How to Play the Advanced Expedition Healer Build
Once you set up your healing (Sacred Ground, Beacon, Orb of Protection) you will then swap to your Void Gauntlet. Drop Oblivion, apply Essence Rupture, and then Cast Void Blade. The Goal here is to use Void Blade until just before your Sacred Ground Expires. This should allow you to re-cast Oblivion due to the excellent cooldown reduction of the Void Blade. Swap back to Life staff and light attack until you can apply sacred ground again. Cast Orb of Protection again and go back to your Void Gauntlet for DPS..
It’s important with this approach to stay aware of the health of your group. If needed swap back to life staff and use Divines embrace to top of members when needed.
One of the most important things to remember while in melee range with your Void Blade is dodging. Make sure to use dodge in between your light attack chains to avoid damage and stay behind your target(s). Positioning is key and you want to make sure to never be behind your tank or in front of the boss. The more you use void blade in your rotation, the more you’ll get used to dealing damage and helping your group clear content faster!