
Introduction
The Wand and Tome are centered around cursing your enemies while you support/heal your allies. Learn everything you need to know about Throne and Liberty’s Support/Healing Weapon in our Throne and Liberty Wand Guide.
Wand and Tome Active Skills
Active Skills in Throne and Liberty go on your skill bar and can be cast to affect both enemies and allies. There are 12 total Skill slots on your skill bar. You must choose between the Active Skill of both of your weapons to make your build!
The Wand and Tome Active Skills are centered around Healing/supporting/Buffing your allies. Along with support, you will also be cursing your enemies with damage over time effects. Below is a list of all the Active skills for the Wand and Tome.
| Active Skill | Icon | Description | Specializations |
| Chaotic Shield (DEFENSE) |  | Defends against attacks. On defending against a Fury Attack, Curse skills’ remaining cooldown decreases by 3s, and Touch of Despair is applied to all enemies within a 3m radius from the target. On defending against a Fury Attack within 0.5s, Chaotic Shield changes to Healing Spell for 3s. Use with the directional buttons to defend against attacks while moving 4m in the designated direction for 0.5s. On defending against a Fury Attack, Chaotic Shield changes to Counterattack Spell for 3s. Healing Spell Restores friendly targets’ Health by 520% of Base Damage + 197 and Stamina by 29. Counterattack Spell Deals 520% of Base Damage + 197. If the target is affected by your Touch of Despair, damage increases by 10% per stack. | N/A |
| Touch of Despair |  | Applies Weaken: Curse. Deals damage over time equal to 41% of Base Damage + 37 per stack for 9s, and the base damage to the target increases by 10%. Stacks up to 3 times. Duration increases by 2s if used on a target with 3 stacks. Does not wake Sleeping targets. | Range (5): Apply Touch of Despair to two more enemies withing a 3m radius around the target. Effect Duration (5): Duration increases by 3 seconds. Curse (7): Adds 2 stacks with a 50% chance. |
| Curse Explosion |  | Deals 420% of Base Damage + 272 to enemies within a 5m radius area. If there is a target has Curse Damage over time from you, boosts the remaining Burning, Curse, and Poison Damage over time from you by 5% for every one of your Touch of Despair stacks, deals the damage two times, and removes the effects. | Dark Explosion (7): While damage over time is kept, Curse Explosion damage decreases by 50%. Additional Damage Boost (5): Touch of Despair’s damage boosts by 10% per stack. Focus Target (5): Curse Explosion changes to a target skill, and the Cooldown decreases by 6 seconds. |
| Swift Healing |  | Heals friendly targets’ Health by 610% of Base Damage + 232. Can be used up to 2 times consecutively, and Mana Cost increases upon consecutive uses | Heal Transfer (10): Additionally heals self by 50% of the total heal. Consecutive Use (7): Total amount of uses increases to 3. Range (3): Range increases by 5m. Mana Recovery (5): Target recovers Mana equal to 50% of Base Damage. |
| Corrupted Magic Circle |  | Creates a 5m area at the target location and inflicts Weaken: Curse on all enemies within the area to deal 65% of Base Damage + 73 per sec for 9s. Does not wake up Sleeping targets. | Decaying Touch (7): Applies Weaken: Curse to all enemies within the area to deal damage per second for 9 seconds. Does not wake up Sleeping targets. Rotten Swamp (7): The Corrupted Magic Circle area lasts 5 seconds. Bonus Damage (5): Deals damage equal to 260% of Base Damage to the target. Does not wake Sleeping targets. |
| Cursed Nightmare |  | Has a(n) 80% chance to decrease Attack Speed and Move Speed by 30% for 3s, and Sleep: Curse for 6s afterwards (15.6s for monsters). Hitting a Sleeping target becomes a Critical Hit, and wakes the target. | Deep Sleep (5): Can be removed if attacked twice while Sleeping. Enhanced Nightmare (5): Instantly falls asleep unless affected by Move Speed decreases. Enhanced Mire (5): Move Speed decrease duration increases by 2 seconds, when Move Speed decreases is applied, creates a 5m radius zone which decreases Move Speed and Attack Speed by 30% with a 80% chance for 3 seconds. |
| Clay’s Salvation |  | Restores Health to all party members within range, proportional to 520% of Base Damage + 469. | Janice’s Rage (7): All party members within the attack range’s Base Damage increase by 3.2%. Remove Resistance (5): Removes Weaken from all party members within the range. Range (3): The skill range increases by 5m. |
| Time for Punishment |  | Has a(n) 90% chance to apply Weaken: Curse that decreases Skill Damage Resistance 220 for 9s. | Enchanting Time (7): Friendly target’s Skill Damage Boost increases by 80 for 9 seconds. Effect Duration (5): Duration increases by 3 seconds. Burning Time (5): Has an 90% chance to apply Weaken: Curse. Deal damage for 9 seconds. Mana decreases by 22. |
| Blessed Barrier |  | Friendly target’s Magic, Melee, and Ranged Defense increase by 2100 for 6s. Incoming Heal increases by 48% during the day, and Magic, Melee, and Ranged Endurance increase by 480 at night. The increased amount will be multiplied by 2 for 2s after the effect is activated. | Fighting Spirit Barrier (7): Friendly target’s Max Damage increases by 50 for 6 seconds. Expand Targets (7): The Blessed Barrier’s 2 times boost effect ends, transferring to a party member in a specified location within 5m. Effect Duration (5): Skill duration increases by 1 second. |
| Karmic Haze |  | Weakens the target and has a(n) 80% chance to spread the Curse from the main target to up to 3 other targets within a 8m range. | Unlucky Clock (5): Weaken: Curse you applied to the target’s duration increases by 5 seconds. Range (5): Karmic Haze’s curse transfer range increases by 2m. Bonus Damage (5): Inflicts additional damage that is equal to 200% of Bonus Damage based on the type of Curse you applied to the target. |
| Ray of Disaster |  | Connects you and the target for 6s, dealing 82% of Base Damage + 20 to all enemies on the path every 0.5s. Damage increases by 50% of Skill Heal. | Expand Targets (7): Ray of Disaster is applied to 2 more targets within 5m radius around the target, and reduce the damage. Move Speed (5): The target’s Move Speed decreases by 15 by 6 seconds. Cooldown (3): Cooldown decreases by 6 seconds. |
| Fountain of Life |  | Creates a 3m radius area at the designated location for 6s. Party members within the area recover 90% of Base Damage + 82 every 0.5s. | Mana Recovery (5): Additionally recovers Mana by 40 when healed. Range (5): Fountain of Life radius increases by 2m. Effect Duration (7): Fountain of Life duration increases by 2 seconds. |
| Invincile Wall |  | Grants Protection to an friendly target proportional to 990% of Base Damage + 591 for 6s. | Expand Targets (7): The effect decreases, and the target is switched to every party member within the attack range. Range (3): The skill range increases by 5m. |
Wand and Tome Passives
Along with your Active abilities, you will also have to choose 8 Passivesbetween your two weapons, to add to your build.
The Wand and Tome’s passive abilities are centered around supporting your builds healing, Mana pool/regen, and increasing your curses effectiveness. Below are the Passive for the Wand and Tome.
| Passive | Icon | Description |
| Full of Corruption |  | When a Weakened target dies, Mana Regen 70 ▲ and Max Damage 40 ▲ for 9s. Stacks up to 3 times. |
| Devotion and Emptiness |  | Skill Heal 36% ▲ and Skill cooldown 10% ▼ during the day. Skill Damage over time 36% ▲ and Curse Skill cooldown 10% ▼ at night. |
| Wraith’s Beckon |  | Increases the duration of your Curses by 3.3s, and Curse chance increases by 10%. |
| Vampiric Contract |  | Restores Health of a friendly target by 17.4% of the damage you deal to a target affected by your Curse. If a friendly target is not within your range, your Health is restored instead. |
| Noble Revival |  | Skill Heal 3.02% ▲ per 1,000 Max Mana. |
| Saint’s Oath |  | On taking Skill Damage, has a(n) 20% chance to apply Amitoi Heal, Incoming Heal, Recovery Crystal Heal, and Skill Heal 15% ▲ for 3s. Stacks up to 5 times. |
| Selfless Soul |  | Increases Mana Regen by 38 and Skill Heal by 8.2% per stack for 3s when you apply Heal and Regen with Active Skills to a friendly target. Stacks up to 5 times. |
Defensive Skill
The Wands’ defensive Skill is Chaotic Shield.
Chaotic Shield Defends against attacks. On defending against a Fury Attack, Curse skills’ remaining cooldown decreases by 3s, and Touch of Despair is applied to all enemies within a 3m radius from the target. On defending against a Fury Attack within 0.5s, Chaotic Shield changes to Healing Spell for 3s.
Use with the directional buttons to defend against attacks while moving 4m in the designated direction for 0.5s. On defending against a Fury Attack, Chaotic Shield changes to Counterattack Spell for 3s.
Healing Spell
Restores friendly targets’ Health by 520% of Base Damage + 197 and Stamina by 29.
Counterattack Spell
Deals 520% of Base Damage + 197. If the target is affected by your Touch of Despair, damage increases by 10% per stack.
Wand Weapon Mastery
Each weapon in Throne and Liberty can be Mastered using the Weapon Mastery System. The Wand has Three Weapon Mastery Paths: Damage, Recovery, and Weaken.
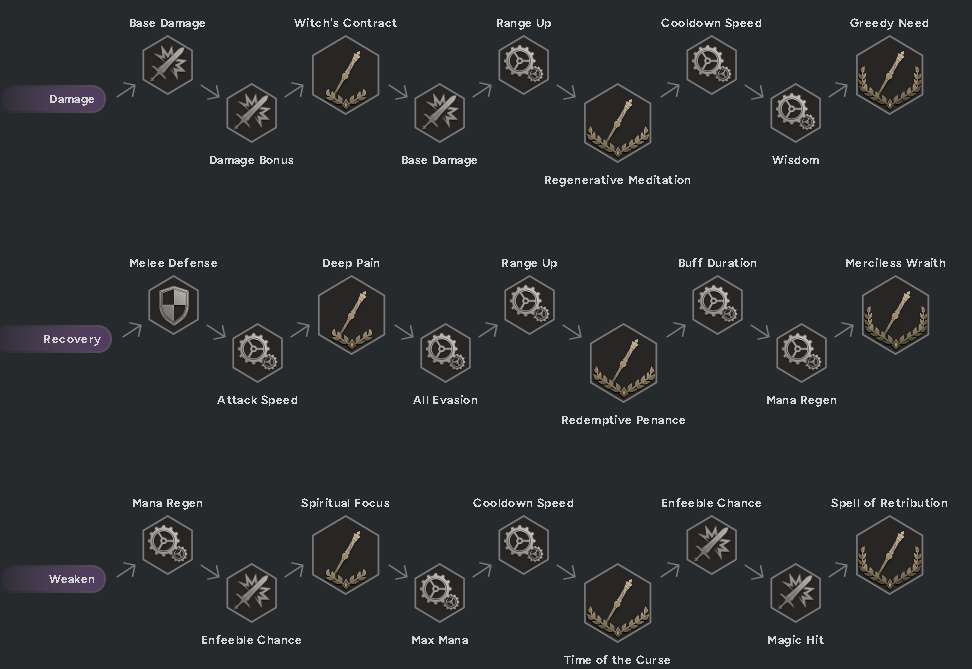
Damage
The Damage tree gives bonuses to Base Damage, Cooldown reduction, and more.
- Base Damage +4
- Damage Bonus +2
- Witch’s Contract (Curse Damage 6%)
- Base Damage +8
- Range +4%
- Regenerative Meditation (Mana Regen 56)
- Cooldown Speed 3%
- Wisdom +2
- Greedy (Cooldown Speed 5%)
Recovery
The Recovery Tree gives bonuses to Skill Heal and several Defensive Attributes.
- Melee Defense +40
- Attack Speed+1.2%
- Deep Pain (Magic Critical Hit 60)
- All Evasion +40
- Range +4%
- Redemptive Penance (Skill Heal 8%)
- Buff Duration +6%
- Mana Regen +42
- Merciless Wraith (Heavy Attack Chance 100)
Weaken
Last, The Weaken Mastery Tree Provides increased Enfeebling Chance, as well as Magic Hit and Maximum Mana
- Mana Regen + 14
- Enfeeble Chance +24
- Spiritual Locus (Mana Cost Efficiency 6%
- Max Mana +280
- Cooldown Speed +2%
- Time of the Curse (Curse Duration +1s)
- Enfeeble Chance +72
- Magic Hit +60
- Spell of Retribution (Skill Damage Boost 50)
Recommended Weapon Combinations
Long Bow
Combining the Wand with the Long Bow provides large amounts of healing/support with good Ranged Utility.
Nature’s Blessing is an AoE that greatly increases allies’ Health Regen in the Area. Purifying Touch Removes 1 CC from a selected Target. Finally, Blitz resets the cooldown of the last used Skill. This can be used to reset any of your healing or support skills to help provide increased support to your group!
Staff
The Staff can be combined with the Wand in multiple different ways!
For a more DPS-centered build, you can stack your curses and burn spells from the Staff to deal massive amounts of burst damage by consuming them with Curse of Explosion.
For a support build, you can use the Staffs utility spells to help provide increased cooldown reduction and Mana Regen. Inner Peace increases your Mana Regen by 600% (X2 while Wet) High Locus Increases your Cooldown Speed by 49%, Global Cooldown speed by 28%, and Move Speed by 21% for 12 Seconds.
Overall, Staff and Wand combined is the best Support set-up in the game.
Sword & Shield
Sword and Shield enables a Paladin playstyle when combined with the Wand. This combination works as a frontline disrupter, healing support and AoE sleep bomb threat.
Throne and Liberty Wand Guide Conclusion
That concludes our Throne and Liberty Wand Guide. For more information, be sure to check out our Throne and Liberty Home Page!