
The Sword and Shield, the classic equipment of a knight on the front lines. This weapon serves as an iconic choice in Throne and Liberty, focusing on protections, tanking and crowd control. Learn everything you need to know about Throne and Liberty’s premier frontline weapon in our Throne and Liberty Sword and Shield Guide!
Sword and Shield Active Skills
Active Skills in Throne and Liberty go on your Skill Bar and can be cast to affect both enemies and teammates. Currently, there is a total of 12 Skill Slots on your Skill Bar. To create your build, you must choose between both weapon’s Active Skills to fill out your 12 slots!
The Sword and Shield’s Active Skills are focused on Crowd Controlling opponents, protecting yourself & allies and dealing some damage in return. Below is a list of all the Active Skills for the Sword and Shield.
| Active Skill | Icon | Description | Specializations |
| Shield Survival Technique (DEFENSE) |  | Defends against attacks. On defending against a Fury Attack while stationary, 690 Health regenerates, creates a shield equal to 14% of Max Health for 3s, and Shield Survival Technique changes to Retaliatory Strike for 1.5s. On defending against a Fury Attack within 0.5s, increases Damage Reduction by 141 for 6s. Wrath Attacks can’t be defended. Use with the directional buttons to defend against attacks while moving 4m in the designated direction for 0.5s. On defending against a Fury or Wrath Attack, creates a shield equal to 14% of Max Health for 3s and Shield Survival Technique changes to Retaliatory Strike for 1.5s. Retaliatory Strike Deals 380% of Base Damage + 147 damage to the target. Defending Fury Attacks with Shield Survival Technique before using Retaliatory Strike increases Retaliatory Strike damage by 65%, up to 3 times. Retaliatory Strike from the Shield Survival Technique with a directional button deals the maximum damage. | N/A |
| Shield Strike |  | Deals 580% of Base Damage + 129. Weakens the target with a(n) 70% chance to decrease Magic, Melee, and Ranged Hit by 250 for 6s. Shield Strike’s Melee Heavy Attack Chance increases by 50 per 1% of Shield Block Chance. On counterattacking with Counter Barrier, Shield Strike cooldown decreases by 1.3s. The target’s aggression greatly increases. | Piercing Attack (5): Deals damage to the target and all enemies in a 60-degree cone. Weakens the target with a 70% chance to apply a 250 Hit decrease for 6 seconds. Shield Strike’s Melee Heavy Attack Chance increases by 20 per 1% of Shield Block Chance. On counterattacking with Counter Barrier, Shield Strike cooldown decreases by 1.3 seconds. The target’s threat greatly increases. Aggression (3): The Damaged target’s aggression greatly increases. Critical Hit Down (5): When Weaken is applied to a target, has a 70% chance to apply a Critical Hit decrease of 250 for 6 seconds. |
| Strategic Rush |  | Charges 4.5 times the distance of Attack Range in the selected direction and deal 280% of Base Damage + 150 damage up to 5 targets with a(n) 70% chance to apply Collision: Push. The target is Stunned for 2s if colliding into a wall. Targets immune to Collision increase Base Damage by 40 for 6s. | Range (5): Width of Strategic Rush increased by 150%. Effects Target (3): Strategic Rush can now target up to 8 targets. Move Speed Down (5): On hit, has a 70% chance to decrease Move Speed 50% for 2 seconds. |
| Counter Barrier |  | Shield Block Chance increases by 34% for 6s. On evading an attack, using Shield Block, or blocking with a Defense skill within 1.35 times the Attack Range (4.5 times for Magic and Ranged), performs a counterattack that deals damage equal to 250% of Damage Reduction to the attacker. The counterattack damage is not affected by Critical Hit and Heavy Attack Chance. | Concentrated Barrier (7): Accumulates damage taken (up to 100% of Max Health) for 6 seconds. If used again within 6 seconds, deals 15% of the accumulated damage + 200% of Base Damage to every enemy within attack range. After that, Shield Block Chance increases by 13% for 3 seconds. Cooldown (5): Upon a successful counterattack, Shield Strike cooldown decreases by 0.5 seconds. Additional Damage Boost (5): While Counter Barrier lasts, the Base Damage increases by 5%. |
| Chain Hook |  | Fury Attack | Has a(n) 80% chance to apply Collision: Pull to the target and Bind them for 3s. When used on boss monsters, pulls you to them. Increases the target monster’s Hostility to max on hit. | Controlling Rake (7): Has an 80% chance to apply Collision: Pull to up to 10 enemies within 6 times the attack range in the designated direction, Binding them for 3 seconds. Range (5): The attack range increases by 3.75m. Wrath Attack (5): Changes to Wrath Attack skill. Rear Chain Hook (3): Has an 80% chance to apply Collision: Pull, pulling the target behind the location where the skill is used and binds them for 3 seconds. When used on boss monsters, pulls you to them. Increases the target monster’s Hostility to max on hit. |
| Provoking Roar |  | Has a(n) 70% chance to apply Weaken: Provoke on 6 enemies within 3m for 4.8s (7.2s against Monsters, always hits). Provoked targets direct their attacks and skills toward you. | Cleaving Roar (5): Has an 70% chance to decrease all Endurances by 200 on 6 enemies within 3m range for 2 seconds. (3 seconds against Monster, always hits). Effect Duration (3): Duration increases by 1.2 seconds (1.8 against monsters). Cooldown (5): Cooldown decreases by 6 seconds. Bonus Damage (5): Deals additional damage equal to 220% of Base Damage. |
| Shield Throw |  | Hurls a shield 4.5 times the Attack Range in the selected direction. The shield deals damage equal to 340% of Base Damage to all targets in its path before returning to you. Magic, Melee, and Ranged Heavy Attack Chance increase by 100 for 2s. The targets’ aggression greatly increases. | Whirling Shield (7): Hurls a shield at the target, dealing 270% of Base Damage. The shield ricochets up to 4 times to other enemies within a 5m radius of the target, dealing the same damage. All Heavy Attack Chances increase by 30 for 2 seconds. The target’s threat greatly increases. Aggression (3): The damaged target’s threat greatly increases. Consecutive Use (7): Can be used twice with a chance of 35%. |
| Stalwart Bastion |  | Damage Reduction 103 ▲ for 9s for you and party members within a 10m radius. The area lasts for 2s. | Great Fury (7): Skill Damage Boost increased for 9 seconds for you and party members within a 10m radius. The area lasts for 2 seconds. Move Speed Up (3): Move Speed increases by an additional 10%. Focus on effect target (7): Changes to a skill that affects you and improves the effectiveness of the skill. Cooldown Reduced (5): Decreases the cooldown by 15 seconds. |
| Annihilating Slash |  | Deals damage equal to 280% of Base Damage + 42 to enemies within Attack Range. If used on a target you have Weakened, deals damage equal to 420% of Base Damage + 63. Annihilating Slash’s remaining cooldown decreases by 8% per damaged target. | Move Speed Down (3): Damaged target’s Move Speed decreases by 60%. Consecutive Use (7): You can use Annihilating Slash 2 times. Range (5): Range increases by 1.5m. |
| Fierce Clash |  | Fury Attack | Deals 220% of Base Damage with a(n) 80% chance to apply Collision: Push. Has the same chance to Push enemies that collide with the target and decrease the damage they deal. The target is Stunned for 3s on colliding with a wall. | Desperate Clash (7): Deals a percentage of Base Damage with a 80% chance to apply Collision: Prone. To other enemies within a 3m radius, has a chance to apply Collision: Push. Has the same chance to Push enemies that collide with the target and decrease the damage they deal. The target is Stunned for 3 seconds on colliding with a wall. Damage (5): Damage increases by 200%. Effects Chance (3): The Collision Chance increases by 10%. |
| A Shot at Victory |  | Deals 880% of Base Damage + 107 to the target. Damage of Sword skills increases by 20% for 6s. | Annihilation Blade (10): Uses Annihilation Blade in the designated direction, dealing 730% of Base Damage to all enemies with 6 times the attack range, and increases Longsword skill damage by 20% for 6 seconds. Boost Effects (5): The Longsword skill Bonus Damage increases to 30%. Effect Duration (5): The Longsword skill Bonus Damage duration increases to 2 seconds. |
| Immortal Pride |  | Max Health and Current Health increase by 30% for 6s. | Blessing of Immortality (7): Creates a barrier equal to 12% of Max Health to yourself and friendly target for 6 seconds. Resource Cost (3): Skill Mana Cost decreases by 80%. Health Regen (3): Health Regen increases by 200% for the skill’s duration. All Defense (5): All Defenses gain an additional 5% during Immortal Pride (Up to 1500). |
| Witty Strike |  | Deals damage equal to 290% of Base Damage + 64 to up to 3 targets within 120 angle range. Recovers mana equal to 240 per target. | Stamina Recovery (5): Also recovers Stamina by 12 per target. Consecutive Use (7): You can use Witty Strike 2 times. |
Sword and Shield Passives
Alongside your Active Skills, you can mix and match up to 8 Passives between both of your weapons to create a build of your preference!
The Sword and Shield Passive Skills are focused around increasing evasion, restoring resources and increasing resistances/block chance. Below are all of the Sword and Shield Passive Skills.
| Passive | Icon | Description |
| Skillful Evasion |  | Magic and Ranged Evasion 30 ▲ per 1m of proximity to the target, up to 300. Additionally increases Magic, Melee, and Ranged Evasion by up to 120 against Provoked targets. Only applies to targets within a 10m radius. |
| Resilient Mind |  | Evading an attack restores Mana by 46, and each successful Shield Block or Defense skill block restores Mana by 36% of the damage blocked. Additionally restores Health by 21. |
| Aegis Shield |  | Magic, Melee, and Ranged Defense 9.6 ▲ per 1% of Shield Block Chance. Reduce Damage: Shield always gains 5.5% ▲. |
| Spectrum of Agony |  | On hitting a target you have Provoked and applied Cleaving Roar to, the remaining time for Provoke and Cleaving Roar increase by 0.4s. Deals damage equal to 72% of Base Damage + 37 to all targets Provoked and affected by Cleaving Roar within a 3m radius. |
| Gerad’s Patience |  | On evading, using Shield Block, or blocking with a Defense skill, all CC Resistance 18.75 ▲ for 3s. Stacks up to 10 times. |
| Impenetrable |  | Increases Magic, Melee, and Ranged Defense proportional to the number of targets within a 9m radius. Magic, Melee, and Ranged Defense 299 ▲ if there are 2 or fewer targets within range, 400 ▲ if there are 3 to 6 targets, and 820 ▲ if there are 7 or more targets. |
| Morale Boost |  | Colliding the target with another applies cooldown 14% ▼ to all skills. Each subsequent Collision applies cooldown 7% ▼ to all skills per Collided target, up to 3 times. |
Mastery Tree
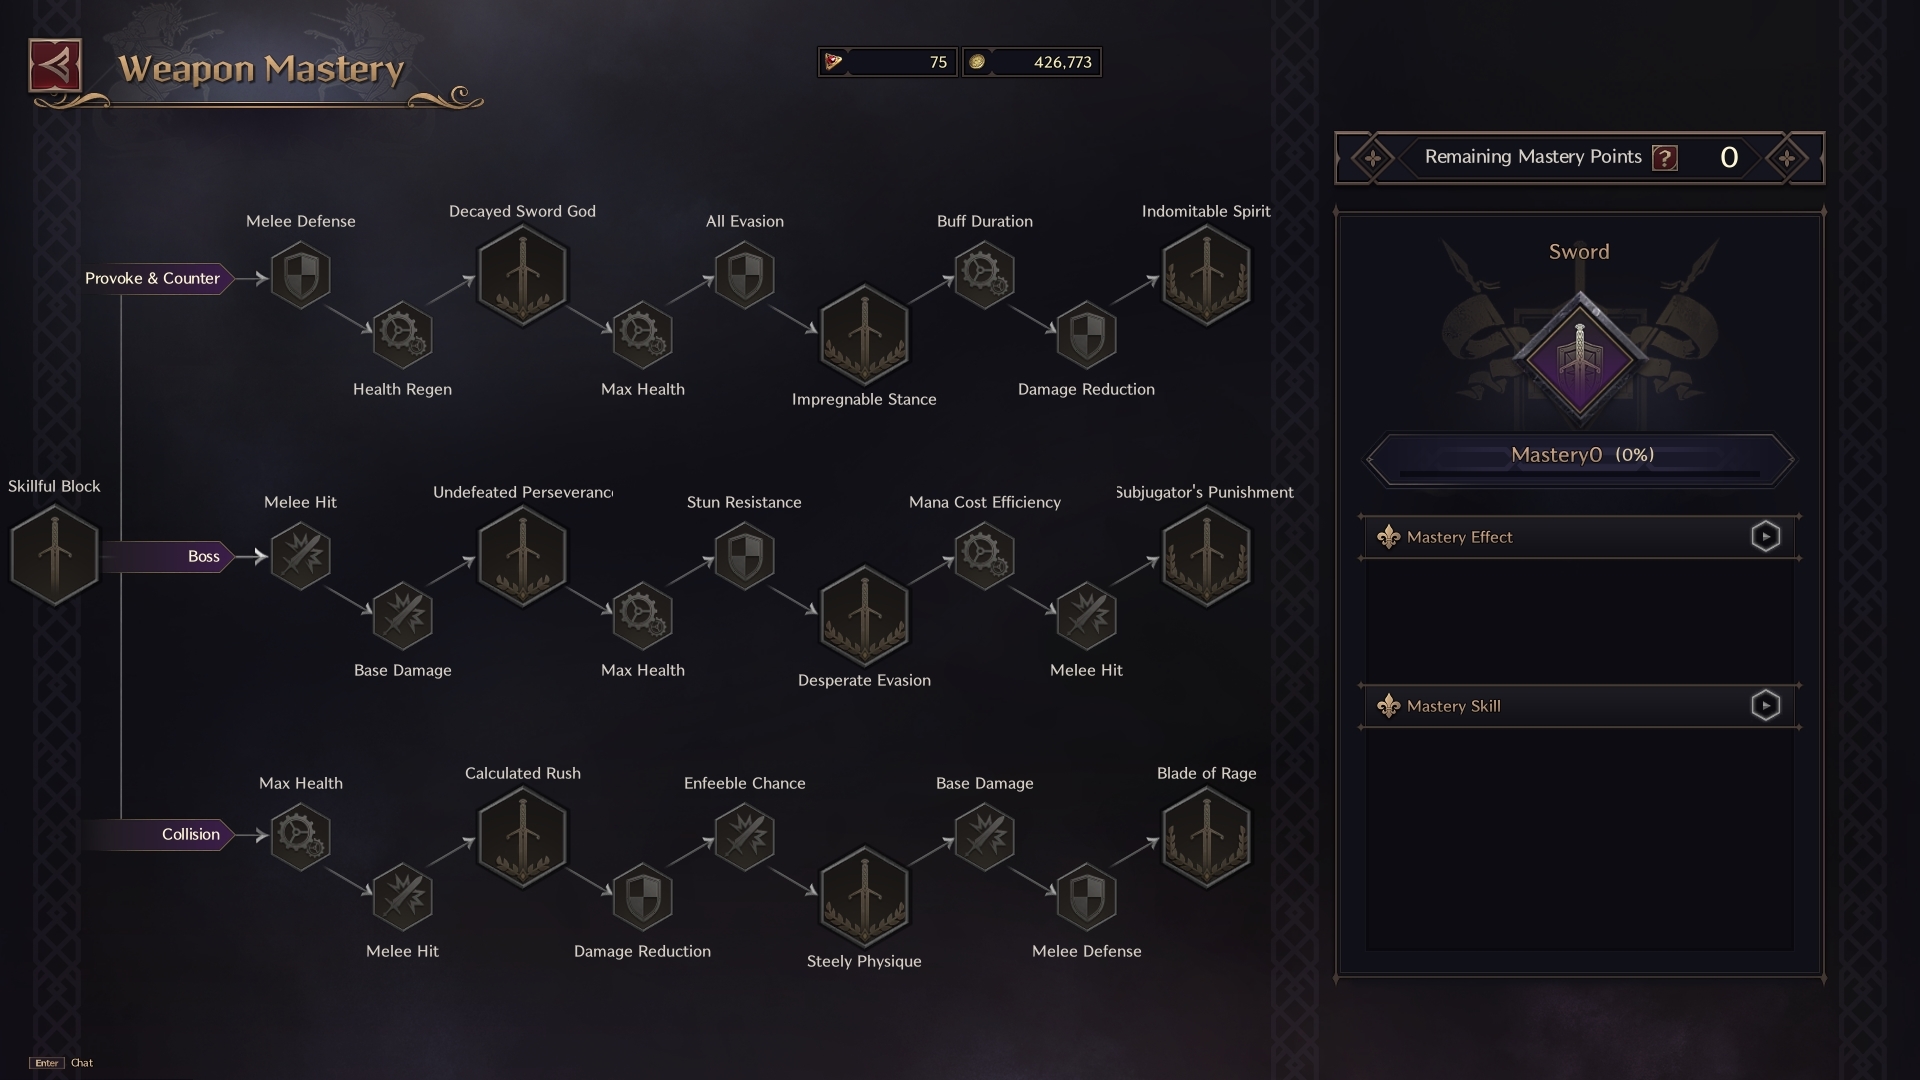
Provoke & Counter
Provoke and Counter is a Mastery Tree that excels in providing Health, Regen and Damage Reduction to stick in the fight for as long as possible.
- Melee Defense +40
- Health Regen +14
- Decayed Sword God (Weaken Chance +75)
- Max Health +280
- All Evasion +40
- Impregnable Stance (Shield Block Chance +8%)
- Buff Duration +6%
- Damage Reduction +6
- Indomitable Spirit (Stun Resistance +125)
Boss
Boss is useful against PVE Bosses that require you to Stun and resist stuns.
- Melee Hit +20
- Base Damage +4
- Undefeated Perseverance (Boss Endurance +120)
- Max Health +280
- Stun Resistance +48
- Desperate Evasion (Boss Evasion +50)
- Mana Cost Efficiency +6%
- Melee Hit +60
- Subjugator’s Punishment (Boss Bonus Damage +49)
Collision
The Collision Mastery Tree provides a bit of damage, but also provides higher chances of Crowd Controlling a target AND resisting it.
- Max Health +140
- Melee Hit +20
- Calculated Rush (Collision Chance +75)
- Damage Reduction +4
- Weaken Chance +48
- Steely Physique (Collision Resistance +100)
- Base Damage +12
- Melee Defense +120
- Blade of Rage (Cooldown Speed +5%)
Recommended Weapon Combinations
Greatsword
The Greatsword is by far the best combination with the Sword and Shield. As a melee tank-like frontline player, the Greatsword provides fantastic passives such as Max Health increases, damage increases based on how many enemies are around you and finally – increased Hit Chances when stunning targets!
Wand
Wand is also an interesting choice when pairing with the Sword and Shield. This combination works pretty much like a “Paladin” build would. However, it is important to note, the damage this combination has is fairly low!
Dagger
Dagger is the final recommended weapon pairing with the Sword and Shield. There is a couple of synergies involving Evasion which helps bring the build together. However, the Dagger can be a great tool for diving into enemy frontlines, too.
Throne and Liberty Sword and Shield Guide Conclusion
That concludes our Throne and Liberty Sword and Shield Guide! For more information, be sure to check out our Throne and Liberty Home Page!