
Introduction
Welcome to our Sword & Shield Dagger Tank build for Throne and Liberty. This guide focuses on the PVP set-up for Sword & Shield and how to play it. This weapon combination forms the “Berserker” Class.
Skills
Below are the Skills and Specializations we recommend for the Sword & Shield Dagger Tank Build in PVP. This includes Large Scale and Small Scale:
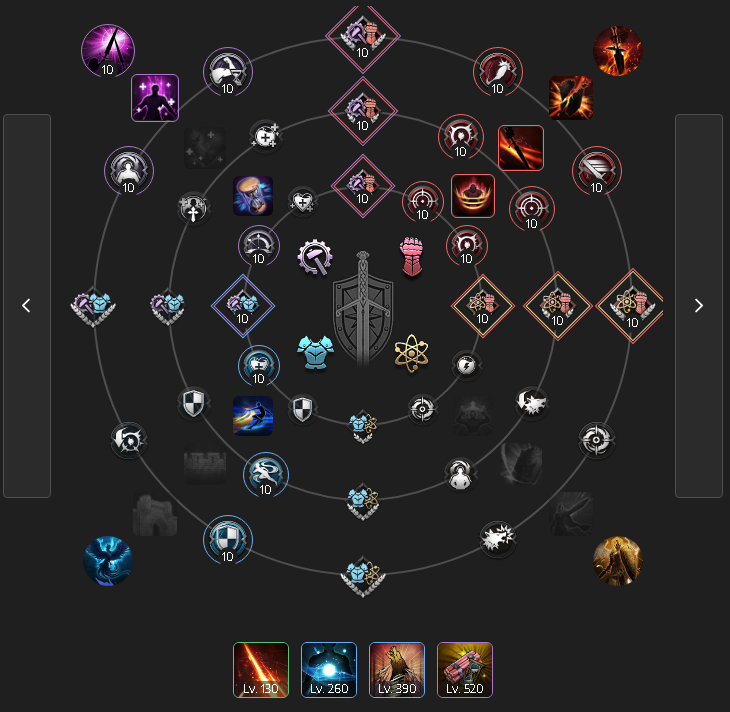
Large Scale PVP (PVP Boss, GVG, Castle Siege)
This Skill set-up allows the Sword & Shield Dagger to dive deep and cause chaos.
Large Scale Specializations
With 100 total points to play with once you hit Level 50, below is our recommended Specializations for the Sword & Shield Dagger build for Large Scale PVP:
Every Specialization helps towards keeping yourself as hard to kill as possible, while disrupting your enemies.
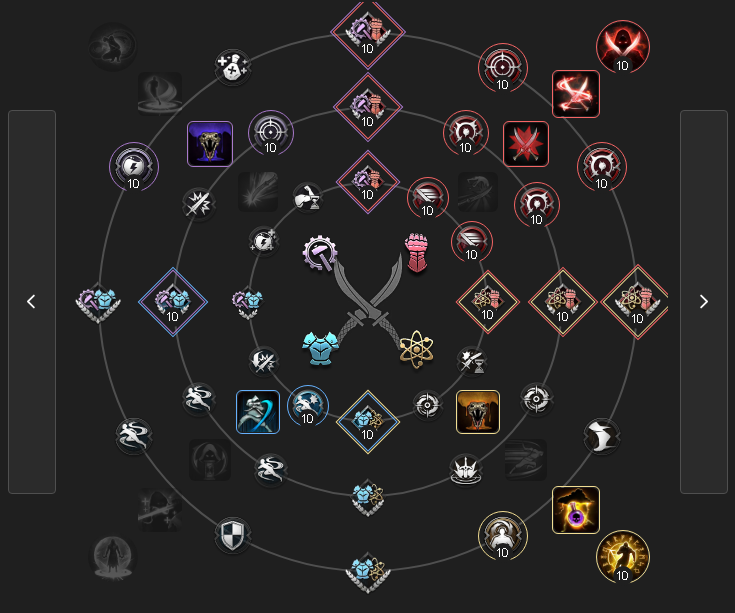
Small Scale PVP (Arena, Dominion, Night PVP)
This set-up focuses on smaller scale skirmishes. As a result, you can play much more aggressively and look to combo enemy players for kills. The largest difference in builds is the use of Ankle Strike to knock down a single player.
Small Scale Specializations
For Small Scale, picking more single-target damage Specializations and selfish defensive Skills is the most efficient.
See our Skill Specializations guide for more information.
Weapon Mastery
This guide assumes you are at least in the range of 130+ Mastery Level. However, if you’re below this threshold, it’s not an issue. Simply spec into the mastery trees that provide the most damage/utility first.
S&S Mastery
Dagger Mastery
Stats
Stats once you reach Tier 1 Epic gear can vary frequently due to stats built into gear. As a result, try to push for at least 50 Perception and 60 Strength while participating in PVP – gear depending. Below is our recommended baseline Stat allocation:
- Dexterity – 12 Points
- Perception – 21 Points
- Strength – 15 Points
Gear & Equipment
The gear loadout largely, if not entirely, stays the same across all content once you reach Tier 1 Epic. Our Tier 1 Epic set assumes that most of the base content has been unlocked with the Milestones completed.
We also recommend picking up Nirma’s Sword of Echoes. Finally, Queen Bellandir’s Languishing Blade is the ultimate S&S to obtain. However, it is incredibly rare, as a result, do not expect to see it for quite some time.
Sword and Shield Dagger relies on heavy Evasion stacking to avoid damage and proc Tank Passives.
Tier 2 (T2) Talandre Gear
Tier 2 Gear is only obtainable from the Talandre Expansion patch onwards. The gear can reach level 12 and provides much stronger benefits than Tier 1 gear in Throne and Liberty. If you prefer PVP, this gear set-up is optimal as a Melee DPS or Tank to get the job done.
We recommend not worrying too much about Archboss Accessories or Nebula Accessories as they’re very rare and expensive.
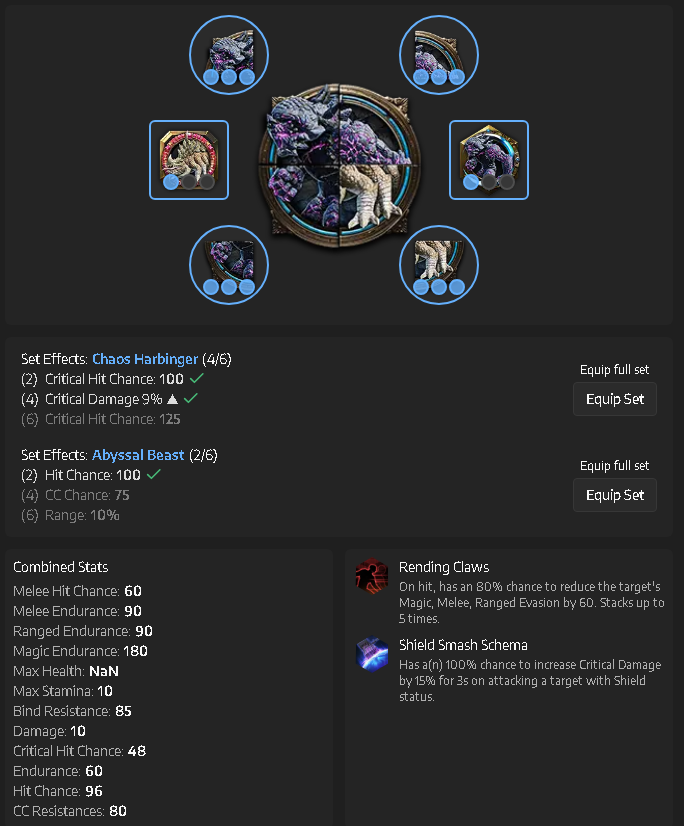
Artifacts
The Artifact System is another source of power for your build that provides stats, an Active and a Passive. We have crafted a general starting point for players to use and adapt to their liking below:
Guardian
Guardians are a unique transformation on a 10 minute Cooldown that gives powerful bonuses to you for 30 seconds. Some Guardians work as an additional “Active” Skill, while others provide buffs. We recommend the following Guardians for PVP:
- Green Ranger Elowen – Green Ranger is the ultimate Guardian for a Sword and Shield player in the frontline. Once you’re deep into the enemy forces, activating Green Ranger Elowen Binds all nearby enemies. Also, the bound enemies have an increased Critical Hit Chance on them. As a result, this Guardian is a fantastic engage tool.
How to Play the Sword & Shield Dagger Tank Build
The Sword & Shield Dagger Tank build is heavily focused around diving the enemy main-ball and bypassing enemy frontlines. You are NOT a frontliner, despite being a tank. Your main role is to dive and disrupt the enemy backline, causing them to be nuked by your DPS players.
Skill Rotation
The main way to play Sword & Shield Dagger is to dive past the enemy frontline by utilizing Shadow Strike. The rotation priority once you’re engaging is the following:
- Shadow Strike into the enemy ball
- Provoking Roar
- Counter Barrier
- Annihilating Slash x2
- Piercing Attack (spam this if the cooldown is immediate)
- Throwing Knives (to anti-heal)
- Defensives if required
While there is many moments any of these skills can be woven into a rotation, this general rotation is enough to engage a clump of enemy squishy players and lock them down. However, this combo can kill certain players too due to the massive amount of Piercing Attack you can spam. The amount of damage you can deal as a tank with this build is far higher than expected under ideal circumstances. Annihilating Slash dishes out a huge 60% Move Speed slow in AoE twice, making it the most impactful Skill during your engage.
Your job is to soak damage and engage for the team. A fantastic way to defend yourself while proccing buffs and Passives is through the use of Phantom Smokescreen. Camouflage should rarely be used to engage, rather, it is a defensive way to get out of a clump after doing your job.
Small Scale
Small Scale combat plays out largely the same. However, make sure of Ankle Strike after landing a Shadow Strike on a target or using Chain Hook to knock the target down.
Finally, remember to time your Defensive Skill (your block) with enemies engaging on you. The chances are, you’ll defend a Fury Attack, giving you a shield and more survivability.
Conclusion
That Concludes our Sword & Shield Dagger Tank Build! For more Throne and Liberty content, news and guides, be sure to check out our Throne and Liberty Home Page