
Introduction
The Dynasty Shipyard is an Expedition located in the Southern Part of Ebonscale. In our Dynasty Shipyard Expedition Guide, we will cover Boss Strategy, Walkthrough, and all the drops you’ll earn in the Expedition.
Dynasty Shipyard Drops
There are many unique drops to obtain in the Dynasty Shipyard Expedition. The following are the named drops in the expedition.
Dynasty Shipyard Weapon Drops
The following drops require the Rise of the Angry Earth Expansion.
The following drops DO NOT require the Rise of the Angry Earth Expansion
| Weapon | Where it Drops | Difficulty |
|---|---|---|
| Pirate’s Piece | Expedition Wide | Normal |
| Inner Peace | Expedition Wide | Normal |
| Madman’s Headhunter | Expedition Wide | Normal |
| Bow of the Enchantress | Expedition Wide | Normal |
| Frostforged War Hammer | Expedition Wide | Normal |
| Accursed End | Expedition Wide | Normal |
| Rapier of Forgotten Queens | Commander Chen | Normal |
| Promise of Power | Oro, Joven, Isabella | Normal |
| Farseer’s Spear | Oro, Joven, Isabella | Normal |
| Dreadwake | Oro, Joven, Isabella | Normal |
| Glowing Lifecrystal Staff | Zhou Taiying | Normal |
| Flamewake | Zhou Taiying | Normal |
| Tempest’s Call | Zhou Taiying | Normal |
| Taiyings Heart | Zhou Taiying | Normal |
| Wodao | Maiden Lanfen | Normal |
| Traveler’s Flail | Captain Kaiwei | Normal |
Dynasty Shipyard Armor Drops
The following drops require the Rise of the Angry Earth Expansion
| Armor | Where it Drops | Difficulty |
|---|---|---|
| Smyhle Armor Set (Light) | Expedition Wide | Mutation 1+ |
| Smyhle Armor Set (Medium) | Expedition Wide | Mutation 1+ |
| Smyhle Armor Set (Heavy) | Expedition Wide | Mutation 1+ |
| Empress Zhou Set (Light) | Zhou Taiying | Mutation 3 |
The following drops DO NOT require the Rise of the Angry Earth Expansion
| Armor | Where it Drops | Difficulty |
|---|---|---|
| Zealous Embrace | Zhou Taiying | Normal |
Dynasty Shipyard Jewelry Drops
The following drops require the Rise of the Angry Earth Expansion
| Jewelry | Where it Drops | Difficulty |
|---|---|---|
| Shipyard’s Amulet | Expedition Wide | Mutation 2+ |
| Shipyard’s Ring | Expedition Wide | Mutation 2+ |
| Dynasty’s Earring | Expedition Wide | Mutation 2+ |
The following drops DO NOT require the Rise of the Angry Earth Expansion
| Jewelry | Where it Drops | Difficulty |
|---|---|---|
| Keeper’s Pendant | Expedition Wide | Normal |
| Shard of Lithomancy | Commander Chen | Normal |
| Band of Ocean’s Oath | Oro, Joven, Isabella | Normal |
| Bloodline’s Curse Earring | Oro, Joven, Isabella | Normal |
Other Drops
The following drops require the Rise of the Angry Earth Expansion
| Item | Where it Drops | Difficulty |
|---|---|---|
| Golda (Horse Mount) | Expedition Wide | Mutation 3 |
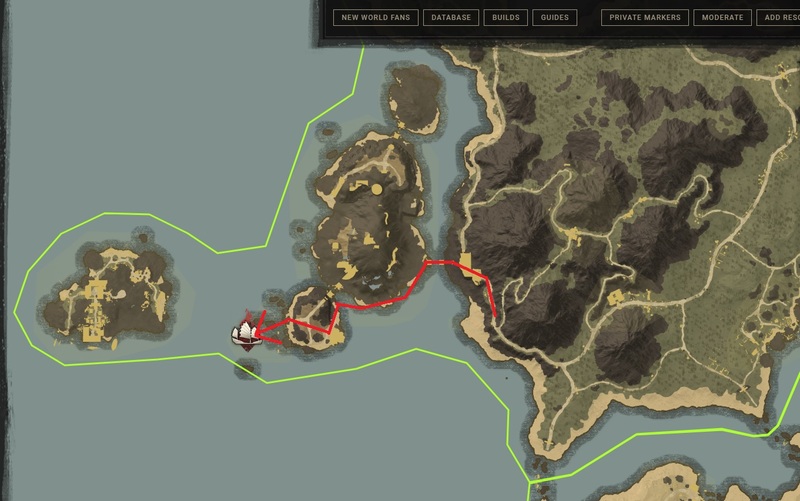
Dynasty Shipyard Map
Dynasty Shipyard Location and General Information
The Dynasty Shipyard is a 5-man instanced level 55+ PvE activity. However, it’s mutated version is intended for level 65 players.
The expedition is located in the Southern part of Ebonscale Reach. The entrance to the expedition can be a bit tricky to find. You will need to follow the road and cross the bridge to get to the island. Once on the island, you can drop off the mountain onto the beach and follow the south side of the beach along the water’s edge onto the next island. You will then just follow the road over to the Shipyard’s Entrance. Be aware that you will be encountering some elite mobs along the way, but you can just run past them if you catch aggro.
The premise behind this expedition is that the Empress of Ebonscale is building a fleet of warships. The fleet and the Empress must be defeated for the safety of Aeternum and the world.
Types of Enemies in Dynasty Shipyard and Optimal Damage Types
Once inside you will encounter corrupted pirates. The most effective damage types against the corrupted are thrust nature and arcane damage. Therefore, in order to maximize DPS a weapon that deals thrust damage should be utilized. You can check our Damage Type vs Mob Type quick chart for a full list of weaknesses for all enemy types.
You can also use Corrupted Coatings and Corrupted Ward Potions to dish out more damage and to mitigate additional damage from the Corrupted enemies. Additional options to help you maximize damage output would be utilizing Corrupted combat Trophys.
Dynasty Shipyard has 2 bosses, 7 named or miniboss encounters, and a lot of trash mobs throughout the expedition. (Trashmob = Enemies that can add to the difficulty and liveliness of a dungeon/expedition and for the purposes of expedition guides include both normal and elite mobs that are throughout the expedition)
Dynasty Shipyard Trashmobs
- Shipyard Spearman (Elite) – These are melee attackers wielding a spear. Their main ability is a jumping spin with their spear that deals decent amounts of damage. You can block the ability or dodge out of the way.
- Shipyard Warrior (Elite) – These are melee attackers wielding a sword and shield. They both deal and block quite a lot of damage. Once you are able to break the block just try to DPS them down quickly. You can block and dodge the attacks with their sword.
- Shipyard Trainee (Normal) – A melee attacker wielding only a sword. Easy to take down and do not do a lot of damage
- Shipyard Musketeer (Normal) – A ranged attacker wielding a musket. Their main ability is a jump-back spin while shooting a musket shot at you. Their Powershot will apply a bleed effect. They are fairly easy to take down and the musket shots can be dodged, and only blocked if you have a shield.
- Deep Pit Abomination (Normal) – A melee corrupted Lost. These do not wield a weapon but claw at you like a rabid animal. They are quick-moving but are easily taken down.
- Corruption Swarmer (Normal) – A melee corrupted Lost. Easy to take down and do not do a lot of damage
- Shipyard Hound (Normal) – A melee hound that lunges forward and deals damage. Easy to take down and do not do a lot of damage.
- Shipyard Worker (Normal) – A melee-corrupted mob wielding a garden tool. Easy to take down and do not do a lot of damage.
- Corrupted Abominations (Normal) – Spawned in during your encounter with Isabella as Ads. These function just like the corrupted abominations in the open world. (Creepy Winged corrupted creatures)
- Shipyard Summoner (Normal) – AOE attack around their body that deals damage. Quick moving and can deal quite a bit of damage. AOE ground slam ability when you see the purple light beam.
Dynasty Shipyard Named / Miniboss Encounters (In order of encounter)
- Summoner Yau
- Spearman Chiu Maiden
- Jingfei Commander Chen,
- Maiden Daiyu, and
- Maiden Lanfen
- Lieutenant Bolin
- Summoner Guang
- Captain Kaiwei
Boss Encounters
Both Oro and Jovo (1st BOSS) – Isabella’s Pets: Joven and Oro obediently wait for Isabella’s command and their next meal.
Empress Zhou (Final Boss) – Zhou Taiying: Elegant, graceful, and brimming with rage, this Empress in exile commands an army loyal beyond death and wields immense corruption energies to exact her vengeance.
How to Enter the Dynasty Shipyard
In order to enter the Dynasty Shipyard expedition (like all New World Expeditions), someone in your party will need to be at the entrance to enter.
There is a limit on the number of expeditions you can run.
- 15 Normal Expedition runs per player per day or 105 per week, per player.
- 35 Mutated Expedition runs per week.
You can also utilize the dungeon expedition group finder to find a group and enter the expedition. The group finder can be accessed through the expedition entrance UI or from the map by clicking on the Expedition map icons.
You can browse listings created by other players, or post your own request to join other players on your server. This tool allows you to declare your preferred team role, such as DPS, tank, or healer. You can recruit based on those roles. You can also set recruiting requirements like minimum gear score and level, then inspect members to learn their average gear score, weapons, and mastery levels.
Repeatable Quests
There is one repeatable quest for the Dynasty Shipyard called Justice for the Dynasty. You must be level 53 in order to accept the quest. You can obtain the quest from Guo the Liberator who stands just outside the Dynasty Shipyard Entrance. The quest will have you collect Dynasty Shackles from Dynasty Shipyard Lieutenants and return then to Liberator Guo.
Dynasty Shipyard Walkthrough
The Eastern Pier
Once inside the dungeon, the first mob encounter you will face is a pack of 5 trash mobs. There are 2 elites, a Shipyard Spearman and a Shipyard Warrior that you can easily pull back onto the pier and fight alone before taking on the other remaining 3. The other 3 are normal mobs that should be easily extinguished.
The Corrupted Cave
The next area you will encounter is a corrupted cave. You must clear the cave and destroy the Monolith. While in the cave you will encounter some Deeppit Abominations, and Corruption Swarmers, and will fight a mini-boss named, Summoner Yau.
Summoner Yau spawns in a lot of corruption swarmers as ads. The ads are not hard, but he will continue to spawn them during the duration of the fight and they can become overwhelming. In melee range he will deal a decent amount of damage with his swings so be sure to block or dodge to avoid taking damage.
He also has a very strong AOE attack. When he holds his weapon up and a pink glow shoots up into the sky make sure to back up as to not take massive damage from the AOE. He does not stay in any one place for a long duration, and will rapidly hover away from your party and spawn in more ads.
The best strategy to defeat him is to group up the ads and make quick work of them and then get to him and do as much damage as possible before he spawns in another group of ads. He is not hard to defeat if you avoid the big damage AOE.
Once you defeat Summoner Yau, make your way over to the corrupted Monolith and close it with your Azoth Staff.
Once closed, the next task is to place some power kegs at the ship’s sterns and the door.
Northern Shore
Upon exiting the cave you’ll encounter quite a lot of trash mobs to defeat, including some Shipyard Spearmen, Shipyard Hounds, Shipyard Musketeers, Shipyard Workers, Shipyard Trainees, and Shipyard Warriors.
As you progress through the mobs you’ll place the first round of powder kegs underneath the first ship on the right.
There is a supply stockpile located on the left side of the mountain right beside the tent as you exit the cave.
You will encounter your 2nd miniboss after placing down the first round of kegs, Spearman Chiu. Chiu has a kicking attack that will stagger you and deal damage, and his main ability is a quick jumping spin attack with the spear (just like the other Shipyard Spearman) that will deal a lot of damage. He is very mobile and dashes around quite a lot. He is not difficult to defeat as long as you avoid the spinning dash hits with his spear and are cognizant of his light and heavy attacks. No real mechanics here, other than blocking, dodging, and dealing damage.
After killing Spearman Chiu, progress through the remaining trash mobs and place the 2nd round of kegs under the second ship, and the third round of kegs at the gate. After placing the kegs you have to run back to the platform in the middle of the area and place the rockets on the top to blow up the kegs.
Once they explode you then progress forward in search of more ships.
Once the gate is blown 3 mobs will come through consisting of 2 Shipyard Spearman and a Shipyard Warrior. After killing these mobs you can then pull a miniboss, Maiden Jingfie. She is a ranged caster. She uses her sphere to summon multiple spheres and shoots them at you dealing damage. Upon using that ability she also casts an AOE around here dealing damage.
Her big damage-dealing ability is a dragon that she summons from the sphere that will shoot out in a straight line and it deals tons of damage. Make sure you avoid this ability. She is very squishy and can be taken down quickly as long as you kill the 3 trash mobs prior to taking her out and avoid her big damage-dealing dragon.
Marble Courtyard
Once she is defeated, progresses up the stairs into the Marble Courtyard to encounter another miniboss. There are 3 mobs or minibosses here, Commander Chen, Maiden Daiyu, and Maiden Lanfen. Both of the Maiden are exactly like the previous one encountered. They are ranged mages that use their spheres to deal damage. Remember to avoid the dragon, it hurts bad.
They will also summon a dragon around them dealing a great amount of AOE damage to anyone close. If you are in melee range and DPSing them down if you see her hands go up into the air make sure to dodge out of the way.
They are fairly squishy so it’s recommended for the tank to hold aggro on Commander Chen while the DPS make quick work of the 2 maidens before focusing on the Commander. It’s best to burn one down and move on to the next.
Commander Chen is a large melee boss with a huge sword. Getting hit by him does a ton of damage so make sure to block and dodge out of the way of his swings. He also has an AOE Ground stomp that deals a lot of damage and is important to avoid.
There’s not really any tricky mechanics to this fight. Kill the 2 casters first while the tank holds aggro on the Commander, and then burn down the Commander while avoiding damage. Most of his attacks are very telegraphed.
Western Piers
After drafting the 3 minibosses, progress down the stairs to encounter more trash mobs in the form of Shipyard Spearman, Shipyard Hounds, and Shipyard Musketeers to make your way to the stern of the ship to place down another powder keg.
Go down the stairs on the right to encounter another miniboss, Lieutenant Bolin. He is a juiced-up Shipyard Warrior. The same attacks just deal more damage and has more health. After defeating him, clear the remaining trash mobs and place down the keg.
After placing down the keg you will have to defend it against a few waves of trash mobs. The mobs will begin to spawn as soon as the keg is placed, so make sure you’re ready. Once all the mobs have been cleared the keg will explode and you’ll keep moving to ding the next ship to destroy.
Once you reach the next pier you’ll encounter more trash mobs in the form of Shipyard Trainee’s, Shipyard Musketeers, Shipyard Hounds, etc. Make your way to the ship, place down the keg, and defend it just like the last keg that was placed. Once the mobs are defeated the keg will explode.
Oro and Jovo (Isabella) Boss Guide
Once in the Barracks you will encounter your first Boss Fight and must defeat Isabella’s Pets. You will first encounter Isabella herself, and she will spawn in 3 Corrupted Abominations at a time as ads. Make quick work of these and you’ll have quite a bit of time to work down Isabella before she spawns them in again.
Isabella wields a flaming corrupted Rapier and does quite a bit of melee damage. She also has a pistol that will shoot periodically that does decent ranged damage so be aware of her pulling that out if she’s at range.
Isabella has a cone attack with her Rapier. She swings it and a large AOE Cone spreads out in front of her dealing damage to all that are in that area.
She will also blink around the map, oftentimes blinking in behind one of your allies and stabbing them in the back with the Rapier.
Basically, kill the ads, do as much damage to Isabella as possible between ad spawns. Watch out of the ranged attack with the pistol, and be aware of the blink and cone AOE that she does.
Once she begins to get close to half health be aware of the Shipyard Musketeers that spawn in on the Ship off the pier. They will start pelting you with damage, dealing decent damage. Shortly after the Musketeers spawn in Isabella will release her 2 pets and disappear.
The musketeers stay on the ship, shooting at you for the duration of the fight so be aware of that and have the tank pull the mobs to a spot that’s sheltered from those shots.
Both Oro and Jovo shoot fire out of their mouths in a line in front of them. The range is fairly long and the ability does a ton of damage. They also do fast swiping attacks with their paws dealing quite a bit of damage.
There aren’t any extravagant mechanics to this encounter. The best way to approach this fight is to simply have your tank hold aggro and block / absorb all the damage while your healer keeps your tank alive and your DPS go to work.
Many groups opt to have an off tank for this fight. The main tank will hold aggro of one of the dogs while the off tank, and DPS kill the other. Once one is dead, the full group switches to the other.
Barracks
Upon drafting the 2 pets you’ll progress through the gates and encounter more trash mobs. You’ll need to kill the trash mobs and make your way to the Shipyard’s Captain. In the middle of the road you’ll encounter Summoner Guang. He is named Shipyard Summoner and has the same abilities, just stronger. He will also summon ads in the form of corrupted swarmers that you’ll have to deal with. Make sure you avoid the AOE attacks that he places on himself. They do a ton of damage. When you see the beam of purple light in the air dodge roll away or block.
It’s best to kill the mobs in the houses to the left and right prior to engaging with Summon Guang because he will quickly move underneath and around the houses inciting aggro the mobs around as you approach him. Defeat him to progress down the road and make your way up the stairs to the captain.
Captain Kaiwei is a stronger version of a Shipyard Warrior, and is accompanied by a Shipyard Trainee and 2 Shipyard Spearmen. Take out the 2 ads while your tank holds aggro and then kill the captain.
After defeating the captain you’ll progress through the gates for the final boss fight of the expedition, Empress Zhou.
Empress Zhou Boss Guide
Upon entering the Imperial Palace the gates will close behind you and the boss fight will begin.

Empress Zhou is much like the Maiden’s that you have encountered up to this point. She has 6 abilities that will need to be aware of:
- Dragon Swirl – Empress Zhou conjures her dragon around her. The Dragon will swirl around the Empress dealing AOE damage to any players in the area.
- Dragon Breath – The Empress’s dragon breathes corrupted flames in a frontal cone. The cone deals heavy damage, knocks back any player hit, and applies a burn effect that will last for a short duration.
- Dragon Lunge – The Empress’s dragon lunges out in a thrusting motion dealing damage to any player that is struck.
- Corrupted Sphere – Zhou uses her sphere or orb to attack at both melee and ranged distances. She conjures a thin corrupted beam for the ranged attack, and smashes the sphere down on players for the melee attack.
- Corrupted Blast – Zhou will temporarily levitate and crash down sending out a blast of corruption bursting outwards in all directions dealing damage to all players that are hit. This can be avoided by dodging and utilizing your I-frame to avoid damage.
- Conjure Dragons – Empress Zhou will conjure pedestals that will then summon her dragon around them. The dragon’s summoned around the pedestals will damage to nearby players. These pedestals can be destroyed. While summoning the pedestals, the Empress also spawns in several adds. The adds will consist of several different trash mobs that have been encountered throughout the dungeon.
Empress Zhou Fight
All of her attacks can be fairly easily predicted by a purple glow. At the beginning of the encounter, Zhou will instantly perform a Dragon Swirl. Make sure you get out of the AOE range of the swirl and avoid damage. Shortly after she will perform a corrupted blast. Make sure you learn to time the dodge appropriately to avoid damage because this ability will be used several more times during the encounter.
Try to avoid damage and work her down to about three-fourths health. At that point, she will use Conjure Dragons and summon several ads and levitate. When this happens there will also be some pedestals that are summoned in. She will use the pedestals to summon her purple dragon’s onto them. They then breathe fire in a cone in front of them causing a lot of damage. If these are not kept under control they will be placed all around the arena and it will become very difficult to avoid the damage.
After Isabella spawns, the adds and the group takes them out she will drop back down. At this point the group should go group in the back right corner of the arena until the remaining pedestals are placed. Once they are all down the group should run back to the front of the arena away from the pedestals to continue the fight. From here you will half the arena to work with and can easily avoid the pedestal damage while you finish off the boss.
In a nutshell, maintain aggro with your tank, avoid the AOE’s as melee DPS, kill ads while she’s levitating, stack the pedestals in the back right corner, move the boss back towards the front of the arena to finish the fight.
Once you defeat Empress Zhou the expedition is complete.
Dynasty Shipyard Expedition Guide Conclusion
That completes our Dynasty Shipyard Expedition Guide. For a guide on the End-Game expeditions, check out our Garden of Genesis, Lazarus Instrumentality, and Tempest Heard Guides.