
Introduction
The Starstone Barrows is a level 35 Expedition located in Everfall. For more on the Drops you can earn, a walkthrough of the expedition, and Boss Fight Guides, continue reading our Starstone Barrows Expedition Guide.
Starstone Barrows Drops
There are many unique drops to obtain in the Starstone Barrows Expedition. The following are the named drops in the expedition.
Starstone Barrows Weapon Drops
| Weapon | Where it Drops |
|---|---|
| Tip of the Morning Star | Expedition Wide |
| Ancient Heartstring | Expedition Wide |
| The Obelisk | Expedition Wide |
| Fleeting Reality | Expedition Wide |
| Glacial Longsword | Expedition Wide |
| Obsidian Rapier | Greundgul the Regent |
| Sunderstrike | Greundgul the Regent |
| Staff of the Immolated Veil | Greundgul the Regent |
| Creeping Cold | Alectos the Relentless |
| Obsidian Edged Musket | Alectos the Relentless |
| Staff of the Befouled Temple | Alectos the Relentless |
Starstone Barrows Armor Drops
| Armor | Where it Drops |
|---|---|
| Masquerade Mask | Greundgul the Regent |
Starstone Barrows Jewelry Drops
| Jewelry | Where it Drops |
|---|---|
| Stonehewn Ring | Expedition Wide |
| Fanged Ring | Greundgul the Regent |
| Graveguard’s Seal | Alectos the Relentless |
Other Resources
| Item | Where it Drops |
|---|---|
| Starstone Materia | Greundgul the Regent |
| Sparkling Bone Dust | Expedition Wide |
Startstone Map
Starstone Barrows Location and General Information
This Expedition is located southeast of the Everfall Settlement underneath the Shattered Obelisk. The recommended level to run Starstone is level 35. However, you can accept the repeatable quest and run the expedition at level 33.
Types of Enemies in Starstone Barrows and Optimal Damage Types
Once inside you will encounter the Ancient enemy type. The most effective damage types against the Ancients are strike, void, and lightning damage. You can check our Damage Type vs Mob Type quick chart for a full list of weaknesses for all enemy types.
You can also use Ancient Coatings and Ancient Ward Potions to dish out more damage and to mitigate additional damage from the Ancient enemies. Additional options to help you maximize damage output would be utilizing an Ancient Combat Trophy.
How to Enter the Starstone Barrows
In order to enter the Starstone Barrows (like all New World Expeditions), someone in your party will need to be at the entrance to enter.
There is a limit on the number of expeditions you can run.
- 15 Normal Expedition runs per player per day or 105 per week, per player.
- 35 Mutated Expedition runs per week.
You can also utilize the dungeon expedition group finder to find a group and enter the expedition. The group finder can be accessed through the expedition entrance UI or from the map by clicking on the Expedition map icons.
You can browse listings created by other players, or post your own request to join other players on your server. This tool allows you to declare your preferred team role, such as DPS, tank, or healer. You can recruit based on those roles. You can also set recruiting requirements like minimum gear score and level, then inspect members to learn their average gear score, weapons, and mastery levels.
Repeatable Quests
At level 33 you can obtain the quest “More Bones for Barkimedes”. This is a repeatable quest that can be picked up from Barkimedes who sits in front of the Amrine Excavation Expedition. During the Starstone Barrows Expedition, you will encounter 3 skeleton mini-bosses that will each drop a bone. You need to pick up all bones in order to complete the quest. You will then have to return to Barkimedes to turn the quest in. Along with the More Bones for Barkimedes repeatable quest you will also begin to receive Expedition Faction missions for Starstone Barrows from Everfall once you reach level 33.
Starstone Barrows Walkthrough
Ancient Hall
Once inside, head west down the ancient hall and cross the bridge to clear the first group of Ancients. Once cleared, open the Ancient Azoth Seal and head into the Sealed Chamber
Sealed Chamber
From here head up the stairs and clear another group of ancients above. Here you will be introduced to the first mechanic of the expedition, the Arcane Beams. To the right (north) there is a room with an Iron Vein and a lore page. To the left, you will need to crawl prone under the beams to move out of the Sealed Chamber and to your first Checkpoint. Keep heading down the hallway. Dodge the next beam and clear the next group of ancient mobs. From there, head south to enter the beam-filled Forbidden Passage.
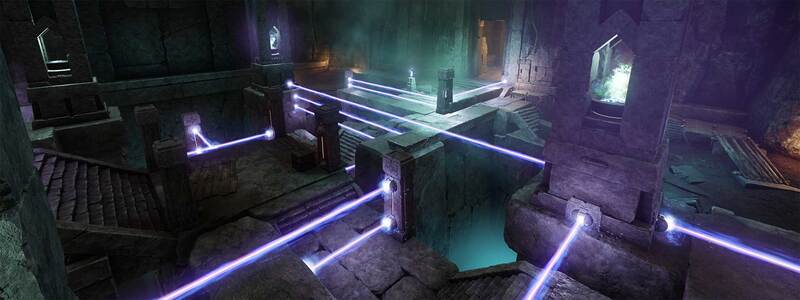
Forbidden Passage
Here is where the fun begins! Keep heading south and drop off the ledge to left. Then continue south and avoid the beams! You will keep going till you see the ledge of the platform. From here you will hug the ledge to the right and jump across the first gap using your action key (default shift). Once on the next platform climb up the wall to the right and take a left turn. You should see a bouncing beam ahead.
There is a small ledge on the right side of this platform that dips down. Carefully hop down the lower ledge and head under the bouncing beam! From there you will need to jump to the next small platform ahead then get to the next small platform on your right. For the last jump, leap ahead to the large platform with stairs. Head left and crawl prone underneath the next bouncing arcane beam.
Careful as there is a Shattered Archer on the other side of the beam that has a knockback ability that can knock you into the beam!
Kill him, then head up the wooden platform ahead onto the wooden walkway. Jump off the walkway and onto the stone platform below then SPRINT straight and jump over to the lower wood platform. Clear the adds below and then hug the wall around the corner to your right.
After turning left you will be able to reach the Arcane pool below. This will provide one player in your group with an Arcane Protection enchantment. Once picked up a shortcut will form between the platform and the beginning of the room. Whoever picked up the Arcane Protection can now stand between the arcane beams and open up a gap for members to go through. This mechanic will be several times throughout the Expedition. Use the Arcan Protection to move through the 3-beamed doorway to the south. This leads to the 2nd Respawn Shrine. There is also a chest in the hallway ahead. Turn to the west and up the stairs to clear some more Ancient Mobs. Finally, get past the Arcane beam at the end of the hallway and enter The Amphitheater.
The Amphitheater
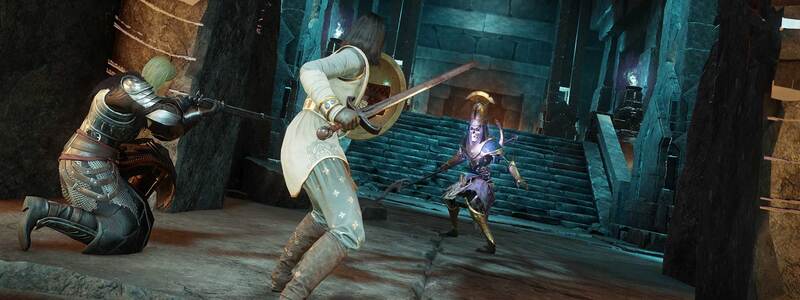
Once inside the Amphitheater, turn left to see a grand staircase with several Ancients. In this pack of Mobs is an Elite mini-boss named Ioane. Ioane is wielding scimitar sword and has an exceptionally high amount of mobility. Kill Ioane and the mobs then move up the stairs and around the corner to the right (north).
You will see another pack of ancient mobs with another Elite mini-boss named Erine. Erine has an Ancient with a spear and a shield. Down these mobs, open the Ancient Azoth seal, and head into the Shattered Obelisk.
Shattered Obelisk (part 1)
Just inside the door are the 3rd Respawn point and a flight of steps. Climb the Steps and Grab the Expedition chest to your left. Clear the mobs and the arcane beam at the top of the stair will turn off. head up the stairs and go to the left of the Obelisk and down the stair behind it. Clear the Ancients below and head through the Ancient Azoth-sealed door to the Antechamber
The Antechamber (part 1)
Inside the door, you’ll see a respawn shrine. Head to the right and clear the Ancient mobs up ahead. You’ll note a door with 4 runes on it. You’ll need to remember this for later. Now turn around and go through the Ancient sealed door behind you and head to the left. More Ancient mobs Ahead! Clear them and head down the stairs to the Halls of the Crypt
Halls of the Crypt
Keep heading down the hallway and clear the next group of Ancients and head down the stair to your right(east). Below you’ll find two Elite mini-bosses, Limos and Erebas. Defeat them and make sure one party (preferably DPS) member picks up the Arcane Protection buff at the back of the room! You will need this buff to get through Use this to get through to doorways protected by arcane beams. Go through the three beams, then the 4 party members without the arcane Protection need to clear the ancients quickly so that the protection buff does not expire before the party gets through the next set of beams. Once through the second set, you will be greeted with a Respawn Shrine. Head up the stairs, back to the Shattered Obelisk for the first boss fight.
Shattered Obelisk (part 2)
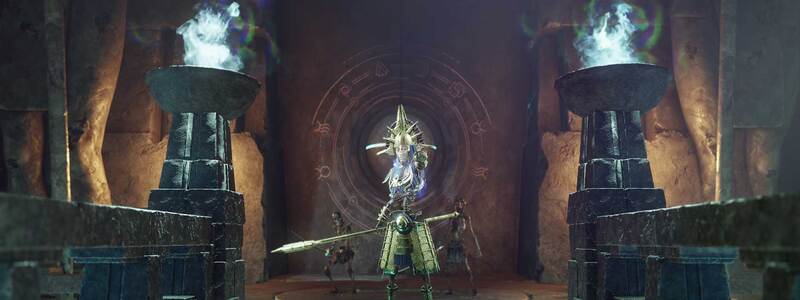
Once up the stairs, you will encounter a pack of Ancient mobs and the first true boss of the Expedition, Alectos the Relentless.
Alectos the Relentless Boss Guide
Alectos Mechanics
- Arcane Orbs – Alectos shoots out a large cone of Arcane orbs at the party
- Raise Ancients – Alectos Spawns in more adds to the fight – clear these to prevent Alectos from using enchanting beam
- Enchanting beam – enchants an add, causing it to grow in size and strength.
- Arcane Nova – Alectos Slams his staff to the ground to form an Arcane Nova around him, dealing damage
- Arcane pool – small purple Aoe placed on the ground.
- Arcane Rejuvenation – Alectos Holds his arcane glowing, hands up in the air for a self-heal (approx 33% of his health).
Through the duration of the fight, the tank will face Alectos towards the outer edge of the platform to point Arcane Orbs away from the group. The Tank will also need to interrupt Arcane Rejuvenation interrupting his self-heal, Arcane Rejuvenation. The DPS may need to help interrupt this ability if the tank’s interrupt is on cool down. The DPS will need to clear the adds that Alectos spawns, preventing Alectos from enchanting them. The rest of Alectos damage is easily avoided at range. Finish him off and collect your loot.
Once Alectos is down, note the Ancient Shrine(shrine with blue pool). You will need to use this later. Grab the chest to the west, then head down the steps and clear the Ancients Below. Grab Arcane protection and head through the two sets of Arcane beams. There will be another Elite mini-boss named Sangarion with more Ancient mobs. Once clear, search the ornate chest for the Obelisk Key. You will need to take the Obelisk Key back to the Ancient shrine to bless it. Then take the Key to the Antechamber to open the Runed door. Head back through the Halls of the Crypt to get there.
Antechamber (part 2)
Use the Obelisk Key to open the Runed door and enter the Crypt of the Regent. Once through the door, you will see the final respawn point. The final boss is ahead.
Greundgul the Regent Boss Guide
Phase 1
- Cleave – Grendgul slams his greatsword to the ground
- Gruendgul’s Bone – Gruendgul throws a bone on the ground that spawns in Ancient Adds
His first phase is simple. DPS Greundgul and clear Gruendgul’s Bones as he spawns them in. You will always clear the bone first, then the adds they spawn in. Once you Kill Greundgul, his second phase begins.
Phase 2
Gruendgul will now start leaping around the room, creating a shockwave from where he lands, creating a massive AOE shockwave. Dodging these completely is difficult, so players will need to spread out and avoid the once they can to reduce stress on the healer. After several leaps he will then stop leaping and spawn in 2 Bones. Kill the bones first and then the adds. Gruendgul will then go back to the Leaping phase. Rinse and repeat and you have finished The Starstone Barrows!
Starstone Barrows Expedition Guide Conclusion
That completes our Starstone Barrows Expedition Guide. For a guide on the next expedition you’ll encounter, The Depths, Check out our Depths Expedition Guide. For more New World Aeternum guides be sure to check our comprehensive guide library!