
Introduction
Welcome to our Wand Longbow Healer build for Throne and Liberty. This guide focuses on the PVP set-up for Wand Longbow as a healer and how to play it. This weapon combination forms the “Seeker” Class.
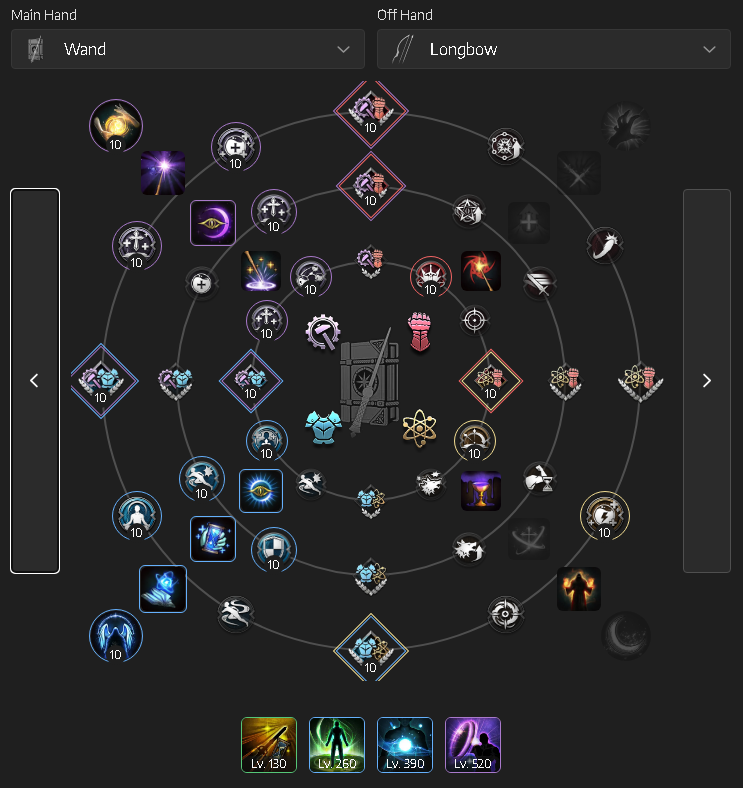
Skills
Below are the Skills and Specializations we recommend for the Wand Longbow healer build in PVP. This includes Large Scale and Small Scale:
ALL PVP (PVP Boss, GVG, Castle Siege, Events, Arena)
The Wand Longbow set-up is pretty universal. The build is very flexible in changing a Skill here or there and tweaking Specializations to fix any situation/size of PVP.
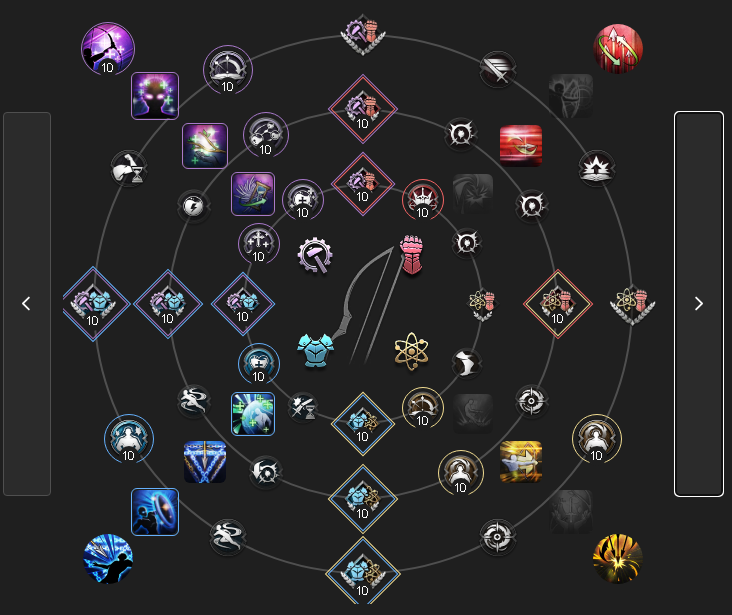
Specializations
With 100 total points to play with once you hit Level 50, below is our recommended Specializations for the Wand Longbow build for PVP:
Every Specialization helps towards keeping your team alive through buffs and raw healing. Upgrading Flash Arrow, turning it into Flash Wave becomes a crucial AoE damage tool in larger scale fights.
See our Skill Specializations guide for more information.
Weapon Mastery
This guide assumes you are at least in the range of 130+ Mastery Level. However, if you’re below this threshold, it’s not an issue. Simply spec into the mastery trees that provide the most damage/utility first.
Wand Mastery
Bow Mastery
Stats
Stats once you reach Tier 1 Epic gear can vary frequently due to stats built into gear. As a result, try to push for at least 60 Perception and 50 Strength while participating in PVP – gear depending. Below is our recommended baseline Stat allocation:
- Strength – 19 Points
- Perception – 8 Points
- Dexterity – 17 Points
- Wisdom – 5 Points
Gear & Equipment
The gear loadout largely, if not entirely, stays the same across all content once you reach Tier 1 Epic. Our Tier 1 Epic set assumes that most of the base content has been unlocked with the Milestones completed.
Tier 2 (T2) Talandre Gear
Tier 2 Gear is only obtainable from the Talandre Expansion patch onwards. The gear can reach level 12 and provides much stronger benefits than Tier 1 gear in Throne and Liberty. If you prefer PVE, this gear set-up is optimal as a Ranged player or Healer to get the job done.
We recommend not worrying too much about Archboss Accessories or Nebula Accessories as they’re very rare and expensive.
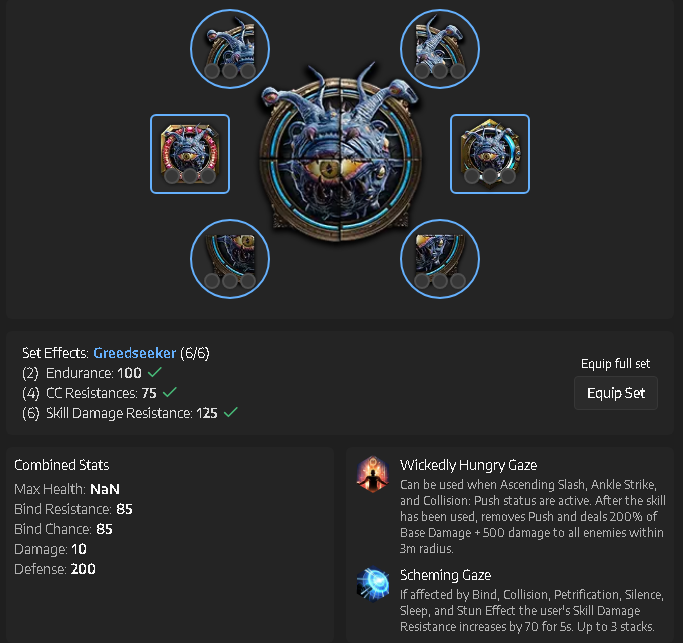
Artifacts
The Artifact System is another source of power for your build that provides stats, an Active and a Passive. We have crafted a general starting point for players to use and adapt to their liking below:
Guardian
Guardians are a unique transformation on a 10 minute Cooldown that gives powerful bonuses to you for 30 seconds. Some Guardians work as an additional “Active” Skill, while others provide buffs. We recommend the following Guardians for PVP:
- Lady Knight Kamarshea – This Guardian is a fantastic safety net, just incase you’re taking too much damage on an engage. You’ll also get a huge amount of Cooldown Speed too.
How to Play the Wand Longbow Healer Build
The Wand Longbow build is heavily focused around Healing and Supporting in PvP while sporting some great crowd control. The Wand Longbow combination is quite an “all round” experience. It can deal damage, self-heal and heal teammates, buff your team up and lock-down enemies.
Important Skills
One of your most powerful tools is the ability to AoE “Sleep” crowd control your opponents. This is done through using Cursed Nightmare on a target and then using Karmic Haze on the same target. Karmic Haze spreads curses on the current target to multiple other targets in the radius. This is one of the most powerful crowd controls and engage tools in the game.
You have the following AoE support heals and support Skills available to you:
- Fountain of Life
- Nature’s Blessing
- Clay’s Salvation
These Skills can be used pretty freely during a large fight and usually has good value. Placing Fountain of Life at your Tanks feet or on top of a ranged party can prove very effective. Your single-target heal, “Swift Healing”, can be casted multiple times until it goes on a cooldown. This makes it pretty flexible in healing several people or pumping heals into yourself.
You also have several heal-over-time Skill such as:
- Healing Touch
- Flash Wave
Healing Touch requires you to stack it 3 times on your target (or yourself) to receive maximum benefit. At max stacks, the health regeneration is quite potent. Combining Healing Touch with Nature’s Blessing provides a massive health regen buff. Flash Wave is a huge AoE that deals damage and applies a heal-over-time to allies in the area. As a result, this Skill is very powerful in large scale as both a damage tool and healer Skill. With Skill Specialization, Flash Wave also lowers enemy Hit which is vital in some situations. The standard set-up to use Flash Wave for damage is:
- Flash Wave
- Blitz
- Flash Wave (reset)
Barrier-style Skills
Finally, you have access to “shield” Skills such as Blessed Barrier and Invincile Wall. Placing Barrier and/or Invincile Wall on a target before you heal them is usually the best order to use your Skills. This allows you to safely heal up a target without them taking damage – losing all the health you just restored. You can also use Blitz to Blessed Barrier two targets. Make sure to play close to your main ball so you can receive peel from your teammates if you get dove by an assassin.
Conclusion
That Concludes our Wand Longbow healer build! For more Throne and Liberty content, news and guides, be sure to check out our Throne and Liberty Home Page