")
Introduction
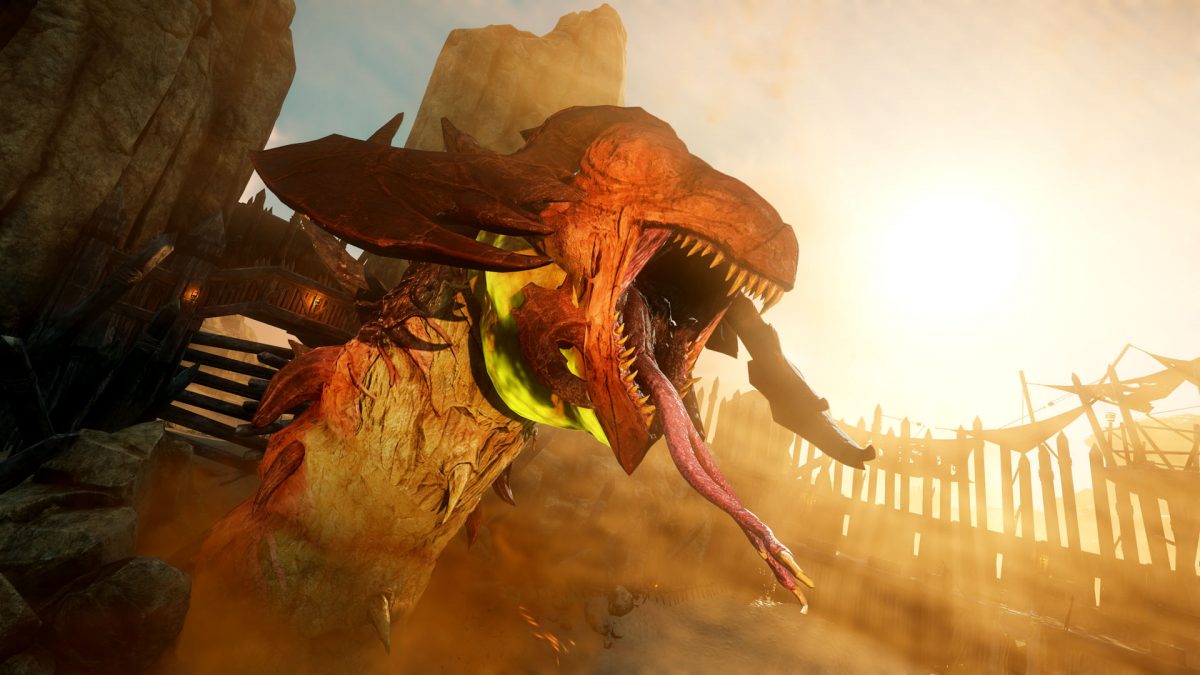
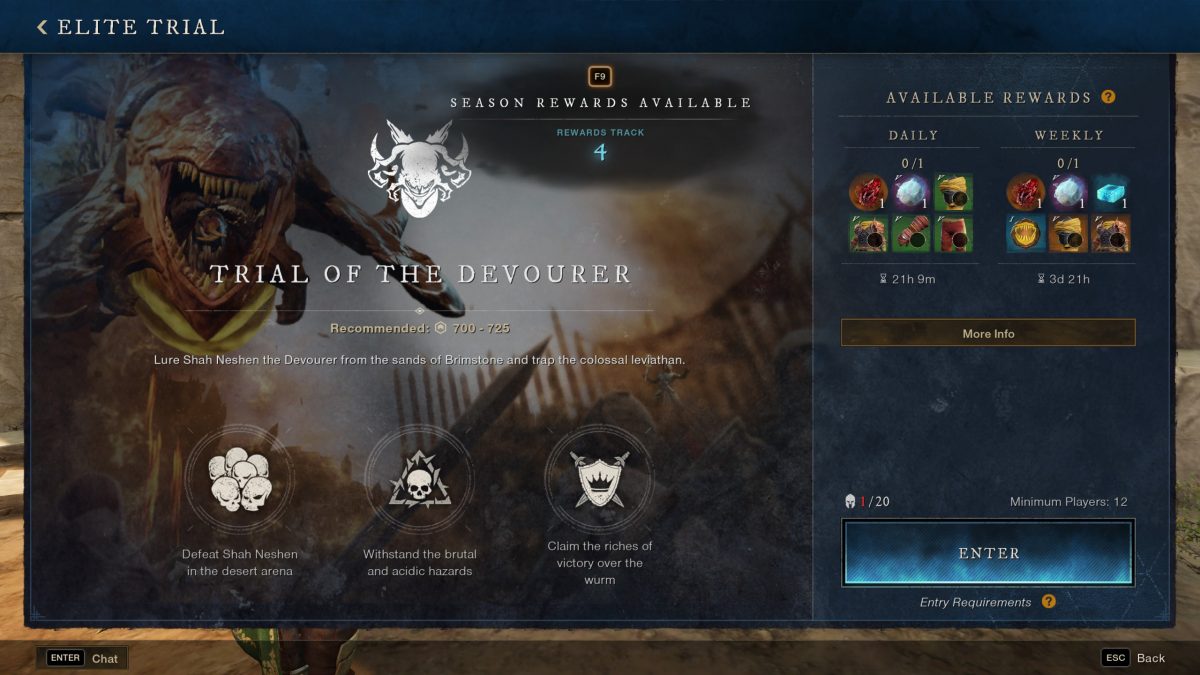
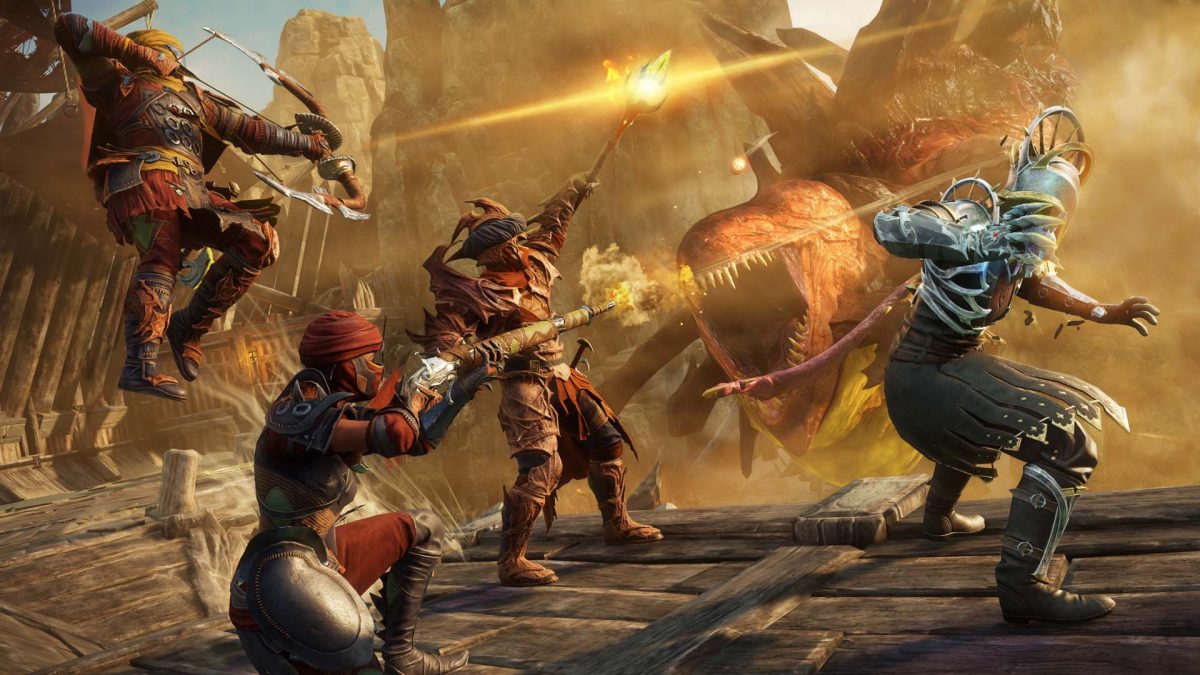
The Sandwurm raid, also known as the Elite Trial: Arena of Shah Neshen, The Devourer, was introduced in New World Aeternum with the introduction of season two: Blood of the Sands.
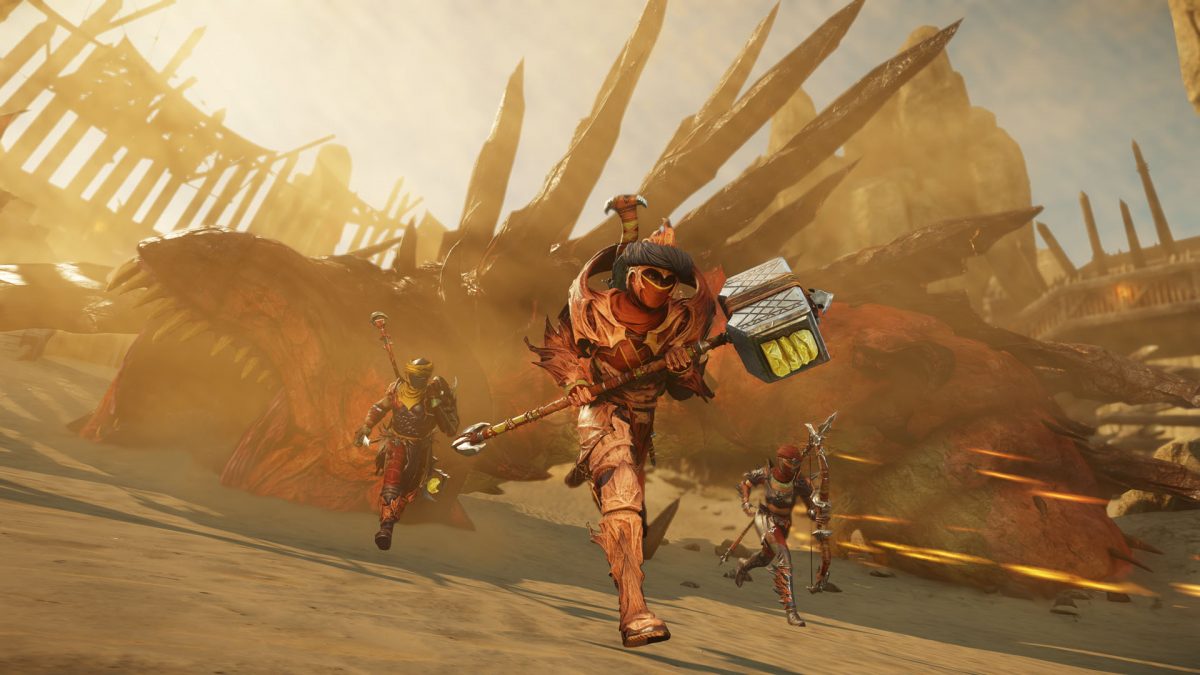
This raid is a 20 player PvE event, and is intended to be an incredibly challenging end game event. The below guide outlines the rewards you will receive from defeating the sandwurm, the location of the raid, the type of gear you will need, and a complete walkthrough of the raid.
Sandwurm Raid Rewards
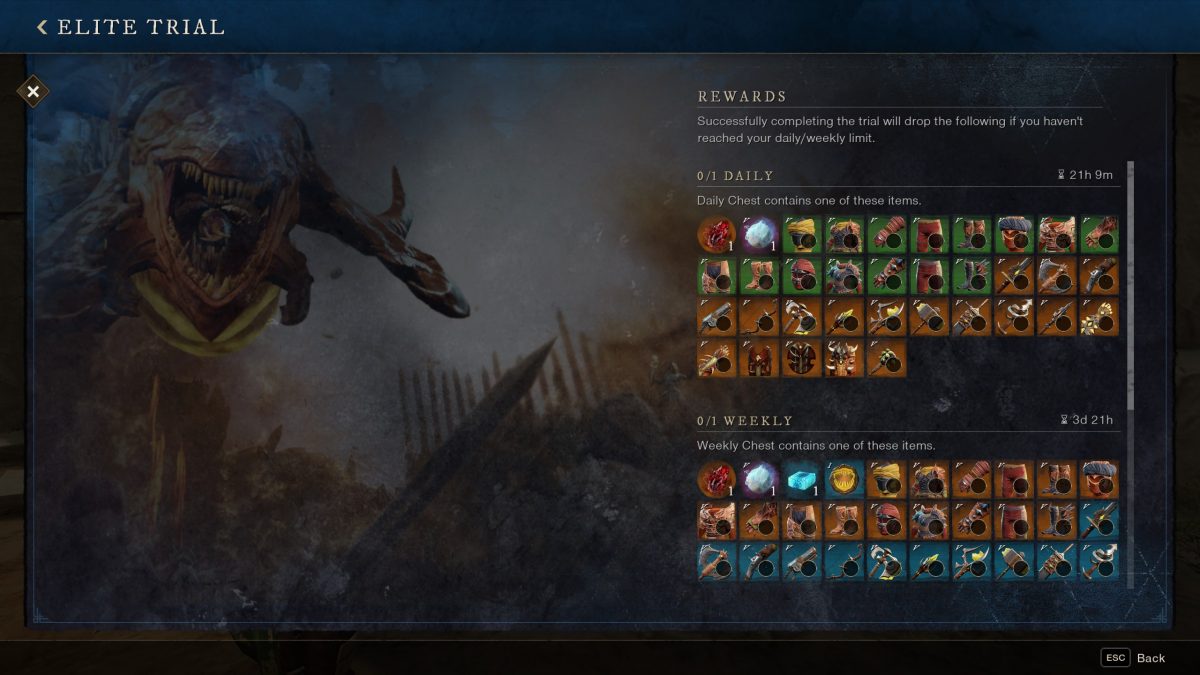
Defeating the sandwurm will yield you with weekly, daily, and basic rewards. You will also obtain the Minor Heartrune of the Devourer when defeating the sandwurm.
Weekly
The Major Sandwurm Spoils Reward Cache can be earned once per week and will contain:
- Named Sandwurm gear up to gear score 710
- 3 Gypsum Orbs
- 400 Dark Matter
- Heartrune of the Devourer Tier 1
- 500 Sandwurm Materia (see sandworm items below)
Daily
The Minor Sandwurm Spoils Reward Cache can be earned once per day and will contain:
- Sandwurm gear up to gear score 710
- 80 Dark Matter
- 1 Gypsum Orb
Basic
The following rewards will be earned after each victory:
- 1 Rolled Sandwurm item
- 20 Dark Matter
Named & Rolled Sandwurm Items
The below table lists all of the sandwurm items that can be obtained from the major and minor sandwurm spoils from the trial. You can use 1000 Sandwurm Materia to craft the Duneborn weapons and the Shah Neshen jewelry.
Armor
| Item | Armor Weight | Cache |
|---|---|---|
| Sclerite Armor Set | Light | Minor |
| Sclerite Armor Set | Medium | Minor |
| Sclerite Armor Set | Heavy | Minor |
| Silken Set | Light | Minor / Major |
| Dune Set | Medium | Minor / Major |
| Sandlion Set | Heavy | Minor / Major |
Shields
| Item | Shield Type | Cache |
|---|---|---|
| Full Duneborn Shield | Kite Shield | Minor / Major |
| Round Duneborn Shield | Round Shield | Minor / Major |
| Tall Duneborn Shield | Tower Shield | Minor / Major |
| Full Sclerite Shield | Kite Shield | Major |
| Round Sclerite Shield | Round Shield | Major |
| Tall Sclerite Shield | Tower Shield | Major |
Weapons
| Item | Weapon Type | Cache |
|---|---|---|
| Duneborn Flail | Flail | Minor / Major |
| Duneborn Stylet | Sword | Minor / Major |
| Duneborn Pincer | Great Axe | Minor / Major |
| Duneborn Vent | Musket | Minor / Major |
| Duneborn Hollow | Blunderbuss | Minor / Major |
| Duneborn Quarry | Bow | Minor / Major |
| Duneborn Hook | Hatchet | Minor / Major |
| Duneborn Photocyte | Fire Staff | Minor / Major |
| Duneborn Illicium | Life Staff | Minor / Major |
| Duneborn Maul | War Hammer | Minor / Major |
| Duneborn Tusk | Great Sword | Minor / Major |
| Duneborn Épée | Rapier | Minor / Major |
| Duneborn Stinger | Spear | Minor / Major |
| Duneborn Ice Crawler | Ice Gauntlet | Minor / Major |
| Duneborn Hajdi | Void Gauntlet | Minor / Major |
| Sclerite Flail | Flail | Major |
| Sclerite Stylet | Sword | Major |
| Sclerite Pincer | Great Axe | Major |
| Sclerite Vent | Musket | Major |
| Sclerite Hollow | Blunderbuss | Major |
| Sclerite Quarry | Bow | Major |
| Sclerite Hook | Hatchet | Major |
| Sclerite Photocyte | Fire Staff | Major |
| Sclerite Illicium | Life Staff | Major |
| Sclerite Maul | War Hammer | Major |
| Sclerite Tusk | Great Sword | Major |
| Sclerite Épée | Rapier | Major |
| Sclerite Stinger | Spear | Major |
| Sclerite Ice Crawler | Ice Gauntlet | Major |
| Sclerite Hajdi | Void Gauntlet | Major |
Jewelry
| Item | Jewelry Type | Cache |
|---|---|---|
| Amulet of Shah Neshen | Amulet | Minor / Major |
| Ring of Shah Neshen | Ring | Minor / Major |
| Earring of Shah Neshen | Earring | Minor / Major |
Sandwurm Raid Location, Gear Needed, & General Info
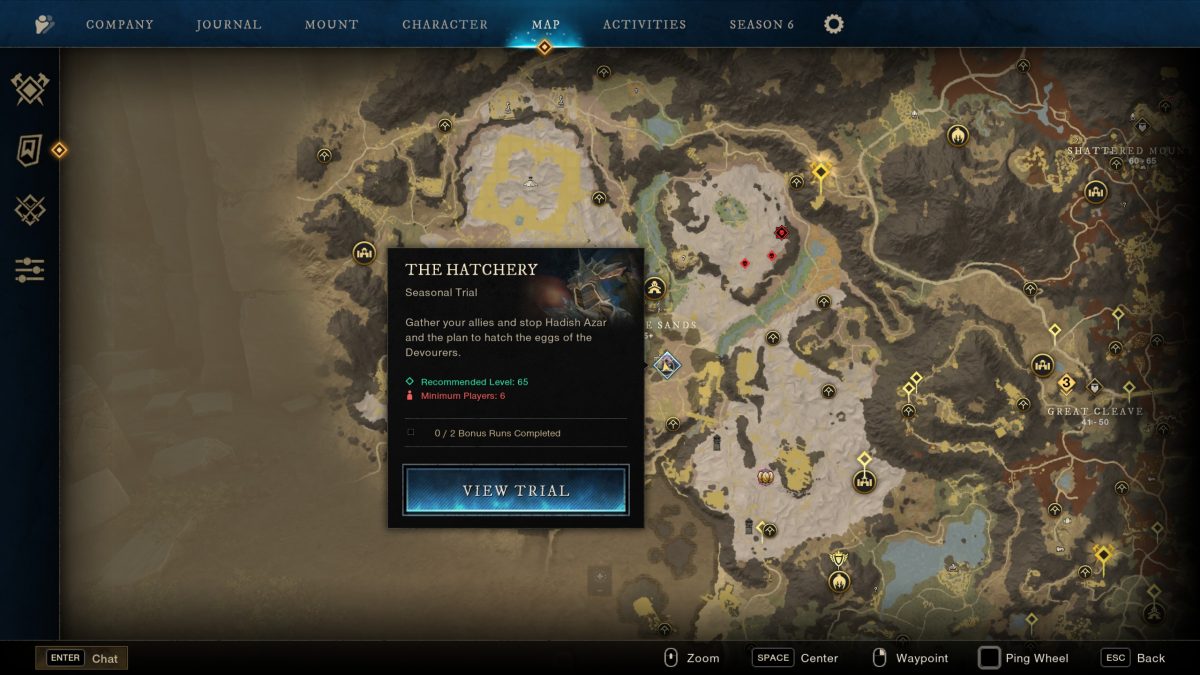
The Sandwurm raid is located in southwest Brimstone Sands. You can fast travel to the Wurmsign Obelisk and run north in order to gain quick access to the Trial, and you can utilize the Activity menu.
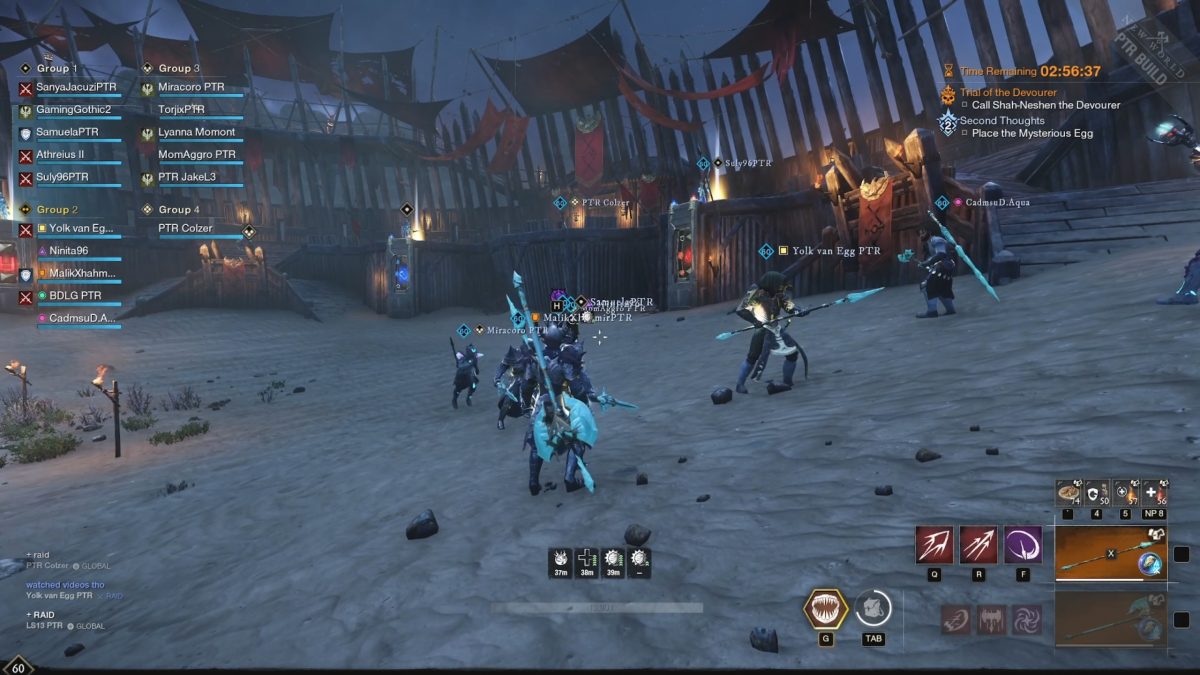
In order to enter the Trial of the Devourer you will need to be in a raid group of a minimum of 12 players. However, the recommended group size in order to complete the trial is a raid group of 20. The recommended team composition consist of:
- 2 Tanks
- 2 Healers
- 16 DPS (Most with melee main and ranged secondary)
Once inside the Sandwurm arena you will be met with several variations of ads and of course the sandwurm itself. All of the mobs inside of the arena are classified as beast type mobs. You will want to have beast coatings and beast ward potions in order to maximize damage and mitigation against the mobs inside of the arena.
The sandwurm deals quite a lot of acid damage as well. Therefore, you will want to make sure you bring acid tinctures along with you. It’s a good idea to have chitin padding slotted in your gear in order to increase your acid resistance.
However, if you are primarily playing the melee DPS role you want to slot jaspers over chitin padding. The sandwurm’s swipes and other melee attacks deal strike. The slotted japers will increase your survivability significantly.
Sandwurm Raid Walkthrough
Light Mechanic
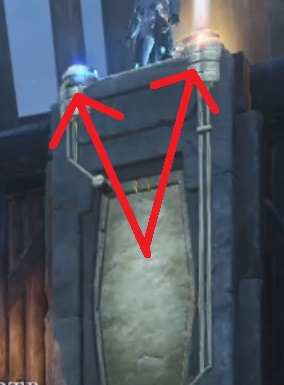
Whenever you first enter the arena there will be a “tutorial” for the light mechanic that will be used throughout the raid. There are a total of 4 light platforms. You will need to have 1 player stand on each of the light platforms. This will activate either a red or blue light beneath that player on the wall. The player standing on the light platform can not see their own light below them, and if you are on the ground in front of the light you will not be able to see it if you are standing too close.
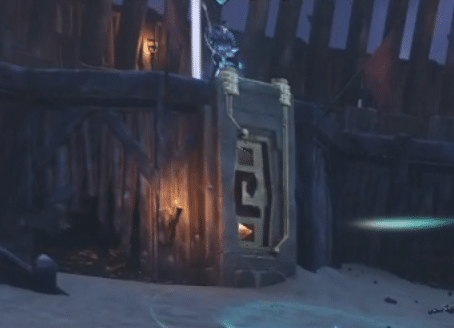
In order to see the light you must be a little distance away from it if you are standing on the ground. This means that you will need someone in the group to shot call the colors of the lights after 4 players stand on them.
A good way to do this is to number the lights. If you’re are standing on the ground you can number the lights 1-4 from right to left. After the lights are lit up someone will need to call out what color each of the lights are. For example:
R,R,B,B which would indicate starting from right to left the colors would be red, red, blue, blue. The players on the appropriate platforms will then need to interact with either the red light or the blue light on the top of the platform. They must choose the light that matches the light underneath them.
If this is performed correctly your raid group will receive a buff. This buff will overcharge you allowing you to deal bonus shield stamina damage. It only lasts for a short duration so it’s incredibly important to perform this light mechanic at the appropriate time during the fight. Once you have this buff you will be able to break the shield of the shielded enemies within the arena.
You will need to perform this mechanic once in order to actually begin the raid. You will also need to perform the light mechanic multiple times throughout the raid.
FAILING THE LIGHT MECHANIC
If the light mechanic is failed, the platform that fails the color will insta kill anyone that stands on it for a short duration. Make sure if this happens you do not go near the light that was activated wrong.
Also, make sure you do not get off the platform once it’s activated until everyone has activated their light. If you step off and then back on the sequence of lights will reset.
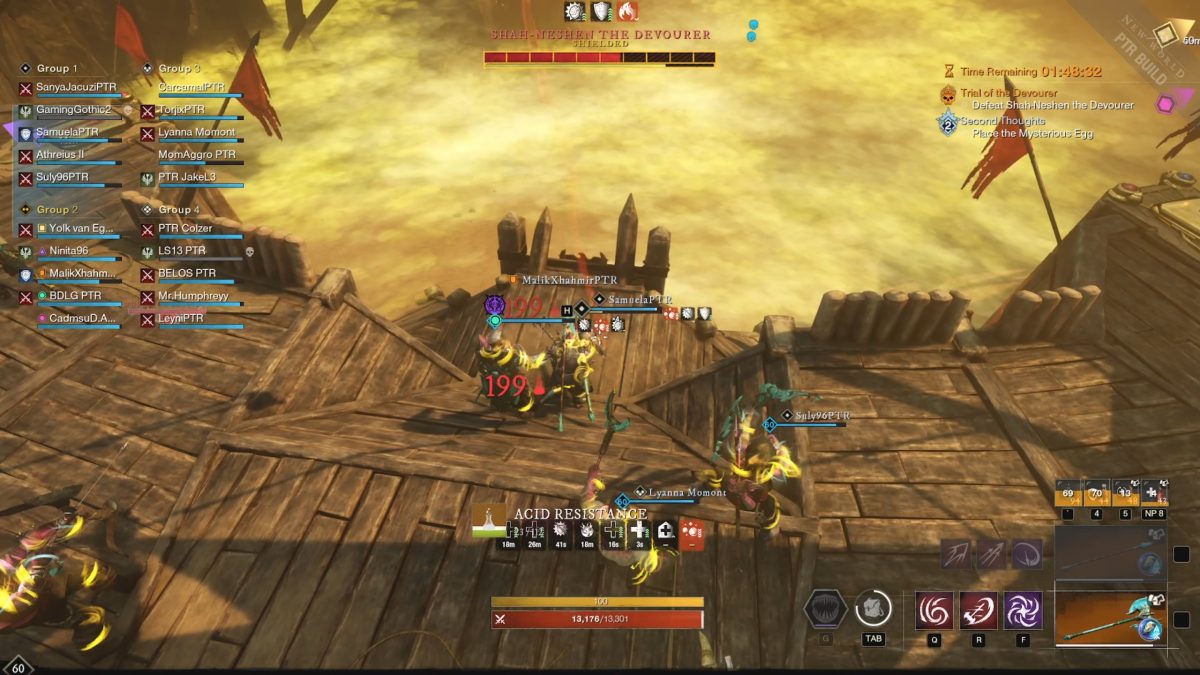
DPS Phase
In order to begin the raid you will need to bang on the huge drum in the arena. This will summon Shah Neshen, The Devourer. There will be a 10 second window from the time you bang the drum until the boss reaches the arena. Once he’s in the arena he will perform a knockdown on everyone. This does not deal a ton of damage, and you can dodge the knockdown if timed correctly.
You will want to make sure the ranged DPS are on the platform, but not standing on the lights. All melee DPS should be within melee range in order to start dealing damage.
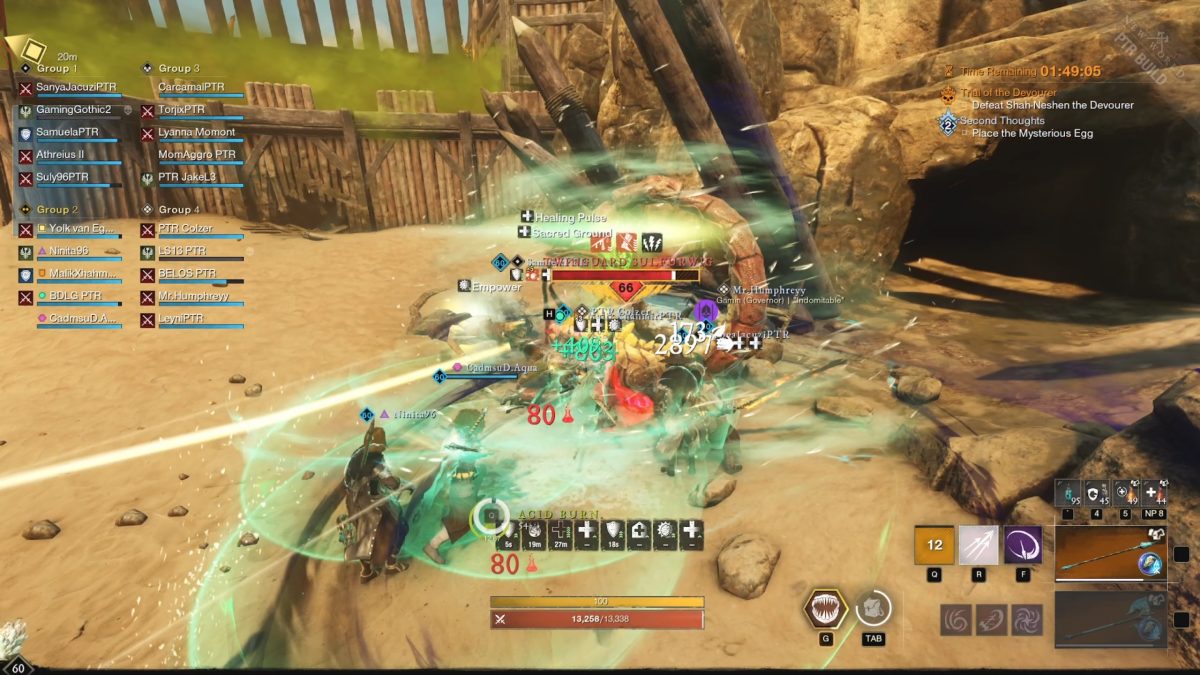
From here you will have a damage phase. So, you will want to immediately head to the boss and start to deal as much DPS as possible. During this phase the wurm will perform some big headswings. As long as you are in melee range or on the platform you will not get hit. Just continue to DPS the boss when this is happening.
The boss will also perform some quicker swipes with his head that will hit all of the melee DPS. Make sure you are aware of the swipes and block when they happen. Having jaspers slotted into your armor will significantly improve your survivability as a melee DPS.
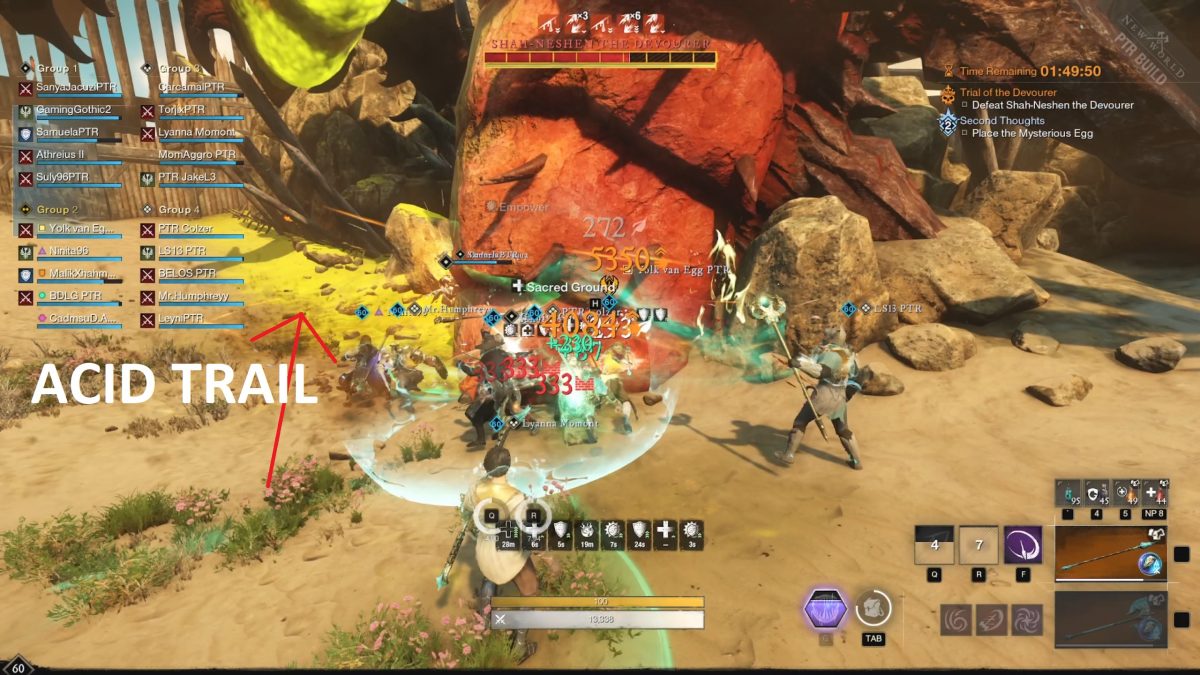
Acid Spew & Acid Trail
All ranged players need to be on the lookout for the head dip and spit animation. You will see the boss spew out acid balls into the air. When this happens all ranged players should focus their efforts on the acid orbs to take them out before they hit the ground. If these hit hit ground they will stun you and deal a ton of damage so make sure you avoid them.
From here the boss will go back to normal for a bit. A short time after he will then perform the first acid trail attack. This will cover an area straight ahead of where the wurm spits the acid. The trail will reach all the way up to the platform. Because of this, the tanks will always want to stay on the left side of the wurm. Whenever they aggro they will want to make sure the wurm spews the acid as far left as possible. This will ensure the acid is out of the main arena area, and more importantly doesn’t land on the lights.
If you are hit by the acid you will receive acid burn and take a ton of damage. You also do not want to stand in the acid if the tank fails to draw the acid trail to the side of the arena. If the acid trail lands on a light you will not be able to activate the light until it disappears, which can make things incredibly difficult for your group.
Ads
After the boss performs the acid trail there will be several ads that spawn, including shielded enemies. You will need to correctly perform the light mechanic in order for the raid group to have the shield break buff. Make sure you hard target the shield mobs first and then clear the other mobs after. This is to ensure the shield break buff does not end prior to killing the mobs with shields.
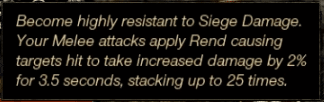
Whenever the ads with the shield are killed they will drop a sword. The melee DPS need to interact with the sword. This will provide a huge buff. You will become highly resistant to sige damage. Your melee attacks will apply rend that will stack up to 25 times. Getting this buff is essential to pumping out additional DPS to defeat the wurm.
After the ads are cleared the sandwurm may perform another acid trail, normal spitting attacks, or a heavy head swing that deals a lot of damage. So, be aware of those once you begin to DPS again. After a short time there will then be 2 scorpions spawned in.
Scorpions
The scorpions will be spawned from caves on either side of the sandwurm. Your tanks should still be positioned to the left of the boss. They will take and maintain aggro of the the scorpion on their side. All DPS will need to focus the scorpion on the right side and burn it down quickly. Once the right scorpion is dead the DPS will then transition to the remaining scorpion and kill it.
While the scorpion phase is happening the boss will burrow himself underneath the ground. You will see a circle on the ground and the boss will then come up and chomp anyone caught in the circle. This also leaves an acid burn circle on the ground. This is typically a one-shot mechanic, so you do not want to be caught in the circle.
Also, you do not want the scorpions to get close to each other. This will cause the scorpions to grow bigger and become stronger making them harder to kill.
During this phase there will be an acid cloud on the top of the arena. This will force your ranged off of the ledge and down into the arena. Make sure no one in the group stands by the stairs during this time. If the boss targets them the acid circle will block your way back up the stairs.
Poison Clouds
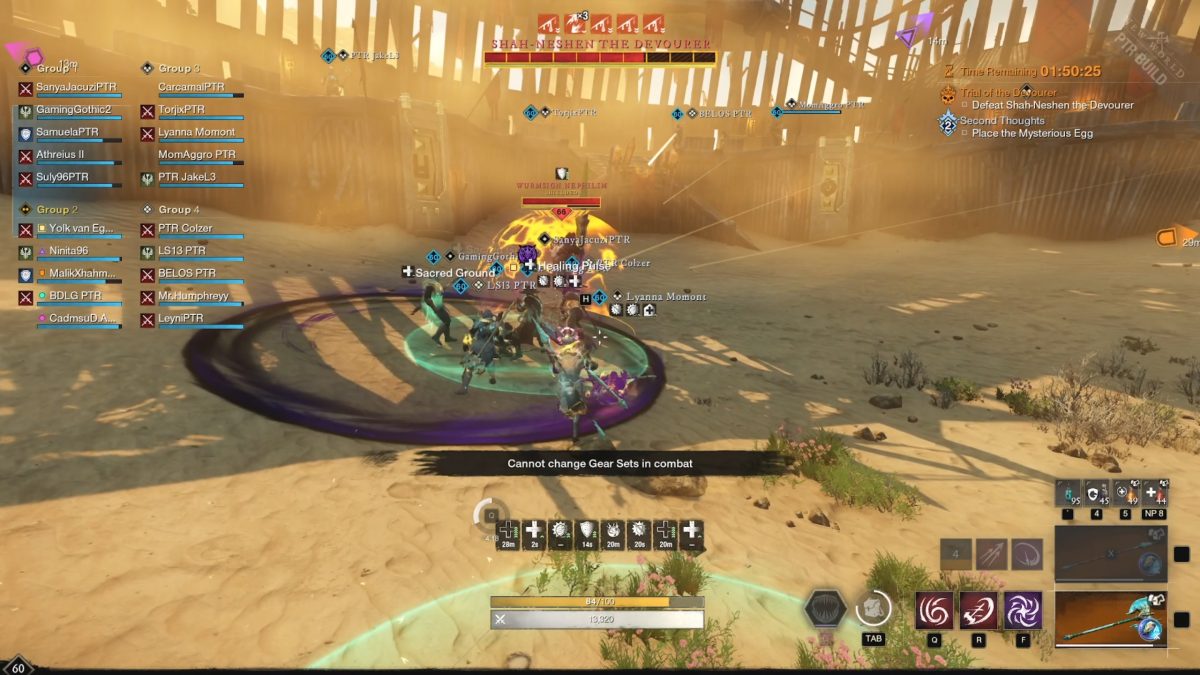
After the scorpions are dead, the entire raid group needs to run up the stairs and onto the platform. As soon as you run up the stairs you will need to activate the light mechanic as well in order to get the shield breaking buff. When the sandwurm pops up he will have a shield. You will need to break the shield in order to progress to the next phase. So, all ranged DPS need to focus on the wurm.
During this time, you will want to have two healers on the left and 2 on the right. Your DPS should be split in half as well. Melee DPS will want to stand on the lower platform right up the stairs, as well as 1 tank on each side, with everyone else all the way up on the higher platform.
The sandwurm will shoot out a huge cloud of poison covering the lower arena, and being on the platform will avoid the poison cloud. However, there will also be ads during this phase that run up the stairs. This is why the melee DPS stay on the lower section. You will want to take out the ads before they reach the higher area of the platform.
The sandwurm can also perform the acid trail during this phase so be aware that you’re not hit by it, or standing in it after it happens.
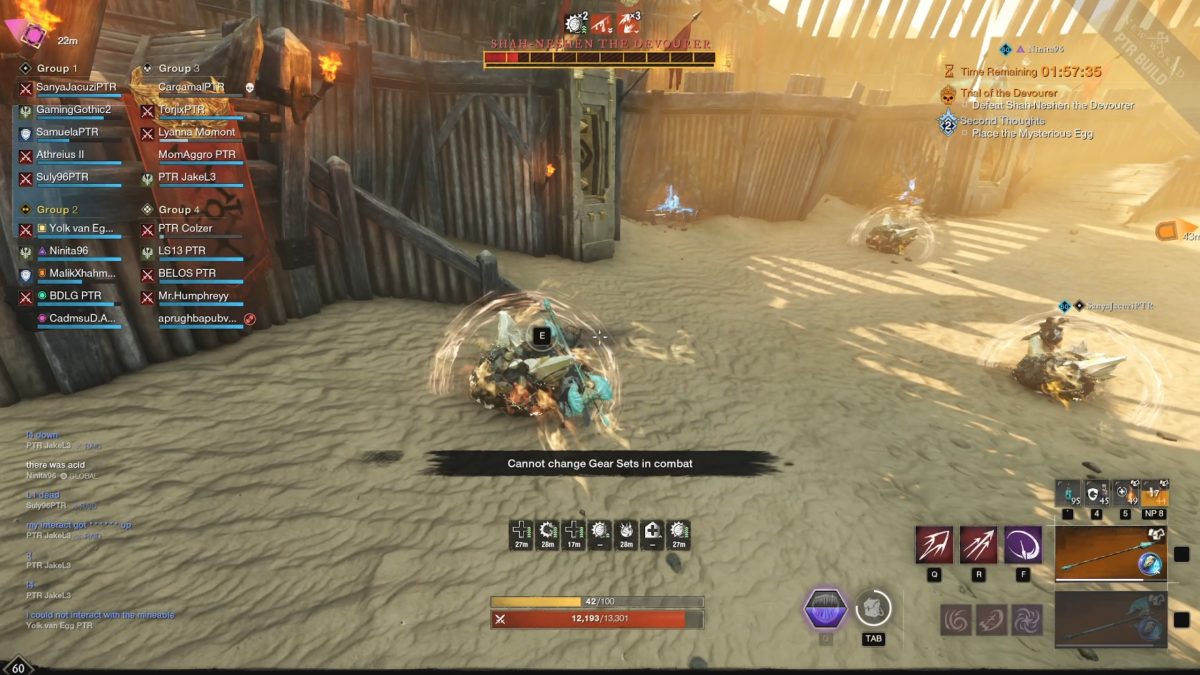
Pellet Bombs
After the scorpion phase has been performed once there is a chance for the wurm to spawn in pellet bombs on the ground. These can spawn anywhere in the arena, on the top or the bottom. When these spawn they need to be priority by the group.
In order to mine these pellet bombs you just simply run up to it and mine it as you would an iron node. While mining the rocks you need to be mindful of the huge sandwurm neck swipe. If you don’t avoid it you could be one shot. If you fail to mine the rocks they will explode, deal damage, and stun your group. The more rocks that are unmined the more damage the explosion will do. This can wipe your group if the bombs are not cleared.
Fight Summary
In order to take out the sandwurm make sure you’re aware of the above mechanics. Throughout the duration of the fight the mechanics will continue to repeat.
Things will get pretty hectic once the pellet bombs begin to fill the arena. Making sure these are diffused are the priority. However, ads can spawn at the same time forcing the light mechanic to need activating as well. Just make sure you clear the bombs first and then focus on the lights and then the ads.
During the duration of the fight the tanks should be on the left side of the boss. This will help direct the acid trail to the edge of the arena. This will also ensure that they can get aggro of one of the scorpions, making that phase much easier when it happens.
After the scorpions are killed, make sure you make your way up the stairs and do not stay in the bottom of the arena. If you do not go up to the platform you will die to the poison clouds. Once up to activate the lights phase and DPS the boss to break the shield and continue the fight.
Video
For more New World Aeternum guides be sure to check our comprehensive guide library!