
Introduction
Fishing in New World is a fun and fruitful way to spend your time in Aeterum! For everything you need to know, continue reading our New World Fishing Guide!
Getting Started
Fishing is a gathering trade skill in New World that allows players to gather fish from fishing nodes that will be used in crafting trade skill, Cooking.
When first starting out you will need a wooden fishing pole to start gathering nodes. This requires engineering level 0 along with 1 fiber and 1 green wood to craft it. Fiber will need a flint sickle and a hemp plant. Once all are obtained a tier 1 camp fire or workshop is required to craft the wooden fishing pole. Once crafted you will need to equip it and you can start gathering.
Higher character levels are able to use better tiers of Fishing Fishing Poles:
| Tier | Item | Level Requirement | Max Cast Distance |
|---|---|---|---|
| 1 | Wooden Fishing Pole | 1 | 12 Meters |
| 2 | Treated Wood Fishing Pole | 5 | 14 Meters |
| 3 | Aged Wood Fishing Pole | 20 | 16 Meters |
| 4 | Wyrdwood Fishing Pole | 40 | 18 Meters |
| 5 | Ironwood Fishing Pole | 45-55 | 20 Meters |
| 5 | Runewood Fishing Pole | 61+ | 22 Meters |
It is advised to use the highest gear score possible to increase your casting distance.
Different Types of Fishing Locations and Bait
Fishing locations are broken down into two categories Standard Locations and Hotspots. As you fish in these locations you will get fish appropriate to their real life locations. So for example Trout will come from freshwater and not from saltwater, or squids would be saltwater not freshwater.
Fresh water consists of rivers and lakes (can loot buckets of water from it). Saltwater consists of oceans and swamps.
Types of Bait and Bonuses
| Water Type | Bait Name | Obtained | Description | |
|---|---|---|---|---|
| Fresh | Meat Bait | Cooking / Scorpling | 150% Higher Fish Size Chance | x |
| Fresh | Woodlouse Bait | Gathered from Bushes | 70% Higher Fish Rarity Chance | x |
| Fresh | Firefly Bait | Gathered from Bulrush | 90% Higher Fish Rarity Chance. | x |
| Salt | Nightcrawler Bait | Gathered from Flint | 70% Higher Fish Rarity Chance | x |
| Salt | Glowworm Bait | Gathered from Flint | 90% Higher Fish Rarity Chance | x |
| Fresh / Salt | Basic Fish Bait | Cooking / Gathered from Elysian Ambrosia | 75% Higher Fish Rarity Chance 200% Higher Fish Size Chance | x |
| Fresh / Salt | Premium Fish Bait | Cooking / Gathered from Clams, Oysters, Eels, Snails | 100% Higher Fish Rarity Chance 500%Higher Fish Size Chance | x |
| Fresh / Salt | Exceptional Fish Bait | Fishing Aptitude Crates | 150% Higher Fish Rarity Chance 800% Higher Fish Size Chance | x |
Hotspots
- Broad Hotspots 30 fish, 15-25 minute respawn
- Common Fish 45% chance
- Uncommon Fish 40% chance
- Rare Fish 10% chance
- Legendary Fish less than 5% chance
- Rare Hotspots 20 fish, 25-40 minute respawn
- Common Fish 0% chance
- Uncommon Fish 65% chance
- Rare Fish 30% chance
- Legendary Fish about 5% chance
- Secret Hotspots 10 fish, 45-90 minute respawn
- Common Fish 0% chance
- Uncommon Fish 20% chance
- Rare Fish 70% chance
- Legendary Fish about 10% chance
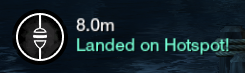
TIP: There are over 75+ hotspot pools and each one has fixed locations in the designated hotspots. Hotspots are tracked with higher levels of fishing and are confined to the shaded areas on the map. You must meet the required Fishing Level to discover each hot spot. You can locate all fishing hotspots by using our interactive map.
In those designated areas you will find circles of fish in which you will need to land your line in to get the hotspot bonus. If successful you will get a “Landed in Hotspot!” text on the screen indicating you are getting said bonuses.
How to level Fishing
The information contained in this section will assist you in leveling your Fishing Trade Skill. We will cover the basics first and then some suggestions.
Starting out after either crafting your T1 Pole or doing the first quest in “Fishing with Shields” you will need to gather or buy some bait. In conjunction with doing the fishing quest line we are looking to use bait that will increase the rarity of our fish.
Let’s break down the basic action of fishing into parts to better understand the best way to gain experience.
Fishing Action
- Equipping Bait
- Casting
- Hooking
- Reeling In
Equipping Bait
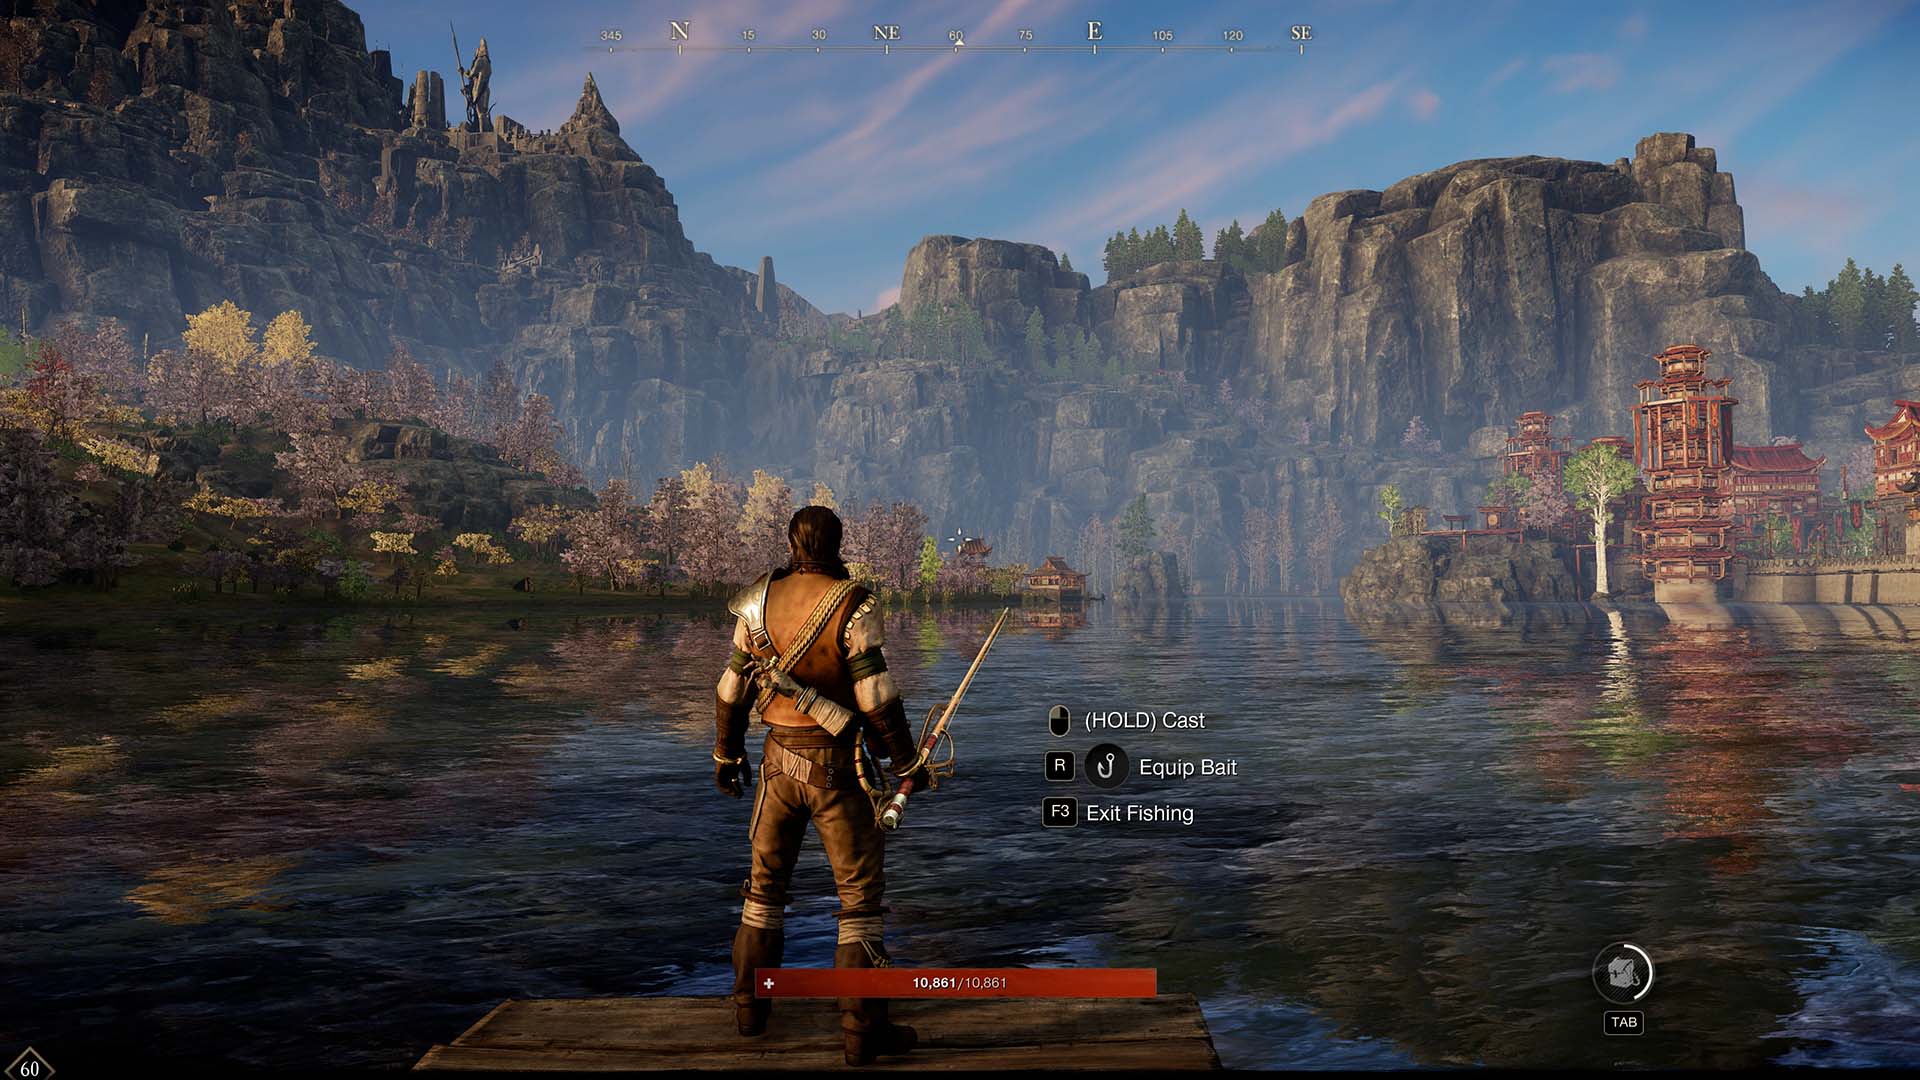
To equip the bait, hit F3 to pull out your fishing pole then hit R to bring up the bait menu.
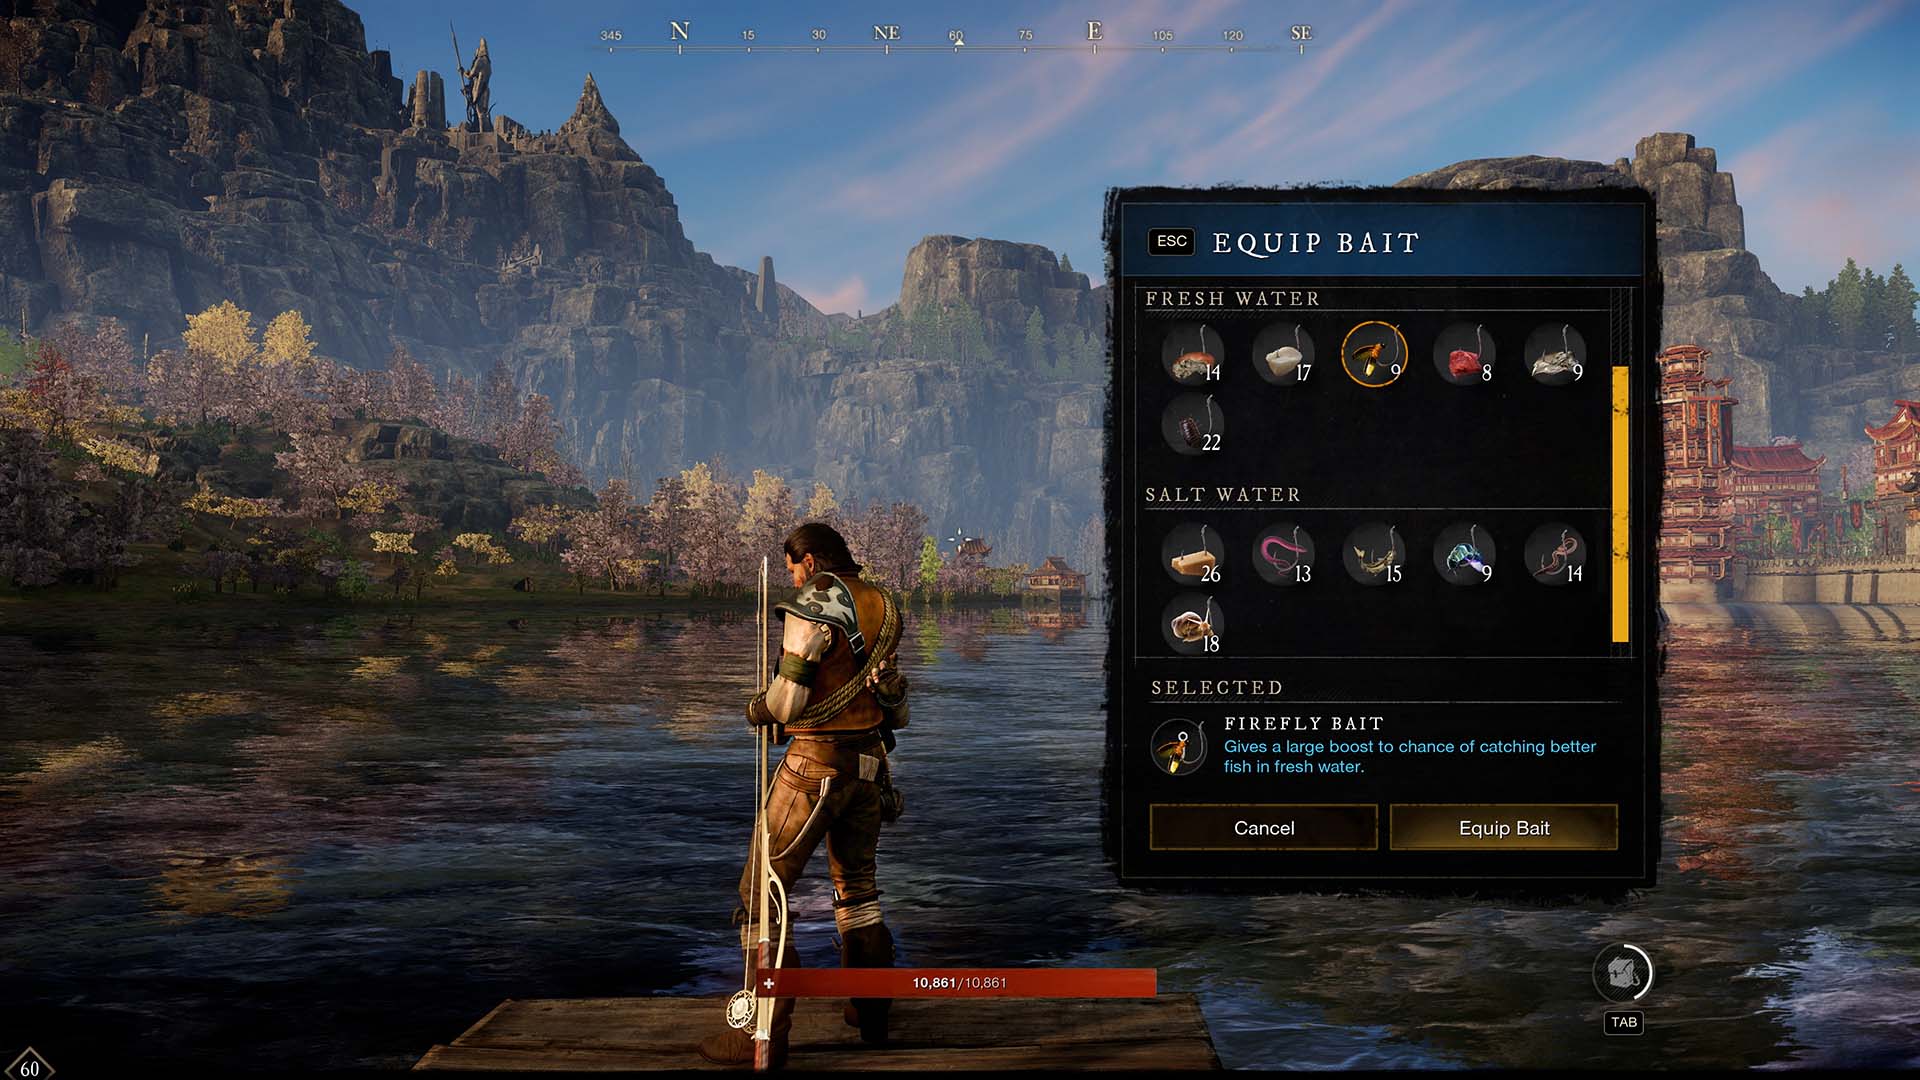
Now you will want to select the type of bait for the type of water we are fishing in as well as if we want bigger or rarer fish. Refer to the Standard Fishing Locations and Bait section of this guide for more information.
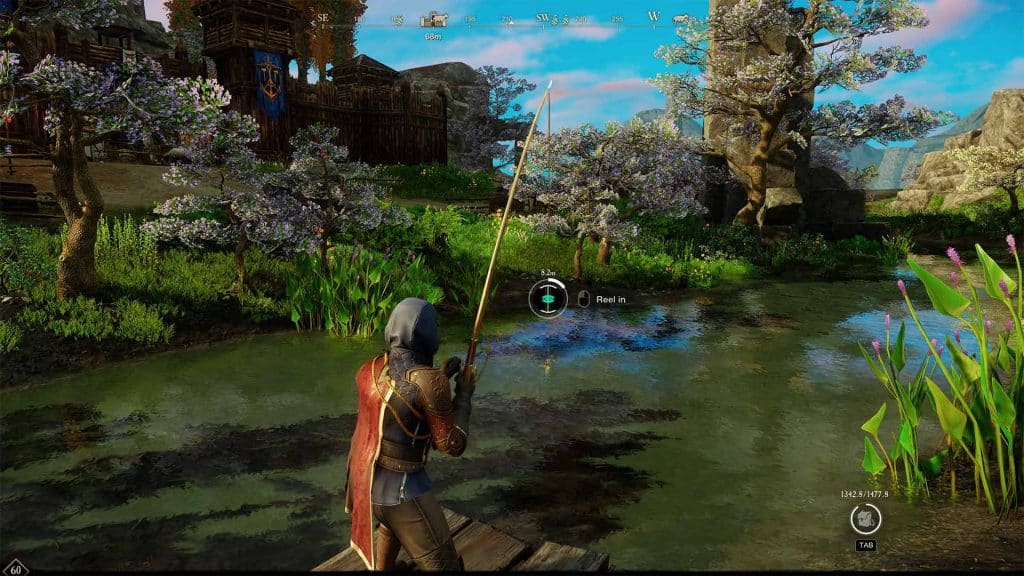
Casting
After you equip your bait it’s time to cast your line. To cast, hold left click and this will start the casting mini-game. A gauge will pop up on screen.
Here we are trying to get to max so when the diamond gets to the top let go of left click. If you manage to stop at the top you will see it say MAX and a chime will sound.
Note: The further you cast, the easier it will be to reel in the fish during the reel-in mini-game.
Hooking
This is where we hold our breath for the bite mini-game. The factor to the time delay between casting and fish biting is depth of the water.
Time Delay
- Freshwater
- Deep Water 5-15 seconds
- Shallow Water 10-25 seconds
- Very Shallow Water 20-30 seconds
- Saltwater
- Deep Water 5-15 seconds
- Shallow Water 10-20 seconds
- Very Shallow Water 15-25 seconds
Fishing in deeper water and getting a longer cast will cut down on the fishing time and help you level up faster.
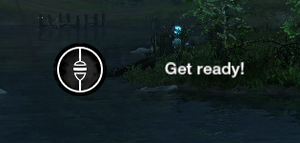
After your line is in the water we are waiting for the bite mini-game. The bobber will start shaking and it will say “Get ready!” don’t let this throw you off.
Wait for the icon of a fish and hook with a timer. This is when you should click to hook your fish. If you don’t click before the timer runs out you will miss your fish and have to recast your line.

Reeling In
Next up is the tension mini-game. Let’s also break this up into smaller bits. First is understanding the icon(s).

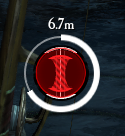
This icon shows the tension meter in the center and is color-coded.
- Green – Low Tension
- Orange – Medium Tension
- Red – High Tension (About to break)
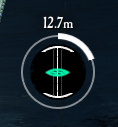
The outer circle indicates how close the fish is to being reeled in. The more complete the circle is, the closer the fish is.
when the fish bites you want to hold left click to reel in the fish, as you do so the tension will go up. If the fish is fighting back the tension will go up faster. As the tension gets to the orange level you will want to stop holding left click to stop reeling in and let the tension drop back down to a lower level.
Once the tension has dropped back down you can left-click again to start reeling in again. If the tension gets into the red and touches the two curved lines the line will break and you will lose the fish.
The level of your fishing, size, and rarity of the fish as well as your cast distance will all determine how difficult it will be to reel in the fish.
Experience
Experience is gained off two factors one being fish size and the other fish rarity.
Rarity
- Common Fish 15-120 experience
- Uncommon Fish 150-163 experience
- Rare Fish 175-200 experience
- Legendary Fish 550 experience
Note: The range for each quality is influenced by the size of the fish.
Now that we know how to fish, where do we actually fish? The short answer is any hotspot with the two star Rare Hotspots while using the appropriate bait based upon the fresh/salt water location. To maximize your experience gain when fishing you will want to be using bait that increases the rarity chance and fish in a hotspot as often as possible. Specifically the pools of jumping fish. You will want to have perks for your preferred fishing spot such as the Lucky Waters perk to boost the chance of catching rare fish or Freshwater Colossus for catching bigger fish in freshwater if that is where you are fishing. We will break down the perks in the Perks section of this guide.
TIP: Use the interactive map to find your perfect hotspot!
Focus at 250 points is ideal while leveling. Having 250 points will give you 20% fishing line tension, a 10% weight reduction to fish, and 10% increase to caught fish size. The 100 point bonus doesn’t help leveling directly but can get you some extra bait from the salvaged fish, while the 300 point bonus can be helpful if you are fishing in the same area as your set Inn.
Types of Fish and Where to Find Them
There are several different types of fish you can catch in Aeternum. They are separated by rarity, common, uncommon, Rare, and Legendary.
Common Fish
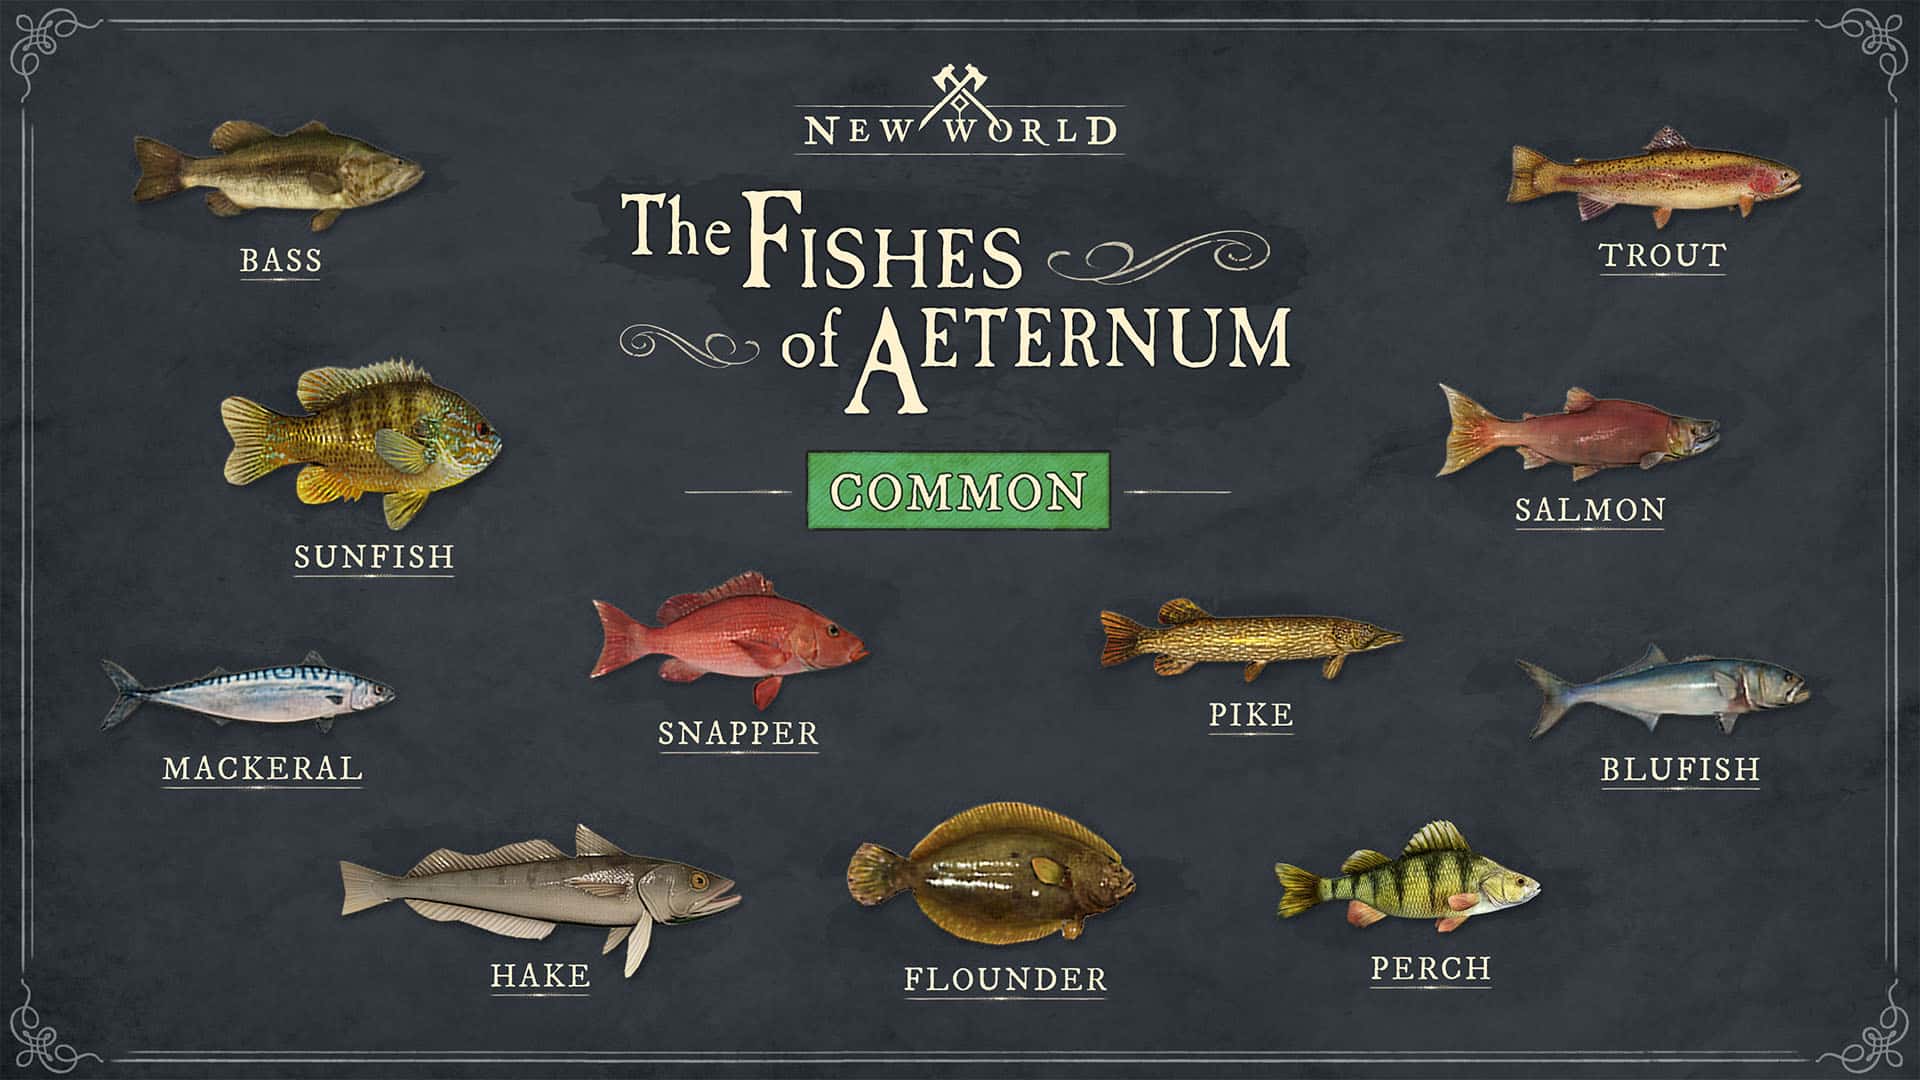
There are variations of each type of fish that include small, medium, and large. You can find the entire list of fish by checking here. Below is the list of all the large fish and their locations in New World Aeternum.
| Fish | Type | Location |
|---|---|---|
| Bass | Freshwater | Everfall, Brightwood, Weaver’s Fen, Great Cleave, Ebonscale Reach, Reekwater, Elysian Wilds |
| Bluefish | Saltwater | Monarch’s Bluffs, Everfall, Cutlass Keys, Restless Shore, Ebonscale Reach, Reekwater |
| Flounder | Saltwater | Windsward, Everfall, Weaver’s Fen, Reekwater, Brimstone Sands, Elysian Wilds |
| Hake | Saltwater | Windsward, Cutlass Keys, Restless Shore, Mourningdale, Ebonscale Reach, Elysian Wilds |
| Mackerel | Saltwater | Windsward, Weaver’s Fen, Restless Shore, Mourningdale, Ebonscale Reach, Brimstone Sands |
| Perch | Freshwater | Windsward, Everfall, Weaver’s Fen, Restless Shore, Edengrove, Reekwater, Shattered Mountain |
| Pike | Freshwater | Any Freshwater |
| Salmon | Freshwater / Saltwater | Any Freshwater or Saltwater |
| Snapper | Saltwater | Monarch’s Bluffs, Windsward, Cutlass Keys, Restless Shore, Ebonscale Reach, Elysian Wilds |
| Sunfish | Freshwater | Windsward, Everfall, Brightwood, Cutlass Keys, Mourningdale, Edengrove, Shattered Mountain, Brimstone Sands |
| Trout | Freshwater | Monarch’s Bluffs, Everfall, Brightwood, Weaver’s Fen, Great Cleave, Edengrove, Shattered Mountain |
Uncommon Fish
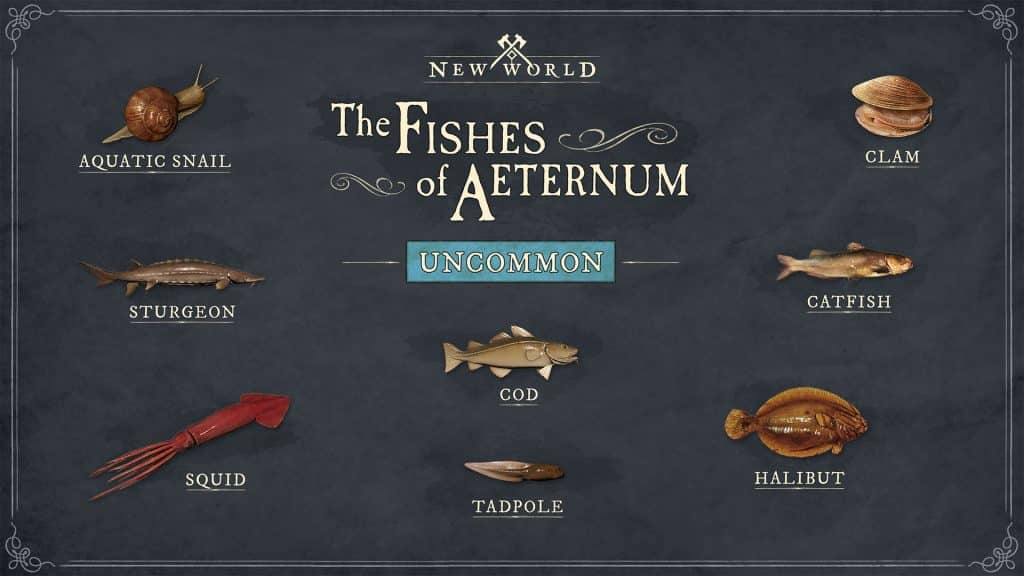
| Fish | Type | Location |
|---|---|---|
| Catfish | Freshwater | Monarch’s Bluffs, Windsward, Everfall, Cutlass Keys, Restless Shore, Mourningdale, Edengrove, Ebonscale Reach, Shattered Mountain, Brimstone Sands |
| Clam | Saltwater | Windsward, Everfall, Cutlass Keys, Weaver’s Fen, Mourningdale, Ebonscale Reach, Elysian Wilds |
| Cod | Saltwater | Monarch’s Bluffs, Windsward, Weaver’s Fen, Mourningdale, Ebonscale Reach, Reekwater, Brimstone Sands |
| Halibut | Saltwater | Windsward, Everfall, Cutlass Keys, Weaver’s Fen, Mourningdale, Ebonscale Reach, Elysian Wilds |
| Squid | Saltwater | Monarch’s Bluffs, Cutlass Keys, Restless Shore, Ebonscale Reach, Reekwater, Brimstone Sands |
| Sturgeon | Freshwater & Saltwater | Windsward, Brightwood, Weaver’s Fen, Great Cleave, Mourningdale, Shattered Mountain, Elysian Wilds |
| Tadpole | Freshwater | Monarch’s Bluffs, Everfall, Brightwood, Cutlass Keys, Restless Shore, Great Cleave, Edengrove, Ebonscale Reach, Reekwater, Shattered Mountain |
Rare Fish
| Fish | Type | Location |
|---|---|---|
| Dragon Fish | Freshwater & Saltwater | Everfall, Great Cleave, Edengrove, Ebonscale Reach, Shattered Mountain, Elysian Wilds |
| Electric Eel | Freshwater | Monarch’s Bluffs, Everfall, Brightwood, Great Cleave, Edengrove, Reekwater, Shattered Mountain, Brimstone Sands |
| Frogfish | Saltwater | Monarch’s Bluffs, Windsward, Everfall, Cutlass Keys, Weaver’s Fen, Reekwater, Elysian Wilds |
| Madtom | Freshwater | Monarch’s Bluffs, Windsward, Cutlass Keys, Weaver’s Fen, Great Cleave, Mourningdale, Edengrove, Ebonscale Reach, Brimstone Sands |
| Paddlefish | Freshwater | Monarch’s Bluffs, Brightwood, Weaver’s Fen, Restless Shore, Great Cleave, Mourningdale, Reekwater, Shattered Mountain, Elysian Wilds |
| Oyster | Saltwater | Cutlass Keys, Restless Shore, Mourningdale, Ebonscale Reach, Brimstone Sands |
| Piranha | Freshwater | Everfall, Cutlass Keys, Restless Shore, Great Cleave, Ebonscale Reach, Reekwater |
| Sculpin | Freshwater & Saltwater | Windsward, Everfall, Restless Shore, Edengrove, Brimstone Sands, Elysian Wilds |
| Speartooth Shark | Freshwater | Windsward, Brightwood, Cutlass Keys, Weaver’s Fen, Edengrove, Shattered Mountain |
| Stingray | Saltwater | Windsward, Cutlass Keys, Weaver’s Fen, Restless Shore, Mourningdale, Ebonscale Reach |
| Swordfish | Saltwater | Monarch’s Bluffs, Everfall, Weaver’s Fen, Mourningdale, Reekwater, Elysian Wilds |
Legendary Fish
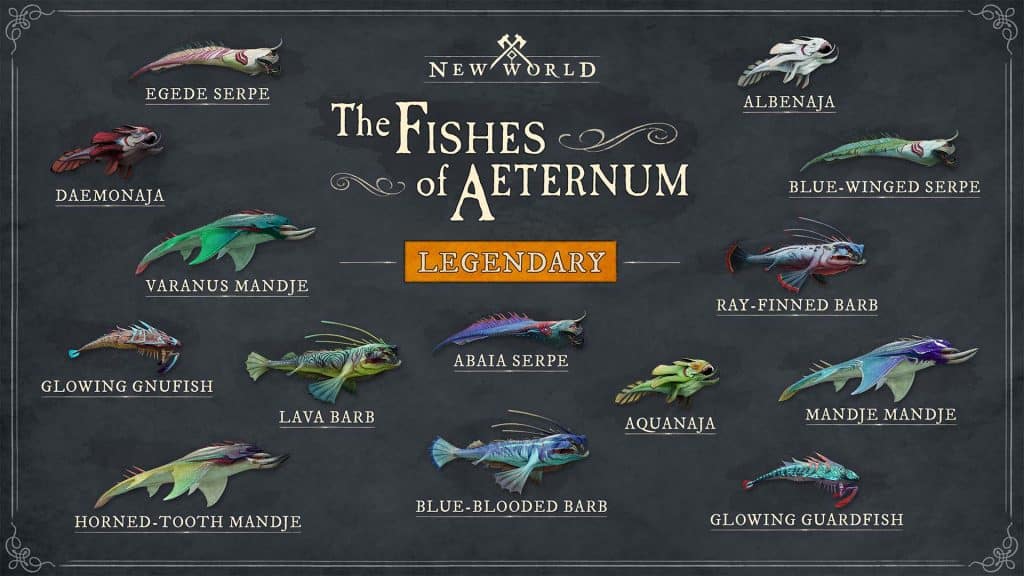
Legendary fish all have home territories. However, there is a chance to catch any legendary in any territory.
| Fish | Type | Location |
|---|---|---|
| Horned-Tooth Mandje | Freshwater & Saltwater | Reekwater |
| Albenaja | Freshwater & Saltwater | Great Cleave |
| Anmisema | Freshwater & Saltwater | Brimstone Sands |
| Abaia Serpe | Freshwater & Saltwater | Edengrove |
| Aquanaja | Freshwater & Saltwater | Monarch’s Bluff |
| Daemonaja | Freshwater & Saltwater | Ebonscale Reach |
| Mandje Mandje | Freshwater & Saltwater | Elysian Wilds |
| Blue-Winged Serpe | Freshwater & Saltwater | Windsward |
| Glowing Gnufish | Freshwater & Saltwater | Cutlass Keys |
| Lava Barb | Freshwater & Saltwater | Shattered Mountain |
| Ray-Finned Barb | Freshwater & Saltwater | Brightwood |
| Egede Serpe | Freshwater & Saltwater | Weaver’s Fen |
| Varanus Mandje | Freshwater & Saltwater | Mourningdale |
| Glowing Guardfish | Freshwater & Saltwater | Restless Shore |
| Blue-blooded Barb | Freshwater & Saltwater | Everfall |
| Prismatic Barb | Freshwater & Saltwater | Elysian Wilds |
Fishing Quest Chain
There is a 12 quest chain for fishing that starts with talking to Perronelle le Noir in Windsward. The quests will give you fishing experience and the final quest gives you a Legendary Fishing Pole Pole.
Below is the quest in order:
- To Unpathed Waters
- And Undreamed Shores
- The Good Squire
- This Melancholy Bait
- The Idle Squire
- Thou Deboshed Fish!
- Gilded Tombs do Worms Enfold
- The Woe of Squires
- Rots From the Head Down
- The Regent’s Wounds
- Depths Close Round About
- The Fisher King Returned
Enhancing your Fishing
Buffs and perks are the 2 main ways to enhance your Fishing.
Fishing Perks are unique and can only be applied to Fishing Poles as we can’t craft fishing gear. The rarity of the pole determines how many perks it can have just like any other tool. Fishing Poles are special as well as they are the only Trade Skill Tool that can be legendary.
Buffs can stack if they come from different sources. For example, I can stack yield increase buff from a Proficiency potion and territory control. If you attempt to stack buffs from the same source it will just refresh your buff timer.
There is a Fisherman’s armor set that is ideal for players to use while Fishing as it should always come with Fishing Perks. These are obtained from the fishing quest line and from the T5 Supply Chests in the high level Elite zones.
Each Perk has a related Crafting Mod that can be used in crafting to guarantee the perk in crafting and has been listed within the Perks section in the chance that you may want a crafted Fishing Pole with the given perk.
New World Fishing World Perks
Brawn
- Freshwater Brawn I 10% Line Strength in freshwater
- Freshwater Brawn II 15% Line Strength in freshwater
- Freshwater Brawn III 20% Line Strength in freshwater
- Saltwater Brawn I 10% Line Strength in saltwater
- Saltwater Brawn II 15% Line Strength in saltwater
- Saltwater Brawn III 20% Line Strength in saltwater
Colossus
- Daytime Colossus I Small boost to chance of catching larger fish during daytime
- Daytime Colossus II Medium boost to chance of catching larger fish during daytime
- Daytime Colossus III Large boost to chance of catching larger fish during daytime
- Freshwater Colossus I Small boost to chance of catching larger fish in freshwater
- Freshwater Colossus II Medium boost to chance of catching larger fish in freshwater
- Freshwater Colossus III Large boost to chance of catching larger fish in freshwater
- Nighttime Colossus I Small boost to chance of catching larger fish during nighttime
- Nighttime Colossus II Medium boost to chance of catching larger fish during nighttime
- Nighttime Colossus III Large boost to chance of catching larger fish during nighttime
- Saltwater Colossus I Small boost to chance of catching larger fish in saltwater
- Saltwater Colossus II Medium boost to chance of catching larger fish in saltwater
- Saltwater Colossus III Large boost to chance of catching larger fish in saltwater
Lucky
- Lucky Day I Small boost to chance of catching better fish during daytime
- Lucky Day II Medium boost to chance of catching better fish during daytime
- Lucky Day III Large boost to chance of catching better fish during daytime
- Lucky Night I Small boost to chance of catching better fish during nighttime
- Lucky Night II Medium boost to chance of catching better fish during nighttime
- Lucky Night III Large boost to chance of catching better fish during nighttime
- Lucky Waters I Small boost to chance of catching bigger fish
- Lucky Waters II Medium boost to chance of catching bigger fish
- Lucky Waters III Large boost to chance of catching bigger fish
Reach
- Moons Reach I 5% Cast Distance during nighttime
- Moons Reach II 15% Cast Distance during nighttime
- Moons Reach III 20% Cast Distance during nighttime
- Suns Reach I 5% Cast Distance during daytime
- Suns Reach II 10% Cast Distance during daytime
- Suns Reach III 15% Cast Distance during daytime
Trophies
- Minor Fishing Gathering Trophy Increase Fishing Luck by 2500 points
- Basic Fishing Gathering Trophy Increase Fishing Luck by 5000 points
- Major Fishing Gathering Trophy Increase Fishing Luck by 9000 points
Focus Bonus
- 50 Points +10% fishing line tension
- 100 Points +10% yield increase when salvaging
- 150 Points -10% decrease in weight of fish
- 200 Points +10% fishing line tension
- 250 Points +10% increase to caught fish size
- 300 Points -10% cooldown reduction for Inn fast travel
Music Buffs
You can check our Music guide for a full breakdown of the music trade skill.
- Decidedly Dexterous: Gathering speed increases by 75% for 30-90min.
- Fortune’s Favor: Gathering yield increases by 3%-10% for 30-90min.
- Luck’s Labor: Gathering luck increases by 2% – 5% for 30-90min.
New World Fishing Guide Conclusion
This completes our New World Fishing Guide! For a detailed map of all the hotspot locations, check out our interactive map!