
Introduction
A dark tide rises in Aeternum with the arrival of Admiral Blackpowder and his dastardly crew! Learn more about this expedition including drops, boss mechanics, and a complete walkthrough in our Barnacles & Black Powder expedition guide.
Barnacles & Black Powder Drops
There are many unique drops to obtain in Barnacles & Black Powder Expedition. The following are the named drops in the expedition.
Barnacles & Black Powder Weapon Drops
The following drops require the Rise of the Angry Earth Expansion
The following drops DO NOT require the Rise of the Angry Earth Expansion
| Weapon | Where it Drops | Difficulty |
|---|---|---|
| The Hook | Admiral Blackpowder | Normal |
| Brodesode | Admiral Blackpowder | Normal |
| Explorers Friend | Admiral Blackpowder | Normal |
| Mastwrap | Admiral Blackpowder | Normal |
| Deep Hole | Admiral Blackpowder | Normal |
| Song of the Sea | Admiral Blackpowder | Normal |
| Priscilla’s Shield | Nereid | Normal |
| Expanse | Nereid | Normal |
| Melting Point | Nereid | Normal |
| Arrowspine | Expedition Wide | Normal |
| Driftwood | Expedition Wide | Normal |
| Maul of Fathoms | Expedition Wide | Normal |
| Soul Spine | Expedition Wide | Normal |
| Grasp | Expedition Wide | Normal |
| Brinicle | Expedition Wide | Normal |
| Iridescence | Expedition Wide | Normal |
| Firewood | Expedition Wide | Normal |
Barnacles & Black Powder Armor Drops
The following drops require the Rise of the Angry Earth Expansion
| Armor | Where It Drops | Difficulty |
|---|---|---|
| Void Darkplate (Artifact) | Nereid | Mutation 1+ |
| Admiral’s Claw | Admiral Blackpowder | Mutation 3 |
| Admiral’s Peg | Admiral Blackpowder | Mutation 3 |
| Admiral’s Pantaloons | Admiral Blackpowder | Mutation 3 |
| Admiral’s Tricorn Cap | Admiral Blackpowder | Mutation 3 |
| Admiral’s Petticoat | Admiral Blackpowder | Mutation 3 |
| Siren’s Gloves | Nereid | Mutation 3 |
| Siren’s Boots | Nereid | Mutation 3 |
| Siren’s Thighguards | Nereid | Mutation 3 |
| Siren’s Headwear | Nereid | Mutation 3 |
| Siren’s Chestwrap | Nereid | Mutation 3 |
| Brined Armor Set (Light) | Expedition Wide | Mutation 1+ |
| Brined Armor Set (Medium) | Expedition Wide | Mutation 1+ |
| Brined Armor Set (Heavy) | Expedition Wide | Mutation 1+ |
| Frosted Tips | Expedition Wide | Normal+ |
| Sinking Petticoat | Expedition Wide | Normal+ |
| Soggy Hat | Nereid | Normal+ |
| Thin Britches | Admiral Blackpowder | Normal+ |
| Padded Shoes | Admiral Blackpowder | Normal+ |
The following drops DO NOT require the Rise of the Angry Earth Expansion
| Armor | Where It Drops | Difficulty |
|---|---|---|
| Admiral’s Claw | Admiral Blackpowder | Normal |
| Admiral’s Peg | Admiral Blackpowder | Normal |
| Admiral’s Pantaloons | Admiral Blackpowder | Normal |
| Admiral’s Tricorn Cap | Admiral Blackpowder | Normal |
| Admiral’s Petticoat | Admiral Blackpowder | Normal |
| Siren’s Gloves | Nereid | Normal |
| Siren’s Boots | Nereid | Normal |
| Siren’s Thighguards | Nereid | Normal |
| Siren’s Headwear | Nereid | Normal |
| Siren’s Chestwrap | Nereid | Normal |
| Wanderers Pants | Nereid | Normal |
| Lost Souls Gloves | Expedition Wide | Normal |
| Shoes of Seine | Expedition Wide | Normal |
| Waterlogged Shirt | Expedition Wide | Normal |
| Quaint Helm | Expedition Wide | Normal |
Barnacles & Black Powder Jewelry Drops
The following drops require the Rise of the Angry Earth Expansion
| Jewelry | Where It Drops | Difficulty |
| Privateer’s Heriloom | Nereid | Normal+ |
| Plundered Hoop | Nereid | Normal+ |
| Seafaring Blessing | Expedition Wide | Normal+ |
| Waterlogged Amulet | Expedition Wide | Mutation 2+ |
| Waterlogged Ring | Expedition Wide | Mutation 2+ |
| Waterlogged Earring | Expedition Wide | Mutation 2+ |
The Following drops DO NOT require the Rise of the Angry Earth Expansion
| Jewelry | Where It Drops | Difficulty |
|---|---|---|
| Teardrop | Expedition Wide | Normal |
| Damp | Expedition Wide | Normal |
| Droplet | Expedition Wide | Normal |
Other Drops
| Item | Where is Drops | Difficulty |
|---|---|---|
| Powerful Hastey Talisman | Chompers and Aligator Adds | Mutation 1+ |
Barnacles & Black Powder Location and General Information
Location and Lore
A dark tide rises in Aeternum with the arrival of Admiral Blackpowder and his dastardly crew! Questgivers in the Cutlass Keys settlement and the docks on the territory’s eastern shore will be looking to offer you loot and renown for defeating the despicable evil within the new Barnacles & Black Powder expedition.
Rumors suggest there might be an even greater power within the Admiral’s hold. Not to mention, more than meets the eye… as with most things in Aeternum, of course.
Barnacles & Black Powder is a level 65 expedition located at the bottom tip of Cutlass Keys. It is an end-game expedition and is part of the expedition mutation rotation.
Types of Enemies
Most of the enemies you’ll encounter in the expedition fall into the Lost Mob category. The Lost have weaknesses to strike (10%), ice (15%), and nature damage (30%).
*Note There are several beast mobs in this expedition. Also, the final boss Nereid is a hybrid mob type. Hanging your Beast and Angry Earth Trophies, along with your Lost Trophy, is advised.
How to Enter Barnacles and Black Powder
In order to enter Barnacles and Black Powder (like all New World Expeditions), someone in your party will need to be at the entrance to enter.
There is a limit on the number of expeditions you can run.
- 15 Normal Expedition runs per player per day or 105 per week, per player.
- 35 Mutated Expedition runs per week.
You can also utilize the dungeon expedition group finder to find a group and enter the expedition. The group finder can be accessed through the expedition entrance UI or from the map by clicking on the Expedition map icons. You can also utilize the activities tab in your menu to access a dungeon queue for random groups.
You can browse listings created by other players, or post your own request to join other players on your server. This tool allows you to declare your preferred team role, such as DPS, tank, or healer. You can recruit based on those roles. You can also set recruiting requirements like minimum gear score and level, then inspect members to learn their average gear score, weapons, and mastery levels.
Map
Repeatable Quests
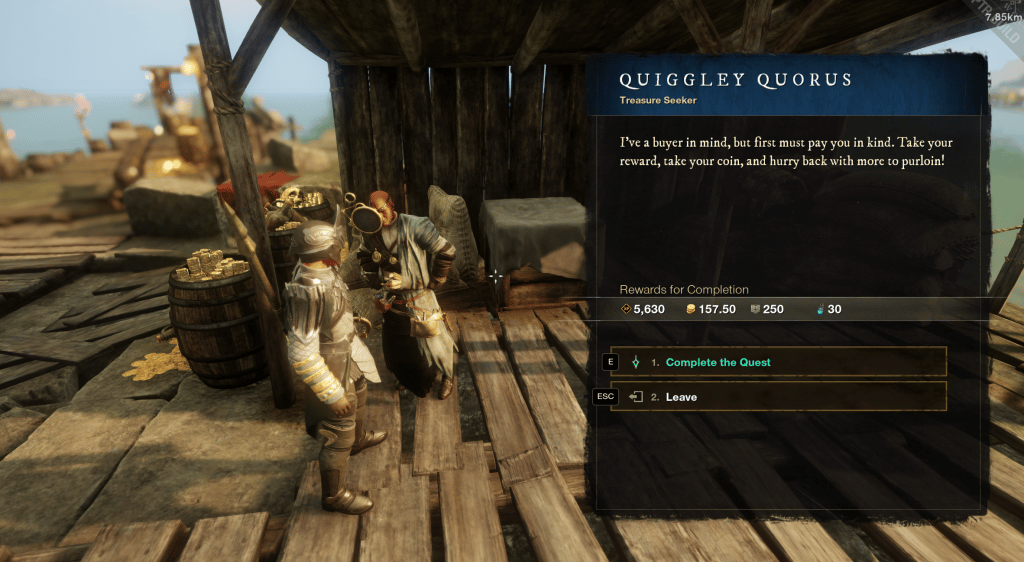
You can speak to Quiggley Quorus for a repeatable quest just before you reach the expedition entrance. This quest will get rewards such as loot caches, gold, and gypsum orbs.
You can also go to your faction vendor in Cutlass Keys and pick up the faction quest associated with the expedition.
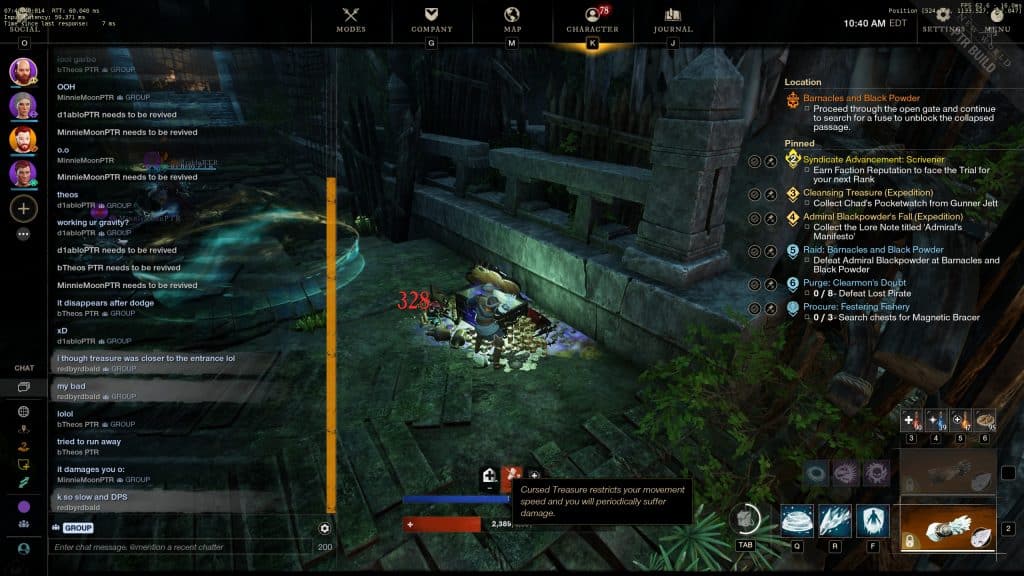
Cursed Treasure
This is a unique mechanic to the Barnacles & Black Powder expedition. As you travel through the expedition you will run into cursed treasure on the ground. If you touch the cursed treasure, you will be slowed and afflicted with a DOT. Be careful not to touch them, especially while in combat. Cursed Treasure mostly comes into play during mutations.
Barnacles & Black Powder Complete Walkthrough
Once you enter the expedition, clear the enemies in the room then talk to the NPC Antonio. Once you speak to him, the switch to the right of the gate ahead will start to glow. Someone will need to hit the switch with a ranged attack to open the gate. This is an introduction to a mechanic you will see throughout the expedition.
Third Officer Gibbs and Gunner Jett
Fight through the group of enemies in the “Old Salt Footpath” until you reach the mini-boss, Third Officer Gibbs. Once defeated, you will see another gate ahead. The switch to this gate is inside the next hallway and will require a ranged attack to hit the switch. Move into the “Black Flag Grove” and defeat the next mini-boss, Gunner Jett. This will unlock the chest in the room to the right. Loot it then open yet another gate by shooting the switch behind the door.
Chompers and Master of Arms
Once through the gate, move into the “Dry Rum Passageway” and into the cavern. You will see black powder kegs to your right that you will use later in the expedition. Careful of the explosive mobs in this room. Defeat them and move up the stairs into “The Crows Nest“. You will encounter another group of mobs here that you will need to defeat. Continue up the stairs and head off the ledge into the “The Borken Bones” to the subsequent boss encounter.
This is a 3 wave encounter filled with Lost mobs and alligators. Group up the first pull and AOE them down. Make sure to coordinate your grouping and CC skills to clear the wave. Next Chompers and another group of mobs will spawn. The Tank will want to pull Chompers while the rest of the group takes the other adds and AOE’s them down.
Beware of Chompers Lunge attack. It hits twice and deals a large amount of damage.
Once the 2nd wave is down, Master of Arms and the third wave will spawn. Next, the tank should take aggro of the adds and Master of Arms. The group should then AOE the mobs down and finish the encounter. Kill the explosive mobs that run into the room and then loot the chest.
Head to the north and defeat the mini-boss Fire Agent Jones. After defeating her, pick up the tool from the toolbox and head back to the “Dry Rum Passage”. On your way, you’ll run into another group of mobs. Kill them and move on!
2nd Officer Bartham and First Officer Well
Light the fuse to blow up the wall, then head through the passage to the “Black Flag Cove”. From here, you’ll continue to head down the stairs and fight through a couple of groups of mobs. Once you reach the deck, you will fight the next mini-boss, 2nd Officer Bartham. Once down, there will be a chest to loot to the east. Another switch is located on the deck that a ranged member of the party will need to hit to progress further.
Once the switch is hit, the bridge will lower to the ship. Here, you will fight First Officer Wells and complete a mechanic you will need to learn for the upcoming boss fight. First, locate the canon balls inside the ship’s cabin. Then, you’ll need to fire a cannon at the stack of black powder kegs on the ledge to the south. This will expose another switch that will need to be hit by a ranged attack. This lowers the bridge on the other side, allowing you to enter the first boss fight of the expedition, Admiral Blackpowder.
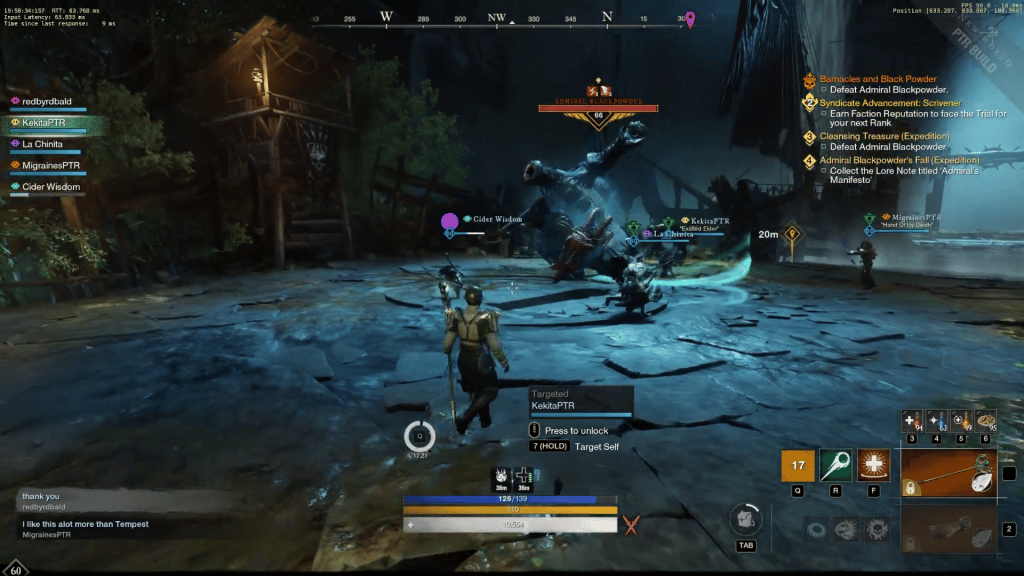
Admiral Blackpowder Boss Guide
Admiral Blackpowder is a Level 66 Lost Elite Boss that has several mechanics you’ll need to master in order to defeat.
Admiral Blackpowder Boss Mechanics
- Slash – Admiral Blackpowder swipes in a forward AOE attack
- Barrel Toss – Admiral Blackpowder chucks an explosive black powder keg into the arena. Players must destroy it to prevent it from exploding.
- Canon Bash – Blackpowder takes the cannon from his back and swings it, knocking down his target.
- Retreat – Admiral Blackpowder jumps to the upper deck of the arena and spawns 3 lookouts. This starts a new set of mechanics
- Spawn Lookouts – Admiral Blackpowder spawns 3 adds.
- Bomb Barrage – A line of bombs is launched at players in the arena. Players must avoid getting damaged by dodging through bomb barrage at the correct time.
- During the final 2 repeat phases, there will be two rows of Bomb Barrage that intersect. Players must manage their stamina while dodging through the intersections.
- Loaded Canons – Players must take cannon balls from the arena floor and load the cannon. Once loaded, players have to shoot the canon at Admiral Blackpowder to get back in to the Arena.
- Fiery Mortar – Blackpowder will call down heat-seeking mortars on all players. Players must avoid the initial explosion and the fire AOE that they leave behind.
Admiral Blackpowder Walkthrough
Phase 1
Once you cross the line into the arena, the fight with Admiral Blackpowder begins! He will jump down from the upper deck and immediately start attacking. Once the tank grabs aggro, they will need to be aware of Slash and Cannon Bash. Once Blackpowder uses Barrel Toss, DPS should focus the barrel to keep the number of barrels building up on the arena floor from growing. At around 75% health, Admiral Blackpowder will retreat to the upper deck and begin phase 2.
Phase 2
Once this Phase begins, Spawn Lookouts will occur. Quickly AOE them down and prepare for Bomb Barrage. During Bomb Barrage, players must avoid the explosives by dodging through the red areas as the bombs come down. This is easily down by standing in the red area as soon as it appears, then dodging towards the area that was just bombed.
NOTE – Admiral Blackpowder will still use Barrel Toss during the Retreat Phase. Bomb Barrage will ignite the Barrels, causing them to explode.
During the phase, players must also be mindful of the Loaded Cannons mechanic. While avoiding Bomb Barrage, players need to load the cannons and fire them at Admiral Blackpowder. Once players hit him enough times, he will jump back down to the arena and repeat phases 1 and 2.
Phase 3
Once Admiral Blackpowder hops back down from the 2nd phase 2 everything stays the same, except that Admiral Blackpowder will not use Fiery Mortar. This mechanic requires good coordination from your group to avoid hitting each other with the mortar. The easiest way to avoid this is to have players slowly rotate in a circular direction with good spacing. Fiery Mortar also leaves a small fire AOE that must be avoided. Once you deal enough damage he will use Retreat.
During this Retreat phase, Bomb Barrage will come in two directions that intersect. Players will need to manage their stamina well to avoid taking damage. While doing so, complete the Loaded Canon mechanic and Admiral Blackpowder will jump back down. He will repeat all phase 3 mechanics until you finish the fight.
Sergeant Morris
Before leaving the boss’s room, don’t forget to loot the boss and the expedition chest down to the south. You will continue on through this passage and into the “Cavern of Forbidden Plunder”. Avoid the cursed treasure and parkour your way to the next room. There are a few geists to fight her so the tank needs to make sure to pull them to the middle of the room, away from the treasure. These mobs have knockback abilities, so make sure to keep them CC’d when possible. Continue through the cavern, avoid the hanging axes, and head into the “Dead Mans Retreat”.
The Gate Puzzle
Loot the expedition chest in this room and defeat Sergeant Morris and his crew. Once cleared, you will need to talk to the NPC Tye. This will start a puzzle that requires members of the group to carry Nereid’s Offering from one statue to another. This puzzle comes down to a healing check.
First, one member of the team needs to touch the statue in the water to the right of Tye. This will start a lighting storm in the middle of the room that leads to the second statue and give the player a debuff that slows them and deals damage over time (similar to the cursed treasure). The healer will need to keep the player with the curse healed as they move to the next statue.
It is recommended that players carry each offering to the other statue one at a time but if your healer can keep multiple people up, then more is fine. Your group will need to do this 3 times to open the gate ahead. Beyond this gate lies the “Sunken Depths“. Here, you’ll will encounter some tendrils and more geists. Defeat them and move through the zone. This will lead you to the final boss encounter, Nereid.
Nereid Boss Guide
Nereid is the final boss in the Barnacles & Black Powder Expedition. She shares some similar mechanics as the Siren Queen.
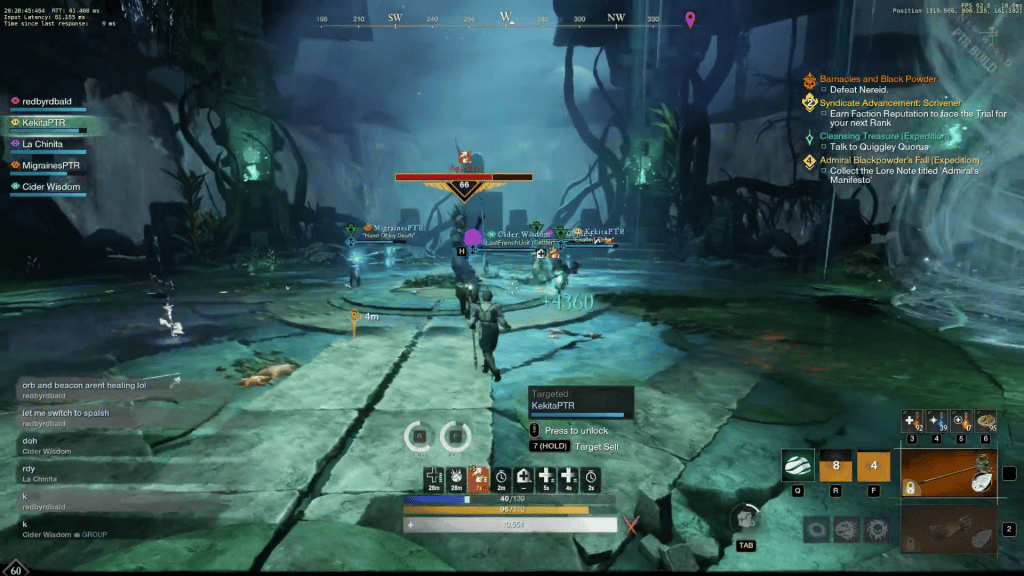
Nereid Mechanics
- Water Wave – Nereid launches a water wave that deals damage.
- Lunge – Nereid lunges her spear at a target, knocking them back.
- Whirlwind – Nereid raises her spear and spins, moving around the area quickly, dealing large amounts of damage, and applying rend stacks on players hit.
- Lightning Rod – Nereid throws her Spear, creating a Lightning AOE where it lands.
- Hurricane – Nereid casts a Hurricane that spins around the area dealing large amounts of damage.
The Nereid fight is one of attrition. The Majority of the fight is tied around avoiding Whirlwind, Lightning Rods, and Hurricane. DPS and Healers should avoid these mechanics as all of them deal large amounts of damage. The Tank should also be aware of Lunge. Lunge will knock the tank and other party members down, making it hard to avoid these mechanics. The tank should point Nereids’ attacks away from the group to prevent Water Wave and Lunge from hitting the group and making it hard for them to dodge the other mechanics.
Enrage
After Nereid reaches 50% health, she gains access to some more challenging mechanics. First, Nereid will cast two permanent Hurricanes that travel around the map. Next, Nereid will now cast more Water Wave during her Whirlwind attack. During the enrage phase, she will also summon multiple Hurricanes at once.
This fight does get hectic and resurrecting teammates is difficult with all the AOE on the floor. This makes dodging the mechanics during Nereid’s enrage even more important. DPS should get attacks in when they can and slowly take down Nereid.
Barnacles & Black Powder Expedition Guide Conclusion
That completes our Barnacles and Black Powder Expedition Guide! For a detailed map of the expedition, check out our interactive expedition map! For more New World Aeternum guides be sure to check our comprehensive guide library!