
Introduction
Welcome to our Bow Staff DPS Build guide for Throne and Liberty. This guide focuses on the PVP set-up for Bow Staff and how to play it. These two weapons combine to form the “Liberator” Class.
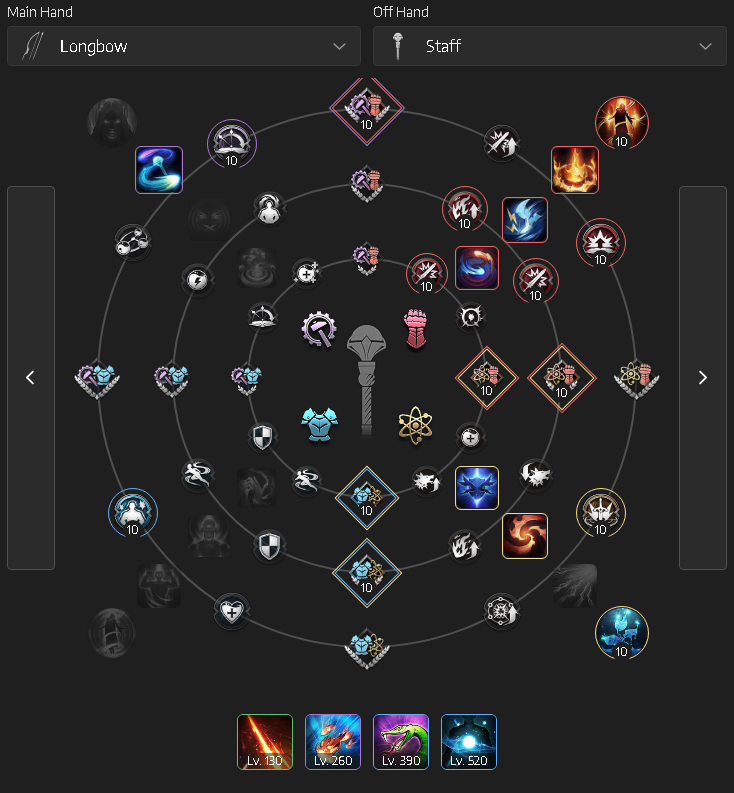
Skills
Below are the Skills and Specializations we recommend for the Bow Staff DPS Build in PVP. This includes Large Scale and Small Scale:
ALL PVP (PVP Boss, GVG, Castle Siege, Arena etc)
The set-up involves a good helping of AoE/Cleave Skills, while also having some single-target Skills to confirm kills. This is to ensure you have every AoE/cleave Skill available to you for large scale with the option to tune more into single-target for smaller scale fights.
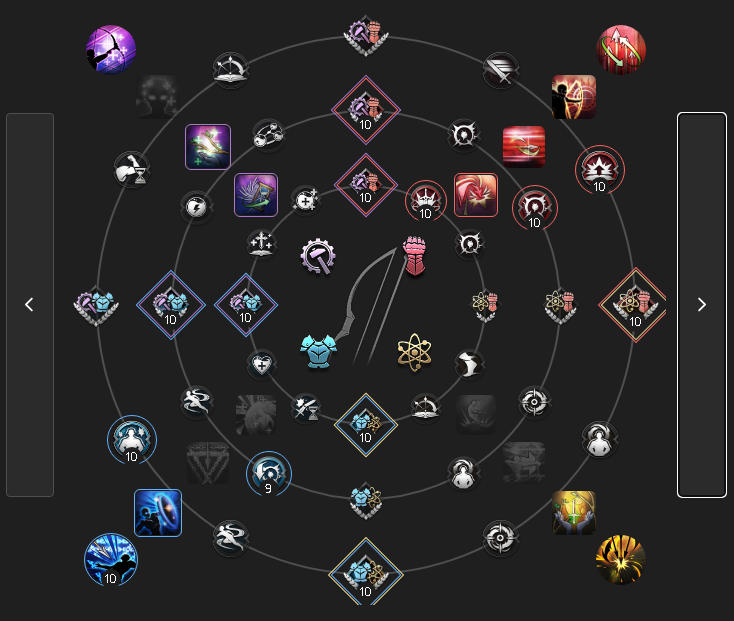
Specializations
With 100 total points to play with once you hit Level 50, below is our recommended Specializations for the Bow Staff DPS build for Large Scale PVP:
Every single cleave or AoE Specialization is selected for Large Scale PVP. The aim is to deal as much damage as possible to multiple targets. Switch out to more power in your single-target skills for smaller scale.
See our Skill Specializations guide for more information.
Weapon Mastery
This guide assumes you are at least in the range of 130+ Mastery Level. However, if you’re below this threshold, it’s not an issue. Simply spec into the mastery trees that provide the most damage/utility first.
Bow Mastery
Staff Mastery
Stats
Stats once you reach Tier 1 Epic gear can vary frequently due to stats built into gear. As a result, try to push for at least 60 Perception and 50 Strength while participating in PVP – gear depending. 60 Perception helps with Hit and a Range increase at 50 Perception. 50 Strength provides more Health and Heavy Attack Chance. Below is our recommended baseline Stat allocation:
- Strength – 19 Points
- Perception – 24 Points
- Dexterity – 2 Points
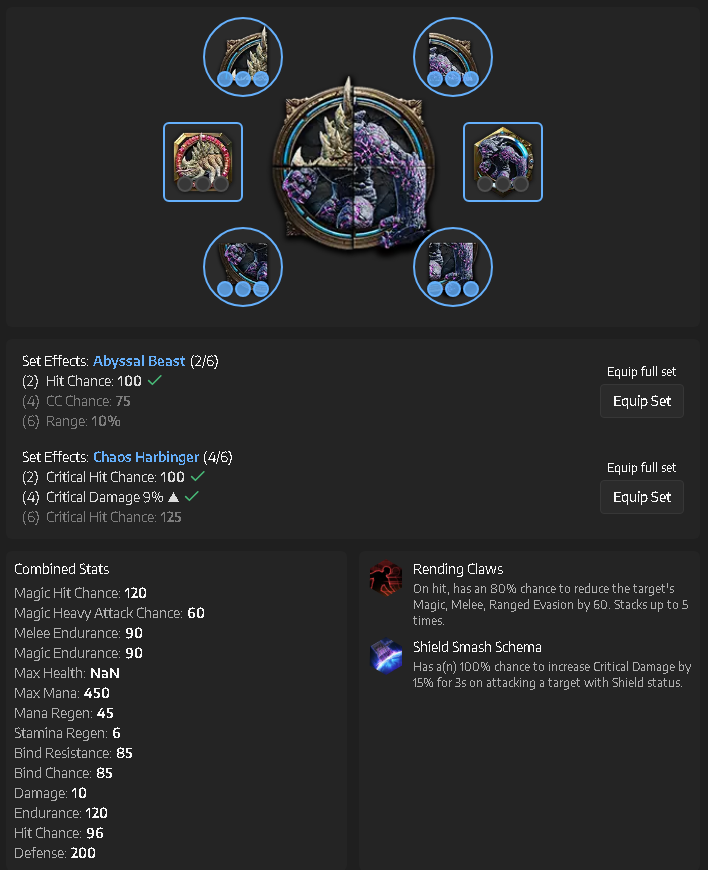
Gear & Equipment
The gear loadout largely, if not entirely, stays the same across all content once you reach Tier 1 Epic. Our Tier 1 Epic set assumes that most of the base content has been unlocked with the Milestones completed.
We also recommend picking up Talus’s Crystalline Staff if possible. The passive from the Staff helps a lot to deal with Assassins that stun you with Greatsword. Finally, Queen Bellandir’s Hivemind Staff is the ultimate Staff to obtain. However, it is incredibly rare, as a result, do not expect to see it for quite some time.
If you need more Hit, we also recommend picking up a Aelon’s Rejuvenating Longbow.
Tier 2 (T2) Talandre Gear
Tier 2 Gear is only obtainable from the Talandre Expansion patch onwards. The gear can reach level 12 and provides much stronger benefits than Tier 1 gear in Throne and Liberty. If you prefer PVP, this gear set-up is optimal as a full Ranged player to get the job done.
We recommend not worrying too much about Archboss Accessories or Nebula Accessories as they’re very rare and expensive.
Artifacts
The Artifact System is another source of power for your build that provides stats, an Active and a Passive. We have crafted a general starting point for players to use and adapt to their liking below:
Guardian
Guardians are a unique transformation on a 10 minute Cooldown that gives powerful bonuses to you for 30 seconds. Some Guardians work as an additional “Active” Skill, while others provide buffs. We recommend the following Guardians for PVP:
- Lady Knight Kamarshea – This Guardian is a fantastic safety net, just incase you’re taking too much damage on an engage. You’ll also get a huge amount of Cooldown Speed too.
How to Play the Bow Staff DPS Build
This DPS build has Top Tier Damage capabilities making it a must-have in PVP. Below, we’ll break down the basics of the PvP gameplay approaches with the build.
For PVP, this build is used to deal damage through a large amount of instant-cast, high damage Skills that vary between single-target, cleave and AoE. You are an undeniable asset of large-scale PVP in Throne and Liberty. The build has a “Turret” playstyle – meaning you can plant your feet from very long ranges and just spam spells for tons of damage.
Skill Rotations
As a Bow Staff, you have several smaller rotations available to you. However, a lot of the time you can just spam instant casts out. Our recommendation for engaging a large-scale fight is the following:
- Focused Fire Bomb
- Flash Wave
- Blitz (Limit Break)
- Flash Wave
You have the option of playing Meteor too to add into this AoE spam. It is also recommended to use this AoE when you see a large stack of enemies CC’d by your team or a boss mechanic. You also have your instant-case Skills such as Chain Lightning and Judgment Lightning for immediate AoE burst.
Similarly to PVE with the Bow Staff or even Bow Dagger, your single-target rotation is the following:
- Ensnaring Arrow
- Strafing
- Zephyr’s Nock
Ice Spear (Bombardment) is a very strong single-target spell in PVP too. Using Ice Spear Bombardment both offensively and defensively has its benefits. You can use Ice Spear Bombardment to nuke a squishy or chunk them at the very least, additionally you can protect yourself due to the root Skill Specialization if you select it.
Mana Regen Combo
One key 2-spell combination you have as a Bow and Staff player that works in both PvE and PvP is the “infinite mana” combo. To pull this off, simply do the following:
- When you want to gain back mana and give your team some mana too, cast Nature’s Blessing (Epic)
- As soon as Nature’s Blessing is cast, immediately cast Inner Peace (if you decide to place it on your bar)
The combined effects and percentage of mana regeneration gained from both skills instantly refills your mana bar in a pinch. Keep this in mind as this is important during PvE or extending large-scale PvP encounters!
Utility such as Victorious Energy should be used on the main engage to provide a damage boost, additional Hit and Evasion to protect yourself further from threats. Arrow Vortex (Tornado) is one of the best large-scale crowd controls in the game. It covers a ton of distance and radius, knocking players up into the air. As a result, try to use it on melee players, such as tanks pushing onto your team. If possible, try to avoid knocking up squishy players, so your melee teammates can kill them.
Conclusion
That Concludes our Bow Staff DPS Build! For more Throne and Liberty content, news and guides, be sure to check out our Throne and Liberty Home Page