
Introduction
This New World Blunderbuss Sword and Shield Build is for Arenas and Outpost Rush. This build revolves heavily around your abilities being active but has the potential to one-shot your opponent. This can be useful for taking out high damage opponents and healers very quickly in arenas and Outpost Rush, giving your team the upper hand.
Pros
- High burst damage
- Decent Mobility
Cons
- Relies heavily on abilities being active
- Long cooldowns on abilities
- Glass Cannon
- Lack of AoE damage
Mastery Points
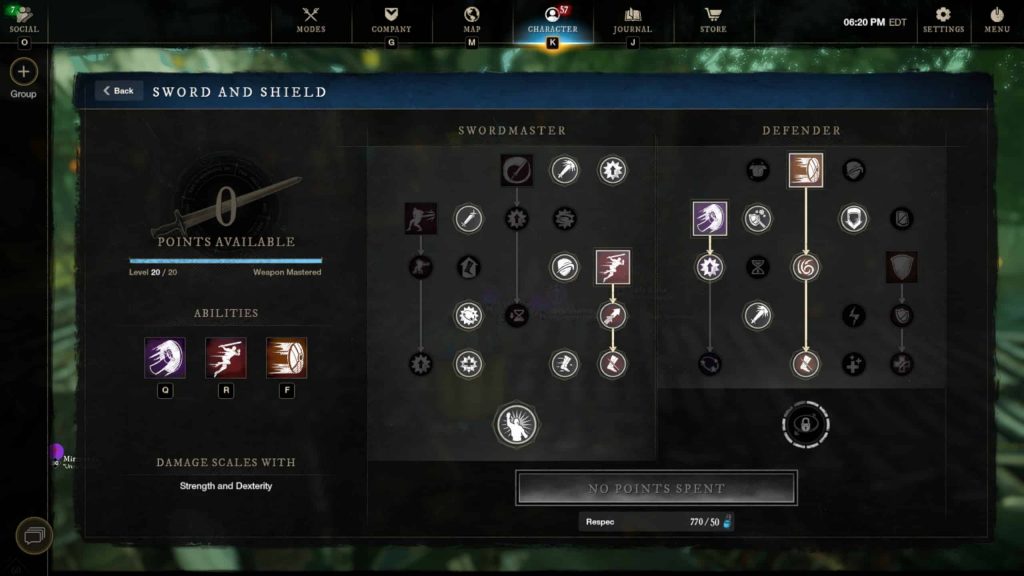
Sword & Shield
Active Abilities:
Leaping Strike
Shield Bash
Shield Rush
For this build, the sword and shield will primarily be used to stun your opponent to set up the blunderbuss damage.
You will want to fully upgrade both leaping strike and shield rush. You will only upgrade shield bash once.
The passives you take will support additional damage, and more importantly, allow you to push into the leadership passive to provide a nice damage increase.
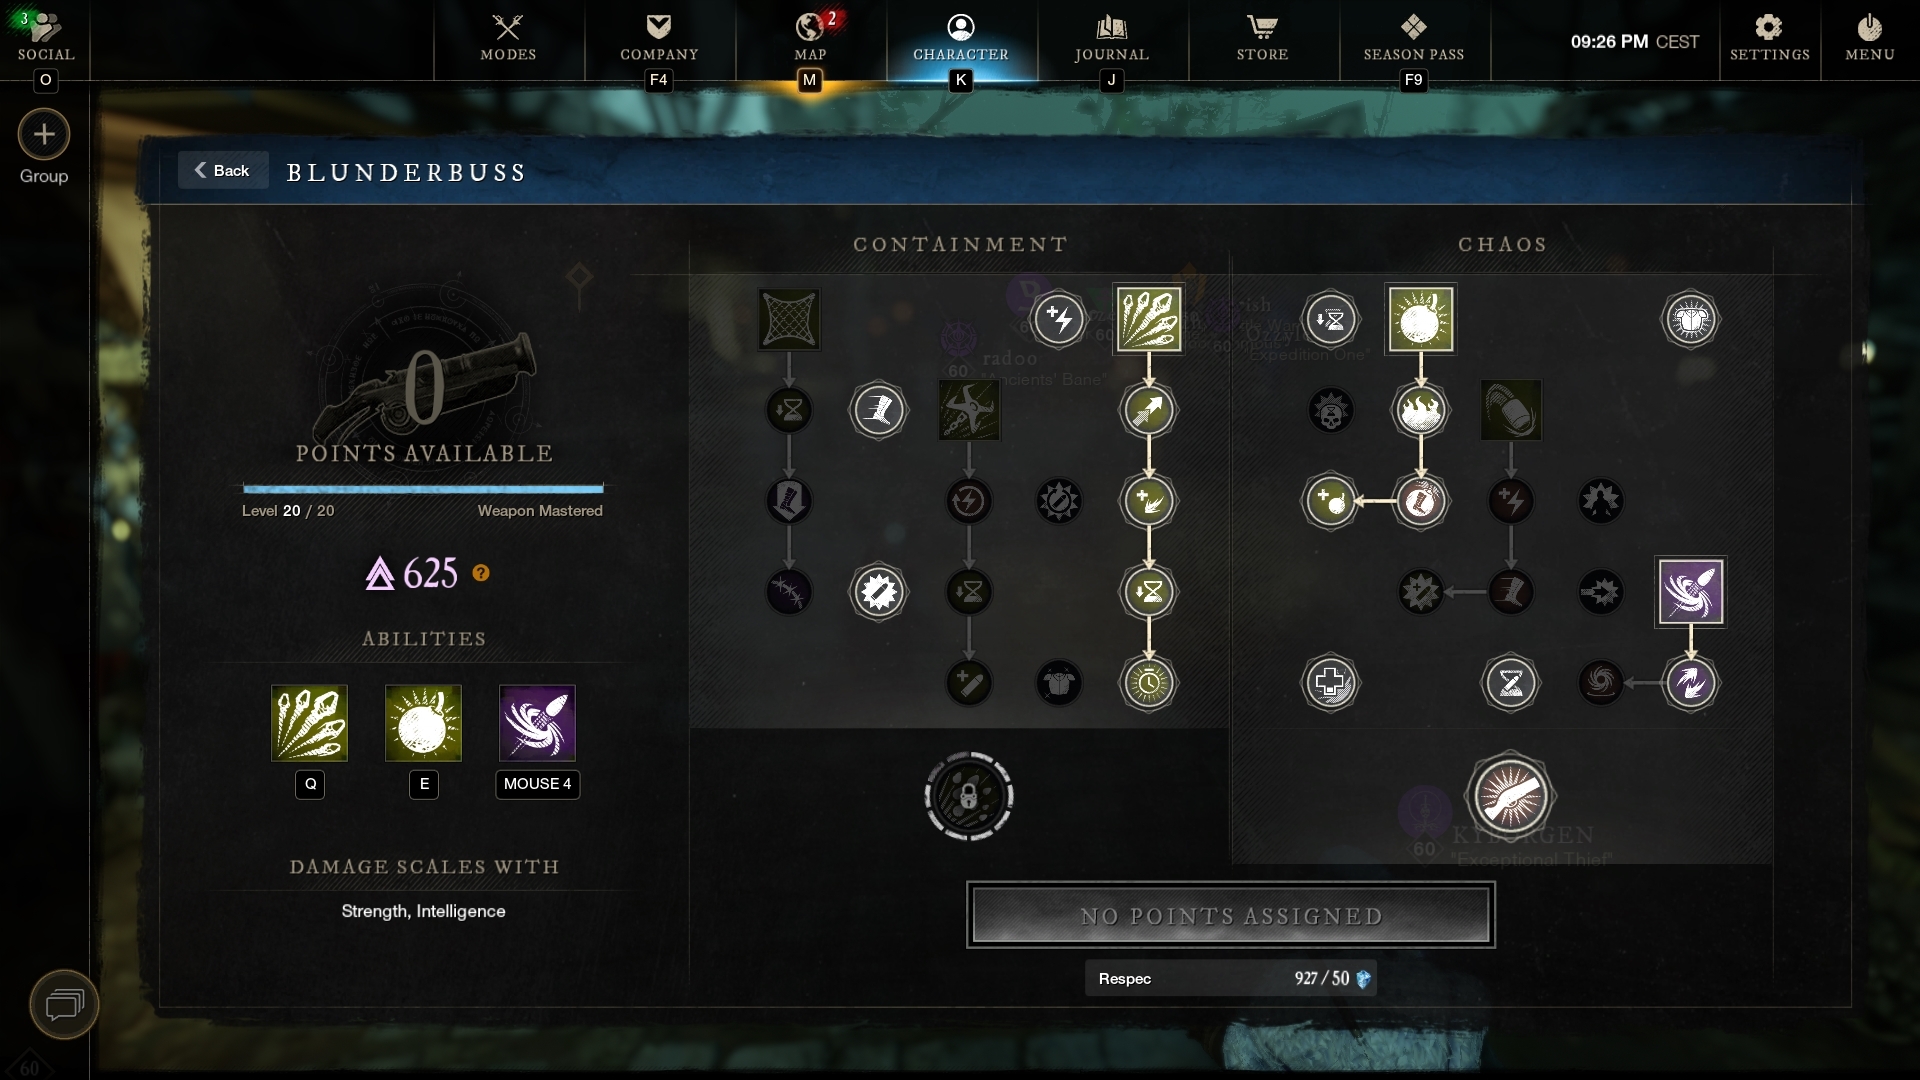
Blunderbuss
Active Abilities:
Splitting Grenades
Azoth Shrapnel Blast
Blast Shot
You are going to take the Blunderbuss abilities that will allow you to essentially one-shot your opponent with a massive amount of burst damage.
First, fully upgrade Azoth Shrapnel Blast to greatly increase your damage with this ability. You will also fully upgrade Splitting Grenade. Upgrade Blast Shot once in order to gain the ability to apply rend to your target.
The passives you take will support additional damage, cooldown reduction, and increased damage mitigation.
Attributes
For the one-shot combo, you will want to be shooting for high damage. The blunderbuss is a split stat weapon between Strength and Intelligence so you will need both. You are going to shoot for:
350 Strength
150 Intelligence
100 Constitution
If you are getting killed too easily you can push your Constitution up to 150 and drop your Strength to 300. Your one-shot combo will not be as effective, but you will still provide a good amount of burst damage and can still easily finish off the damaged targets.
Equipment
In this Section of the One-Shot Blunderbuss – New World Blunderbuss Build, we will break down what equipment you will use. This includes armor perks, weapon perks, and equip weight.
For this Blunderbuss build, we will be in the light equip weight category. You will want as much damage as possible. The way to obtain light equip weight for this build is the following:
Light Helmet, Chest, Gloves, Pants, and Boots
Round Shield
Armor
Artifact Armor
For this build, we recommend the following Artifact Armor pieces:
- Tumbler Shoes – Successfully dodging an attack, gives you 15% empower and 25% fortify for 5s, you are also healed for 200 + 2% of your max hp.
- Featherweight Jacket – Weightless: This armor is weightless.
Most of the armor you need to run the Blunderbuss build will be obtained through crafting or random drops. Below are the recommended perks for your setup:
- Freedom (4)
- Refreshing (4)
- Elemental Aversion (3)
- Empowering Leaping Strike (could be on weapon)
- Plagued Splitting Grenades (could be on weapon)
- Leeching Shrapnel Blast
This build relies heavily on having your abilities active and executing your combo. Cooldown reduction is vital to the build Refreshing is important to have on your gear for that reason. Refreshing is recommended due to it reducing your max cooldowns for both weapons vs your active cooldown. You will be able to perform your combo more often.
If you can not get 3 perk legendaries, shoot for Freedom and Plagued Splitting Grenades on one piece. And Freedom, Refreshing and Elemental Aversion on the other pieces. Leeching Shrapnel Blast can also be replaced with Elemental Aversion. It just provides a nice boost to self sustain, but is optional.
Weapons
Artifact Weapon
For this build, we recommend the Artifact Blunderbuss, Pestilence. The unique property of Pestilence is the following; Blighted Enchantment: Attacks against targets inflict a stack of poison and a decrease to incoming and outgoing healing effectiveness by 5% per stack for 3s (Max 3 stacks).
An alternative Artifact choice can be the Artifact Sword, The Butcher.
Sword
Ideally you will want to have Empowering Leaping Strike on your sword or have the Sword of the Champion. Along with the weapon perk you would also want to shoot for Rogue and Refreshing Move.
If you can not obtain the above then you would want to have Empowering Leaping Strikes on your armor in place of a Refreshing Move perk.
(1) Sword of the Champion – PvP reward track (Recommended)
Shield
You will be utilizing a round shield in this Sword Shield and Blunderbuss build. The perks you will be shooing for on the shield are fortifying shield rush, refreshing / refreshing evasion, enchanted, keenly jagged.
If you can not craft the shield you can obtain several random round shield drops from running expeditions. They often drop with good perks. The perk pool for round shields is not huge so it’s fairly easy to obtain a good one.
Blunderbuss
For your Blunderbuss you would ideally want to shoot for one of the Attunement Perks (Flame Attunement, Frost Attunement, etc), Enchanted, and Keenly Empowered.
However, crafting an item with those specific perks can be difficult. There are a few drops that would work as well.
SpreadShot – Obtained from the Disciple of Disorder in Myrkguard. This weapon has Leeching Shrapnel Blast on it, so if using this weapon you could replace that perk on your armor with Elemental Aversion.
Singular – Dropped by several different enemies in the open world that are level 60+
You will want to slot an Opal in this weapon. During the combo, you will be rolling forward. Having the opal in your weapon will increase your damage after the roll.
Jewelry
Amulet – Refreshing, Divine, Health. For an artifact, we highly recommend “Ankh”.
Ring – For your ring, you would ideally want Mortal Empowerment, Refreshing, and Hearty.
However, if you can’t get your hands on one then you can farm out Smooth Bone Ring from the Caretaker in Garden of Genesis.
Earring – For your earring, you can farm out the Doom’s Chance from the Caretaker in Garden of Genesis. “Endless Thirst” is a fantastic Artifact choice. Providing more powerful potions at the cost of higher cooldowns.
Gems
The types of gems you will depend upon the PVP meta. If in doubt, Onyx is a solid choice.
For your weapons you will want to slot an opal in both. You will be dodging quite a lot so the opal will enhance your damage output.
Runeglass Gem Upgrades
For you runeglass gems you would want to utilize the sighted variant to deal additional damage with your blunderbuss attacks.
Heartgem Rune
The heartgem rune of choice for this build is the Cunning Heartrune of Detonate. You can activate the heartrune and gain empowerment. This will allow you to start your combo with a lot of increased damage and then gain additional burst on the explosion of the detonate rune.
Consumables
You’ll want to utilize the following consumables for this build:
Honing Stone
Infused Health Potion
Infused Regeneration Potion
Hearty Meal
Banana Bread
Along with one of the following depending on your attribute distribution from your gear. You can check a full list of consumables by checking out our consumables guide.
How to Use Build
The New World Blunderbuss Sword and Shield one-shot build revolves heavily around having your abilities up.
Your combo is the following. Leaping Strike – Shield Rush – Shield Bash – Blast Shot – Dodge roll forward to target – Auto – Splitting Grenade – Cancel with Auto – Azoth Shrapnel Blast.
After performing the combo your target should be dead or will have taken a significant amount of damage. Your role after that will be to stay alive until you’re able to perform your burst combo again.
During the downtime between combos, you can deal some damage with your sword auto and blunderbuss light attacks (or auto attacks) to set up the next combo.
New World Blunderbuss Build Conlusion
That concludes our New World Blunderbuss One Shot Build, Remember to be patient, pick you targets wisely, use your cooldowns effectively, and you’ll be one-shotting people in no time!