
Introduction
Learn the most efficient way to get to max level, progress your gear score, and more in our Throne and Liberty Leveling Guide
Getting Started
Below is some general information to prepare you to level as efficiently as possible in Throne and Liberty. Each of these sections is referenced in the Leveling guide below.
Codex
One of the most important things to know while leveling in Throne and Liberty is what types of Quests you have available, and what each objective icon looks like. You can access your codex by hitting “j” on your keyboard or opening your menu.
NOTE – We have placed the Quests types in order of importance as you level for general use. we will cover more on this below.
- Purple Quests are your “Main Story Quest” or Advntuer Codex. These quests are the most important priority in your leveling process by far. Each Chapter of the main story provides huge chunks of EXP, catapulting you through several levels.
- Blue Quests are Exploration Codex or “Side Quests” in Throne and Liberty. Side quests can be found throughout the world as you progress. Each zone has its side quests. The Higher level of the zone, the higher the EXP reward! The best time to do these quests is while close to their recommended level.
- Yellow Quests are your “Contracts“. These contracts are taken out from the Contract Merchant in most major towns. Each contract provides various growth materials, EXP and Sollant as a reward, as well as Abyss Contract Tokens! You will do some of these for a quest but typically you will want to save the contracts til end-game
Dynamic Events
Dynamic Events in Throne and Liberty occur every couple of hours – sometimes more frequently. These Events provide great filler EXP while also providing Sollant and upgrade materials. Events can come in the form of collection-based Events, World Boss Events, and more. Finally, World Boss Events also appear every couple of hours – Bosses also provide great items and EXP rewards.
Dungeons
Dungeons are the final way to gain XP through your leveling process. Not only do Dungeons provide XP, but they also give powerful rewards. Three types of Dungeons give XP for completion Open World Dungeons (Abyssal) Taedal’s Tower and Co-op Dungeons (Dimensional).
Taedal’s Tower
Taedal’s Tower or Secret Dungeons are solo dungeons where players fight unique bosses. There are twenty levels in total. These reward a small amount of XP, but grant more important rewards such as Growthstones and Skill books. We will look to complete these post 50.
Co-op Dungeons (Dimensional)
Co-op Dungeons are group activities made for 6-person parties! These provide additional EXP and smooth out your leveling experience. There are 3 dungeons available as you level up. You can access this menu by pressing (the ESC key or MENU on the controller) and selecting Co-op Dungeon
- Level 20 – Specter’s Abyss
- Level 30 – Roaring Temple
- Level 40 – Cave of Desperation
You will need Dimensional Contract Tokens to gain rewards and XP. Once you hit level twenty, you can find these tokens in the top right of your screen. THESE ARE TYPICALLY NOT RECOMMENDED DURING LEVELING TO SAVE TOKENS FOR level 50.
Open World Dungeons (Abyssal)
Open-world dungeons require Abyssal Tokens to gain loot from. You will get access to Abyssal Tokens at level 18. These aren’t important to the 1-50 leveling experience but will be used to farm gear Post 50.
General Leveling Tips
- Activating Waypoints in a zone unlocks Exploration Quests
- SPREAD OUT and USE Growthstones across all weapons, Armor, and Jewelry to increase your character’s power level faster, making it easier to complete quests.
- Keep Skills upgraded as you level up, focusing on your more powerful skills first.
- Make sure to collect your rewards from the Adventure Codex (J key) and your Leveling Log ([ key). These can help you progress your character.
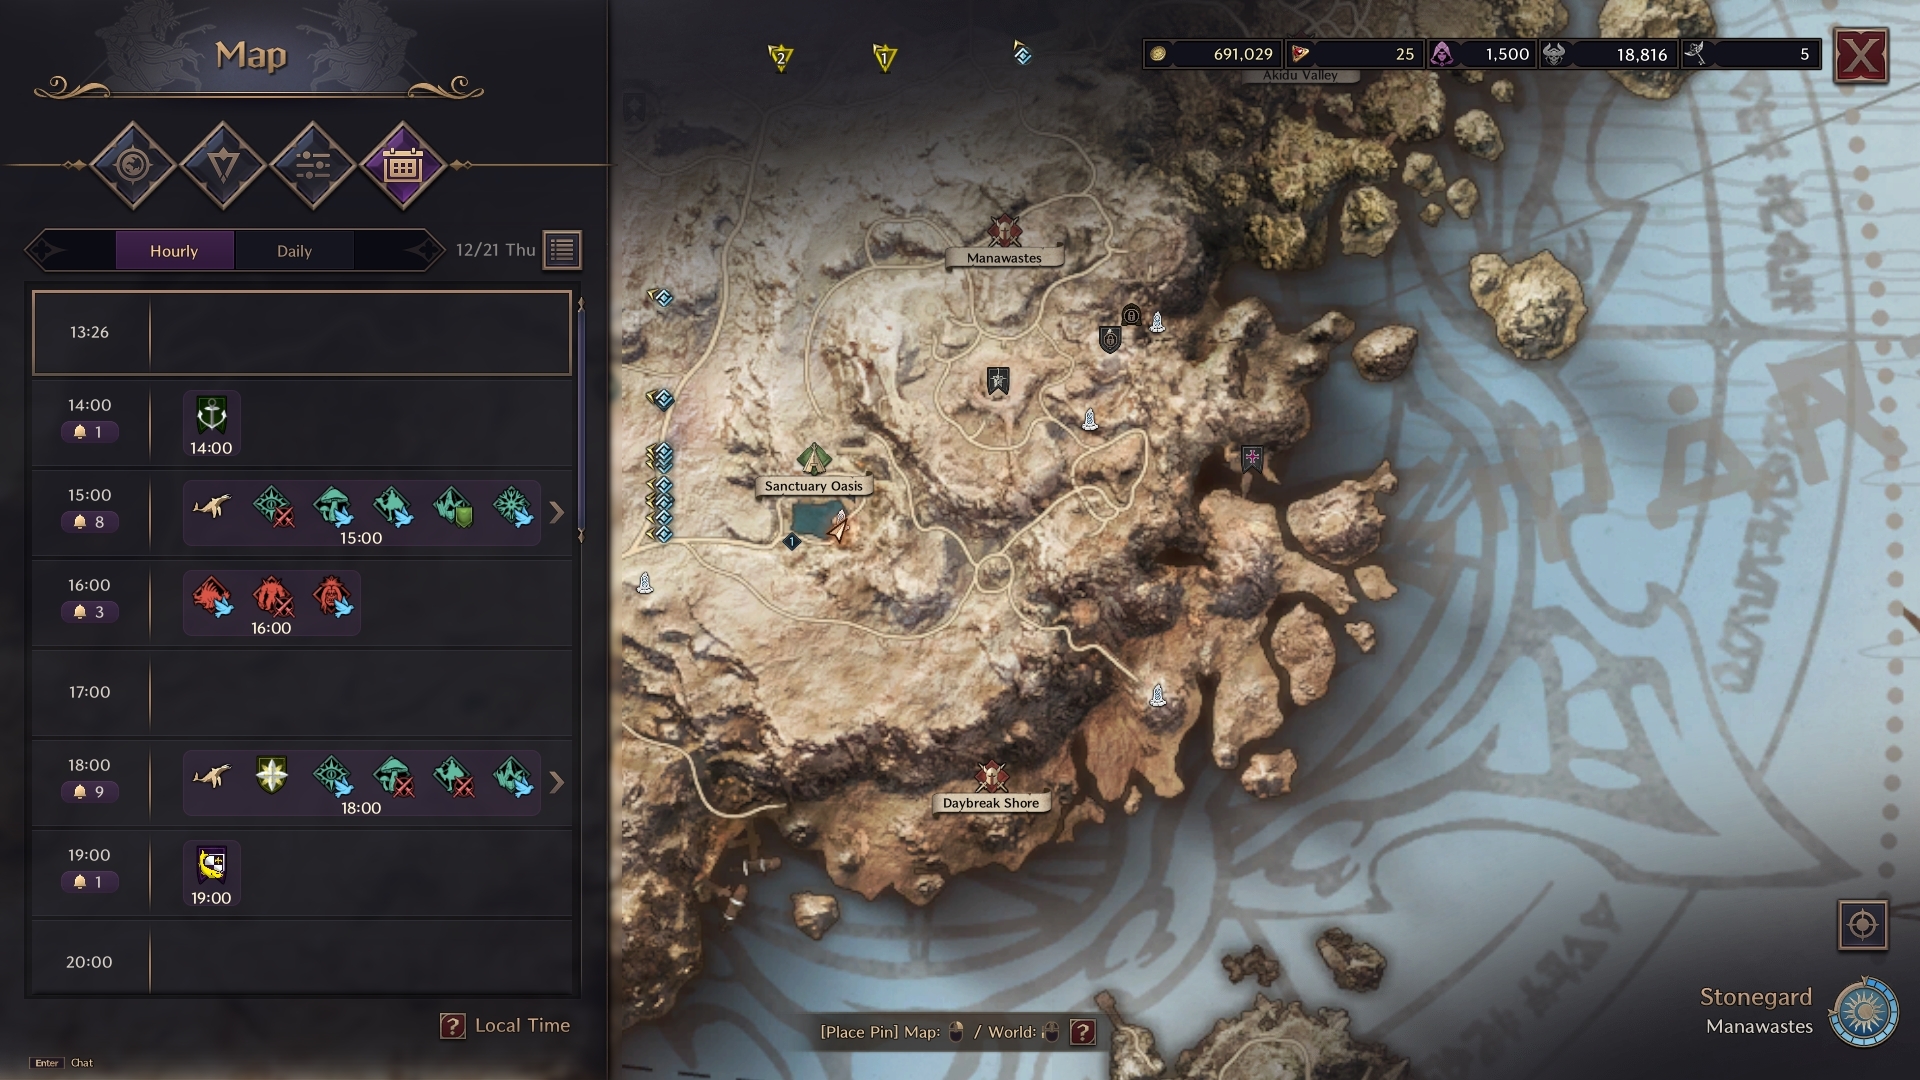
- Use your map (M) and waypoints you’ve discovered to move around the map faster AND mark Exploration Quests in your zone
- The Main Adventure Quest line has side quests as well that provide good XP. Be sure to finish these when there are gaps in the Main Questline.
- Keep your Pin Quests Clean on your Quest log to help with Quest Progression.
Level 1 – 50
Leveling 1-50 in Throne and Liberty is pretty straightforward. You just need to complete the Adventure Codex with some Exploration Codex Quests and Co-op Dungeons to fill in the gaps. Simply put, IF THERE IS AN ADVENTURE CODEX quest available DO IT.
If there is a gap between these quests, look for the appropriate level of Zone for Exploration Codex and complete them. This is usually THE LAST ZONE YOU UNLOCKED during your ADVENTURE CODEX. For Example, if you are level 23 and done with Chapter 4 of the Adventure Codex, head to the NESTING GROUND zone and start doing the Exploration Codex there. If you have completed the zone of the level you are in and haven’t caught up to the Adventure Quest, go to the zone under your level and complete them as well.
Below is a breakdown of the priority you should place on activities as you level from top (most important) to bottom:
- Adventure Codex Quests (MAIN STORY)
- Highest level Exploration Codex discovered during the Adventure Codex
- Prioritize Exploration Codex Quests tied to ACTIVE DYNAMIC Event.
Here is a complete breakdown of what to during each point of leveling in Throne and Liberty.
1 to 17
Tutorial through Main Adventure Codex Chapter 3
17 to 18
- Use Urstella Fields Exploration Quests.
18 to 21
Main Adventure Codex Chapter 4
21 to 23
- Nesting Ground Exploration Quests
- Carmine Forest Exploration Quests
- Clean up side Quests from Main Adventure Codex
23 to 26
- Main Adventure Codex Chapter 5
26 to 28
- Monolith Wastleands Exploration Quests Contract Manager (DO NOT DO Treasure of Daybreaks 3rd quest chain)
- Finish leveling to 28 by using some of the Explorations Quests from the Nesting Grounds
- Clean up side Quests from Main Adventure Codex
28 to 30
- Main Adventure Codex Chapter 6
30 to 32
- Abandoned Stonemason Town Exploration Quests
- Won! Golem Manastone Quest – Listen for – ” Enormous concentration of magic” – Make a Powerful Weapon”
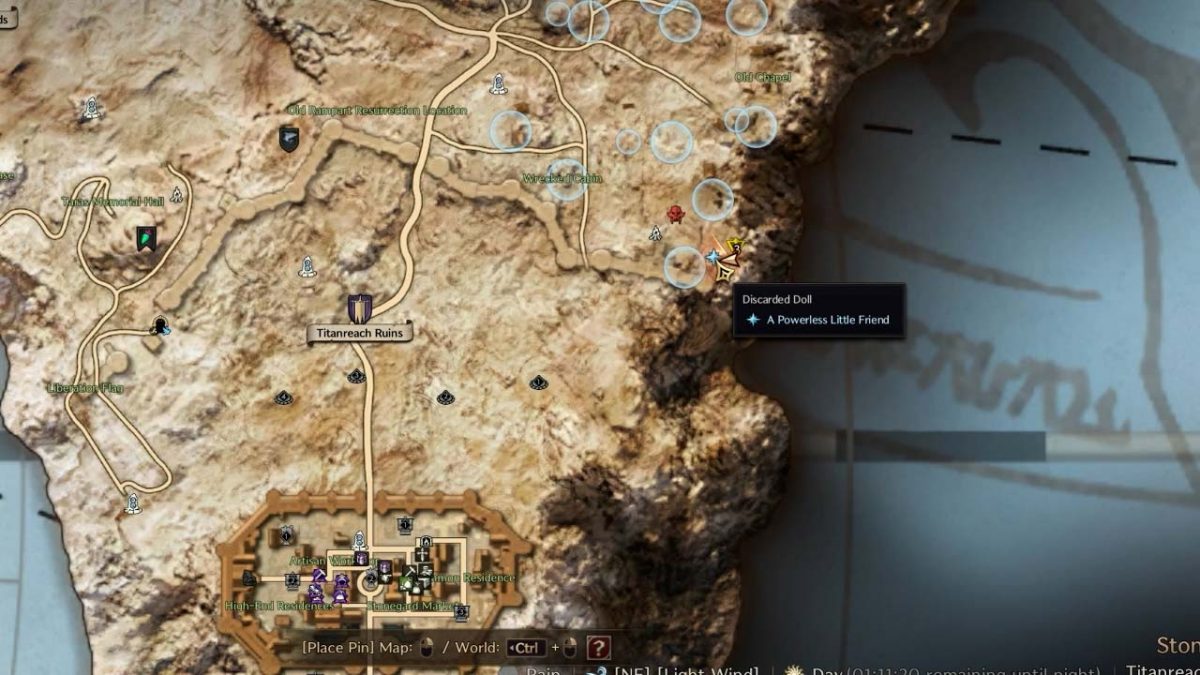
- Discarded Doll – Once you get to the last step, the doll’s location is hidden. Go to the Southeast most part of the zone and climb on the roof of the abandoned house to claim the Doll
- Start Moonlight Desert zone Exploration Quests with Contracts to get to finish leveling to 32.
- Grab Waypoint to Sanctuary Oasis
32 to 35
- Adventure Codex Chapter 7
35 to 38
- Finish Moonlight Desert Zone Exploration Quests
- Finish all Sandworm Lair Exploration Quests
- Qualification of Being a Guild Owner
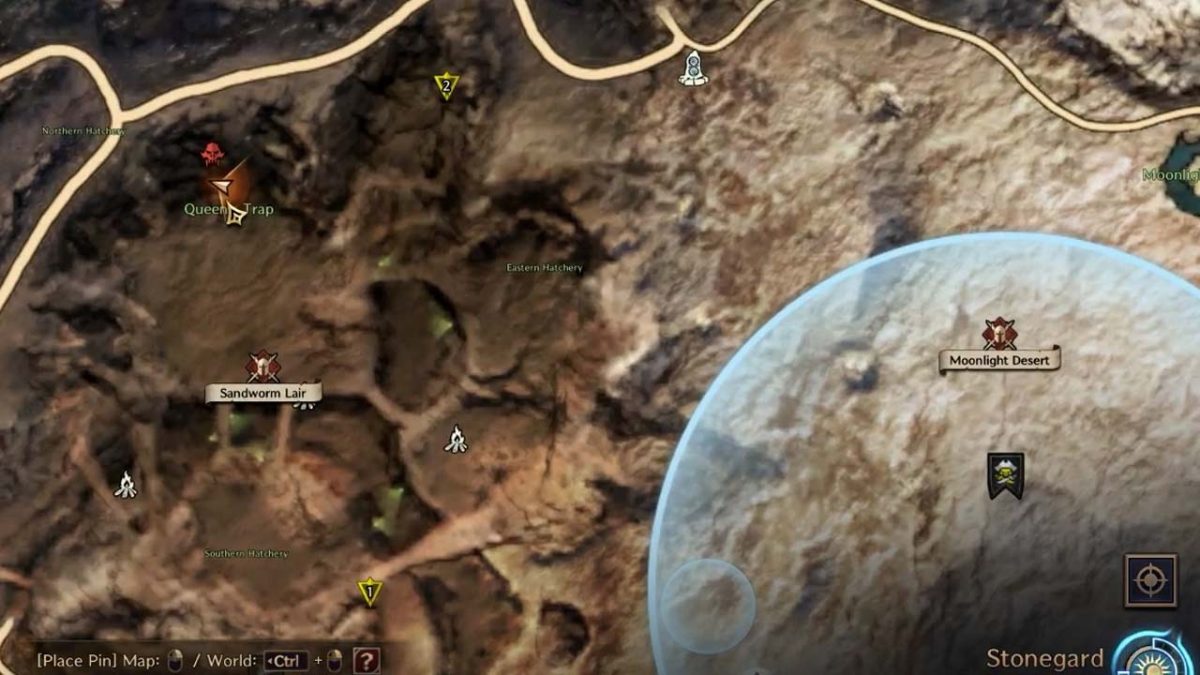
- Acquiring the Guild Owner’s Seal dpected in the picture at Queen’s Trap can be challenging to find since its not marked on the map. Here are two images to help find the CHEST the Seal is in. The chest is easily located on a small cliff by using your grapling hook while standing in Queens Trap. Look North once in the area dipicted in the image and use the Hook in the image below.
- Qualification of Being a Guild Owner

- Sandworm Lair Exploration Quest – The Voice Behind the Mask
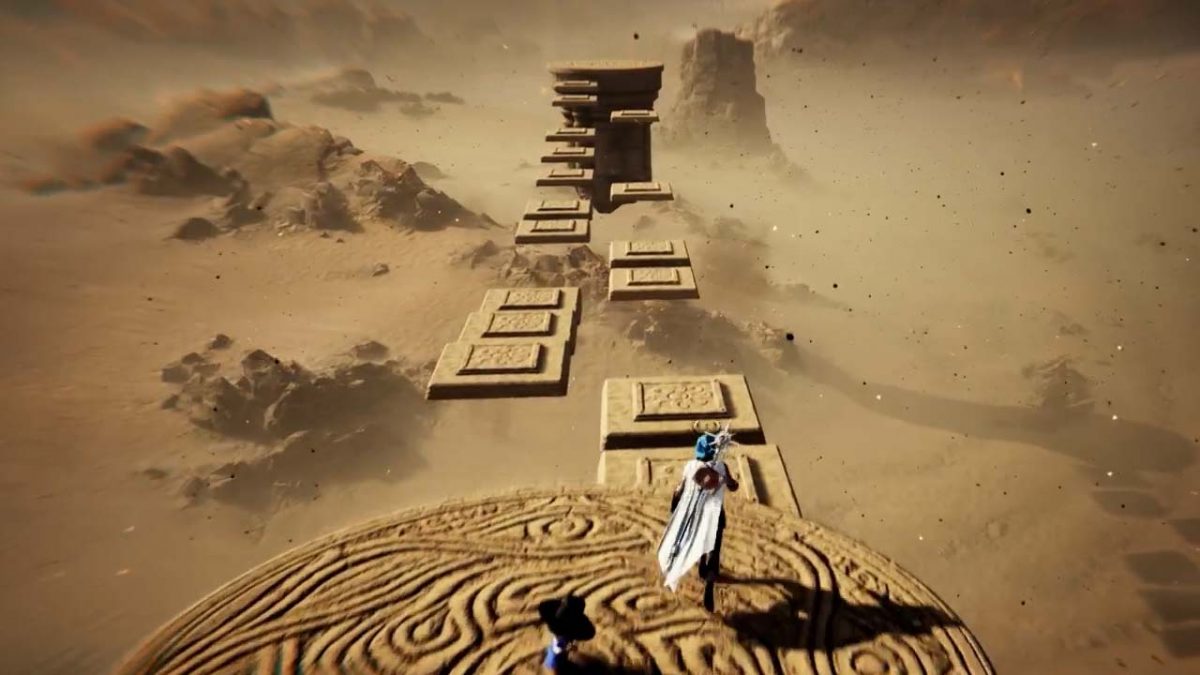
- Here is an image to help you get to the other side of the cliff once in the Rift.
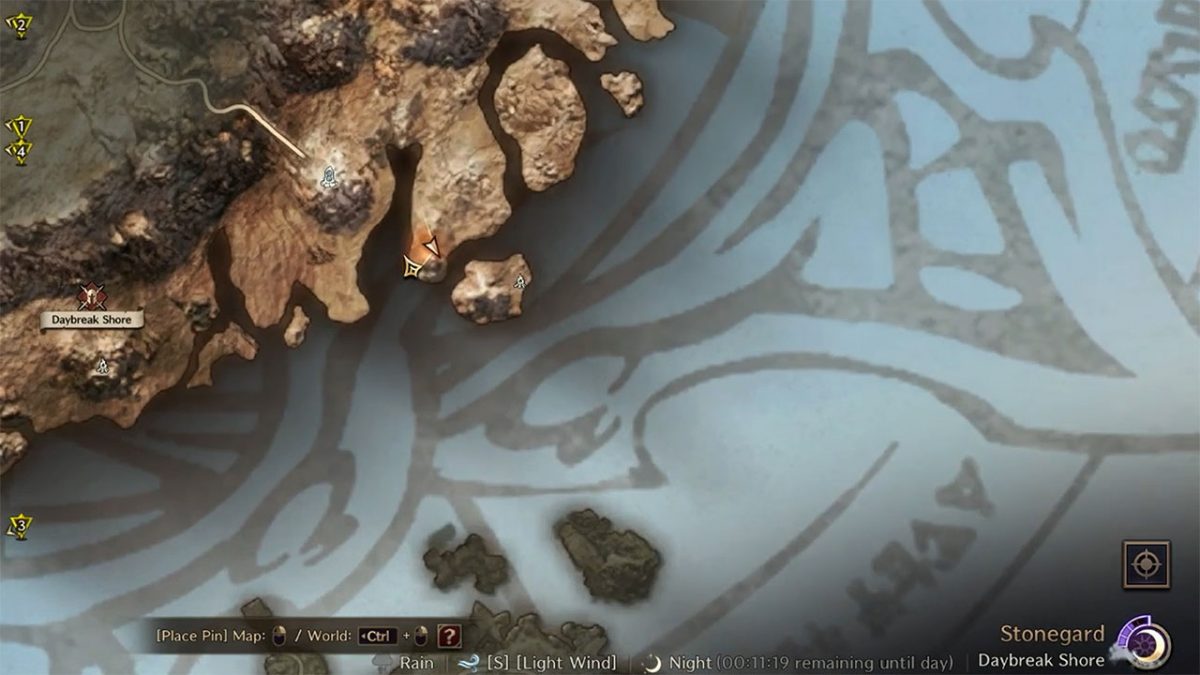
- Start Daybreak Shore Exploration Quests (NIGHT ONLY)
38 to 42
- Adventure Codex Chapter 8
- Grab The Raging Wilds Waypoint
42 to 45
- Finish Daybreak Shore Exploration Quests (NIGHT ONLY)
- Most of these Quests require it to be Night time so during the day move on to Raging Wilds and come back to finish Daybreak during the day
- Danger within Peace
- Collection: To Pirate King Adelico – this step requires you to find ONE of 4 lore pages within the zone. The quickest one can be found SE of the waypoint. Port there and drop down to the image below
- Raging Wilds Exploration Quests
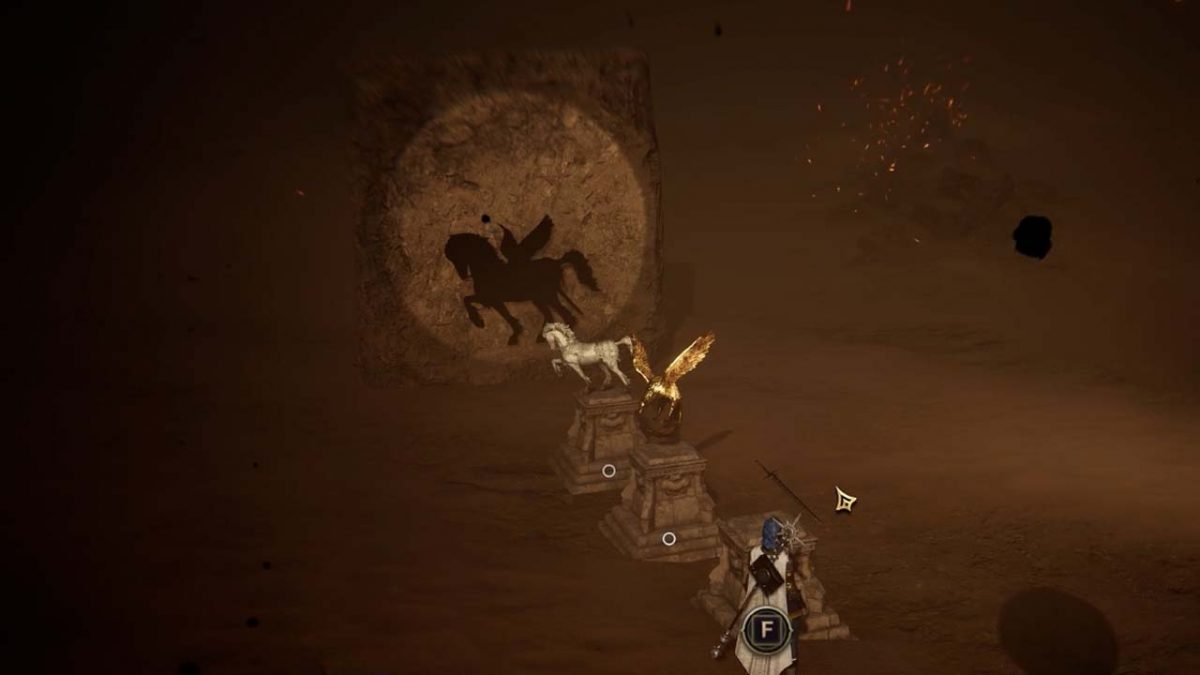
- Demon’s Test – This quest requires you to complete a series of puzzles. Below is a quick guide for easy completion of this quests chain.
- 1st Puzzle – Pegasus
- This one is pretty strait forward, you must form a pegasus with the shadows of the figures. Rotate the horse and wings like the image below and place the sword shadow poking out of the horses head.
- 1st Puzzle – Pegasus
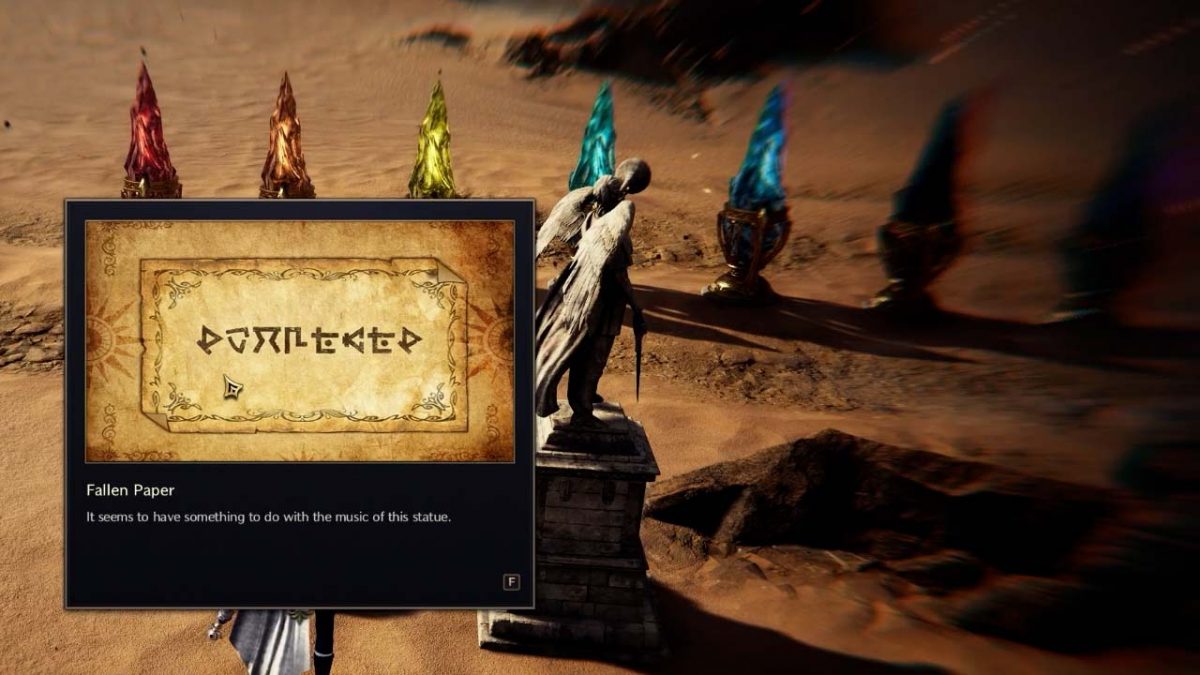
- Demon’s Test – This quest requires you to complete a series of puzzles. Below is a quick guide for easy completion of this quests chain.
- 2nd Puzzle: Color Tones
- This Puzzle is a little more complicated. You will need to repeat the song played with the colored crystals in front of you. Here is the order of crystal from left to right (color included)
- 2 (orange), 5 (blue), 6 (dark purple), 4 (cyan), 3 (Yellow), 1 (red), 3 (yellow), 2 (orange)
- This Puzzle is a little more complicated. You will need to repeat the song played with the colored crystals in front of you. Here is the order of crystal from left to right (color included)
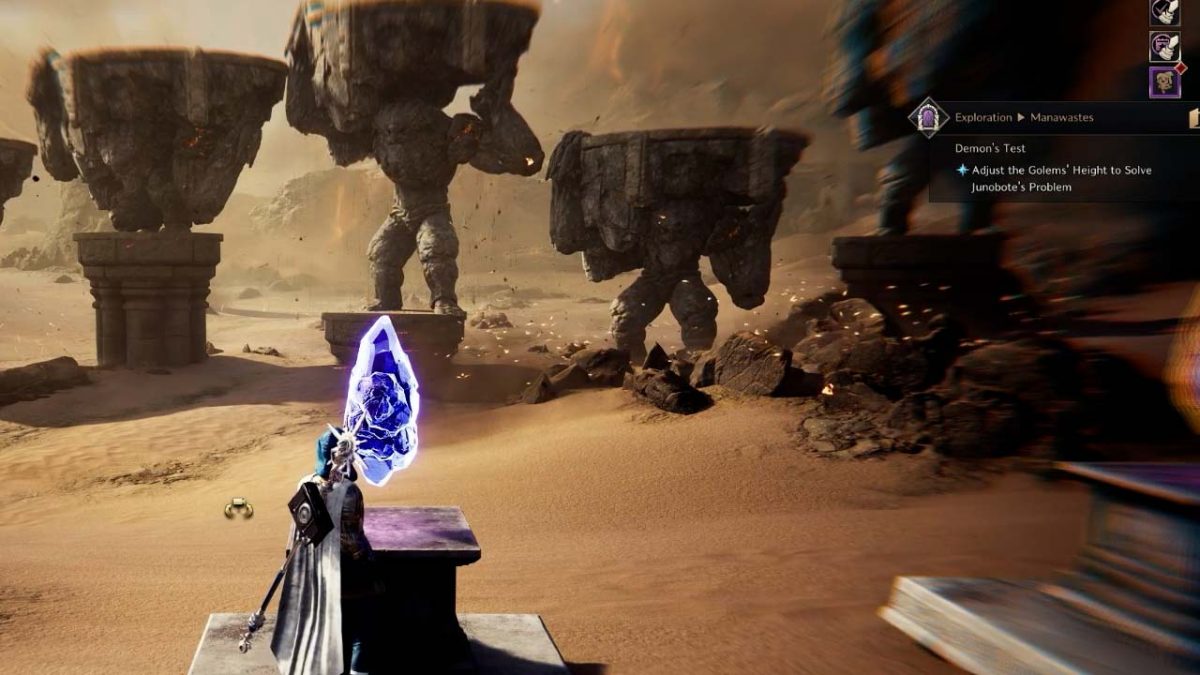
- 3rd Puzzle: Golem Platform Puzzle
- For this puzzle you will need to line up all the platforms by using the 5 crystals. Depending on which crystal you click, a specific group of platforms will move. Below is the order in which you click each platform and how many times from left to right.
- 2 3 3 4 5 5
- For this puzzle you will need to line up all the platforms by using the 5 crystals. Depending on which crystal you click, a specific group of platforms will move. Below is the order in which you click each platform and how many times from left to right.
45 to 48
- Adventure Codex Chapter 9
48 to 50
- Adventure Codex Chapter 10
- At Lycan’s Hall
- The first step of the Moon puzzles requires you to select the yellow and blue half-moons
- 2nd step is to match the opposite color and size of the moon placed over your head to complete all the full moons
- if you get a yellow crescent (1/4) moon, match it to a blue gibbous (3/4) moon
- At Lycan’s Hall
CONGRATS!!!!!! During or after completing Adventure Codex Chapter 10 you should be at level 50! Next, let’s take a look at End Game Progression.
End Game Progression
Once you have hit level 50 and have finished the Adventure Codex, it’s time to start End Game Progression. Past Level 50, you’ll turn your focus into Traiting your gear and getting your gear score up! In this section We’ll take a quick look at each way you can progress your character in Throne and Liberties End Game including Enchanting, Traits, Gear Score, and More!
Traits
Unlocking Traits is an important part of Character Progression in Throne and Liberty. To access the Trait Menu, hit “.” (Default Key) and click on the Trait tab. There are three major ways to unlock Traits on an Item:
- Finding the Exact Same Item that you want to add the Trait to with the Trait that you want
- EXAMPLE – You want to add Heavy Attack Chance to your Lequirus Grip that has Critical Hit. You will need to loot another Lequirus Grip with the Heavy Attack Chance Trait.
- Buy an Extracted Trait from the Auction House
- EXAMPLE – Go to the Auction House and search EXTRACTED TRAIT – Lequirus Grip and look for Heavy Attack Chance
- Use Trait Unlockstones (amount varies depending on the item)
- EXAMPLE – once you have enough Trait Unlockstones, go to the Trait Menu and select unlock Trait, then your desired perk. ( Heavy Attack Chance)
For a complete guide on Traits in Throne in Liberty click here
Gear Score
Your Gear Score is the best end-game measurement of your character’s overall power and determines if you can participate in an activity. Almost everything you do in Throne and Liberty increases your gear score.4 Below is a quick look at each way you can increase your gear score in Throne and Liberty.
| METHOD | Gear Score Increase |
| Weapon Quality Increase (Uncommon, Rare, Epic,) | + 40 |
| Armor and Accessory Quality Increase (Epic to Epic Tier 2) | + 30 |
| Armor and Accessory Quality Increase (Uncommon, Rare to Epic,) | +20 |
| Weapon Mastery, Weapon Traits, Trait Resonance, Weapon Quality Increase (Tier 1 to Tier 2 Epic) | +10 |
| Weapon Enchanting, | +8 |
| Armor and Accessory Enchanting | + 5 per level |
| Traits | + 4 per Trait |
| Runes** | +1 to 22 |
| Skill Increases | +2 per level |
For a complete breakdown of this information, check out our Gear Score Guide.
Throne and Liberty Leveling Guide Conclusion
And that concludes our Throne and Liberty Leveling guide. For more information on Throne and Liberty, check out our official Home page!