
Introduction
The Void Gauntlet Blunderbuss Build is best suited for Outpost Rush and Wars. It excels at survivability and debuffing enemies. You can disease everyone around you with a well-placed grenade shot from the Blunderbuss or a well-timed scream from the Void Gauntlet.
PROS
- Good Survivability
- AOE Disease and Debuffing
- Burst Potential
CONS
- Poor Mobility
Mastery Points
Blunderbuss
- Net Shot
- Azoth Shrapnel Blast
- Splitting Grenade
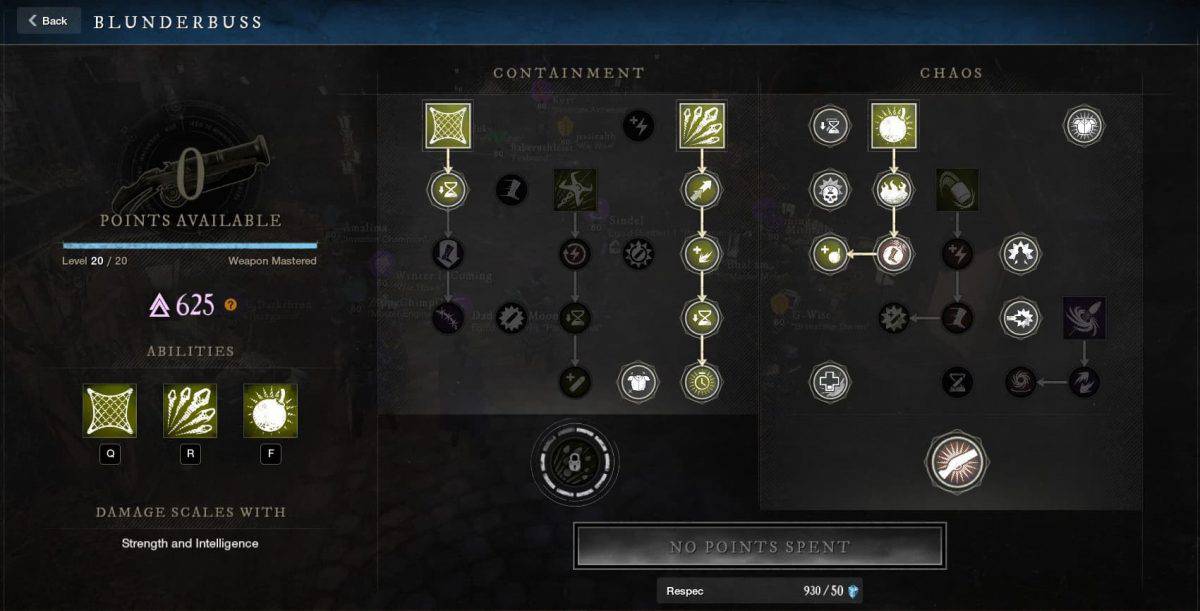
For this New World Blunderbuss Build you are going to utilize your Blunderbuss for fortify/damage resistance, AOE disease capability, and its mobility. The Recommended abilities are:
Upgrade Azoth Shrapnel Blast fully in order to get the Azoth Bomb drop after the shot. Take the first passive on Net Shot to get a lower cooldown as well as the fortify passive on the left. Then take Splitting Grenade and all but one of the passives in the chaos tree in order to get the Double Down ability.
While the left side passives might be better individually, Double Down helps reduce your cooldowns tremendously and provides a ton of value to the build overall. The Blunderbuss passives give the build a ton of survivability and allow you to survive through burst damage you would otherwise die to.
Void Gauntlet
- Petrifying Scream
- Oblivion
- Orb of Decay
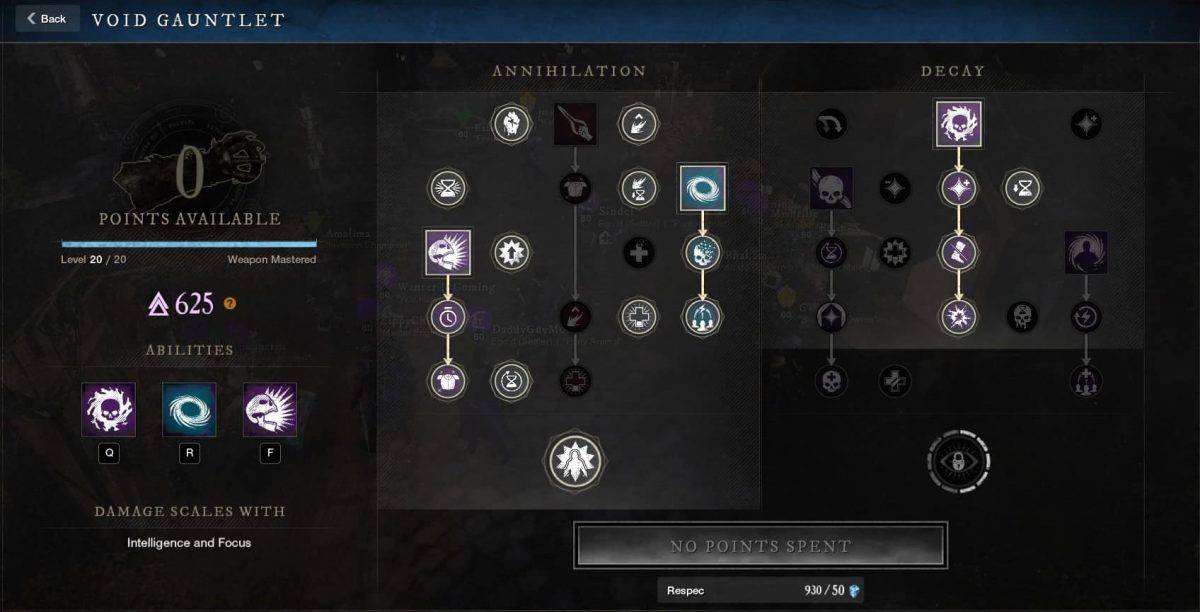
The Void Gauntlet has two of the strongest Utility Spells in the game: Petrifying Scream and Oblivion. Petrifying Scream is used to root enemies in place and gives you 10% fortify per enemy hit (up to 3) for 10 seconds. Oblivion strips the opponents’ buffs and gives your team empower and 15 stamina per second while standing in it. The 15 stamina per second makes tanking much easier and allows you to dodge almost twice as much. The rest of the passives in the Void gauntlet tree primarily revolve around crit chance and lowering cooldowns with critical hits.
Attributes
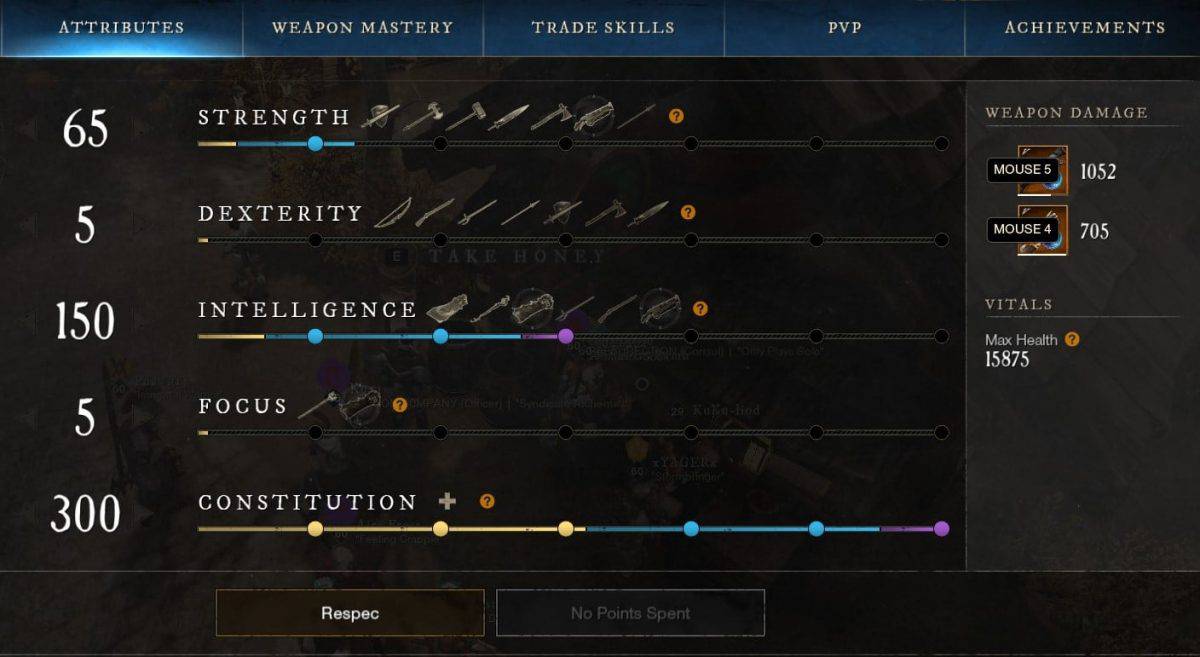
The attribute split for the Blunderbuss Tank build is 65 STR, 150 INT, and 300 CON. The purpose of this build is to debuff enemies while providing point presence and surviving. You will be getting into the fray
and setting up kills in melee range for your team. 300 CON will give you a massive health pool and tons of perks that will help you survive in group fights. 150 INT and 65 STR still provides surprisingly good damage with the key INT perk giving 15% elemental damage.
Equipment
Armor
For the Blunderbuss Tank Build you will be in full Heavy armor. All of the armor you will want for this build can be made through crafting or bought from the auction house. If you’re on a budget you can use Heavy PvP track armor for a couple pieces. Below is the ideal perk spread you will want across all your armor pieces. They are listed in order of importance from top to bottom:
- Nullifying Oblivion
- Diminishing Orb
- Resilient (4)
- Refreshing Ward (5)
- Shirking Fort (3)
- Exhaustive Net Shot
Weapons
The perks listed are in order of importance from left to right. The MOST important perk on these weapons are the ability perks (Putrefying Scream and Plagued Splitting Grenades) so make sure that your weapons have these perks on them at a minimum. Having these perks on your weapons as opposed to your armor gives them increased disease effectiveness.
Blunderbuss – Plagued Splitting Grenades, Chain Fire, Enchanted
Void Gauntlet – Putrefying Scream, Keen, Refreshing Move
Jewelry
The perks for each piece are in order of importance from right to left so you can prioritize obtaining them.
Amulet – Health, Slash Protection, Fortified
Ring – Hearty, Keen, Infected or Refreshing Ward
Earring – Refreshing Toast, Refreshing Ward, Purifying Toast
Gems
For gems I do not recommend using runeglass in armor as the resistance is more important than the increase damage. With a slash protection amulet you want your resistance to be 20% Slash and 10% to everything else. For weapons you want to use any elemental Runeglass with an opal inside for both weapons
Heartrune Ability- Bile Bomb or Stoneform
Cunning Heartrune of Bile Bomb- Spit out a glob of corrosive bile which creates a 3.5m radius disease cloud on impact lingering for 3s. Enemies that enter the cloud are afflicted with a debuff that deals 100% heartrune damage per second and reduces healing by 30% for 8s. Cloud Stick to enemies on direct hits. The Cunning variation Inflicts a 20% slow and 30% exhaust to enemies on hit.
Cunning Heartrune of Stoneform- Harden yourself with layers of stone, cleansing all crowd control debuffs and granting immunity to both stagger and crowd control debuffs for 5s. Hardened form gives you additional fortify the more you get hit stacking up to 40% total fortify. This combines with the refreshing ward very nicely and makes it actually beneficial. to get hit.
Both are very good with the build. I would recommend Stoneform if you do not have reliable heals and Bile Bomb, if you do have reliable, heals.
Consumables
Potions
Consumables on this build are pretty straightforward. You will want one of each type of infused potions on your bar as well as Gemstone Dust. Gemstone dust is preferred because it drastically reduces the damage from enemy detonates. Regeneration potions in combination with purifying toast make it a very good option to save for enemy roots.
Food
For this build, you can use any food that helps you hit your attribute threshold. Foods that are usually cheap/available that have STR, INT, CON are:
- Roasted Rabbit with Season Vegetable
- Carrot Cake
- Spaghetti Bolognese
How to use the Blunderbuss Tank Build
The Blunderbuss Tank role is to setup an area of debuff and disease on as many enemies as possible. First, you want to setup with an oblivion at your feet and then you want to scream to lock your enemies in place. Then you want to drop splitting grenades and orb as many enemies as possible. After dropping your combo on enemies, if you find yourself in a tough spot make sure to use the Net Shot to reposition
yourself.
As you don’t have many movement options, making sure to save the Net Shot for repositioning is very important to survive. The biggest strength of this build is being able to survive while dealing debuffs to mass amounts of people. You are fighting a war of attrition with this build. With access to the most disease and fortify in the game, you’re sure to be the last one standing.
Void Gauntlet Blunderbuss Build Conclusion
That concludes of Void Gauntlet Blunderbuss Build Guide. For more New World PVP builds, check out our New World Home Page