
Introduction
Welcome to our Diablo 4 Shadow Necromancer Build, the “Shadowmancer. This build uses the Ultimate Shadow, Blight, and Damned Aspects to Deal massive amounts of Shadow Damage with Reap while becoming nearly invisible with Blood Mist and Bone Storm. The guide covers Skill Tree, Paragon Board choices, Glyphs, Aspects, and Everything else you need to know to Run the Build.
Pros
- Top Tier Mob and Elite Damage
- Great Survivability with Blood Mist and Shielding Storm Aspect
- Good Burst Damage for Bosses
- No Required Uniques
Cons
- Cooldown Dependent
- High Number of Legendary Aspects Required to Play the Build
- Struggles with sustained damage in Longer Boss Fights
Skill and Paragon Board
Board Order
Starter > Wither > Scent of Death > Flesh Eater > Bone Graft >Blood Bath
Glyph Leveling Priority
Below are the Glyphs the Shadow Necromancer build uses in the Paragon Board. The Glyphs are in order of upgrade priority from top to bottom. MAKE SURE TO UPGRADE EACH GLYPH to 15 First, then push them to level 21
- Exploit (Flesh Eater then Blood Bath) – Vulnerable Damage is one of the most important aspects of any build in Diablo 4. Because of this we will upgrade Exploit Early, and move it around the board as we get more opportunity to scale it. The first board that will come available that has the DEX necessary to scale Exploit is Flesh Eater. Once we get to the Blood Bath Board, We will move the Exploit Glyph there and replace it with Territorial due to the fact Blood Bath has more DEX within range of the node. Also, EXPLOIT is the ONLY glyph we have in the build that requires level 15 to activate the passive with surrounding nodes. This adds to the list of reasons to upgrade it first.
- Control (Start Board) – Control grants increased damage to Slowed or Chilled Enemies and up to 20% Increased damage to Sunnted and Frozen Enemies. With Decrepify, Pertinent Greaves, and Crippling Darkness this build should have all enemies under one of the CC effects above all of the time. Couple this with the fact we can scale the started board to 70 INT and it’s an easy choice.
- Darkness (Scent of Death) – Darkness is the next Glyph well upgrade as its one well utilize early on in the Scent of Death Board. The Glphs additional Damage also provides Damage Reduction to Enemies we’ve damaged. This Additional Bonus can be activated at level 1, which is a nice early boost to Survivability
- Territorial (Flesh Eater) – Territorial is the 4th Glyph well upgrade and add to the Flesh Eater Board. Almost all the damage we deal is within “Close” range and the Additional Bonus Grants us with another Damage Reduction buff.
- Essence (Bone Graft) – Essence is a great boost to our Sever damage, which is this build’s primary source of burst damage. Not only does it provide Scalable Crit Damage with Core Skills, but the passive also grants 22% Crit Damage increase to “non-Healthy” mobs.
- Imbiber (Wither) – The Final Glyph for the Shadowmancer build is Imbiber. The Good thing about Imbiber, aside from the DPS boost, is that it can be activated in the Wither Board early at level 1. Since we have a barrier up most of the time with the Shielding Storm Aspect, Most of our damage falls into the “While Healthy” Bubble and outperforms all the other “6th” options.
Book of the Dead
For our Shadow Necromancer, We will sacrifice all Minions. Below are the perks you will earn from each sacrifice.
- Skeletal Warrior (Reaper) – 15% X Increased Shadow Damage
- Skeletal Mages (Ice) – 15%X Increased Vulnerable Damage
- Golem (Iron) – 30% X Increased Critical Damage
Item Affix Priority
| Item | 1 | 2 | 3 | 4 | 5 |
| Helm | Cooldown Reduction | Maximum LIfe | Lucky Hit with Barrier (Sorc) | + Total Armor | +Intelligence |
| Chest | Damage Reduction | Damage Reduction to Clost Enemies | Maximum LIfe | + Total Armor | + Damage Reduction to Distant Enemies |
| Glove | Crit Chance | Attack Speed | Lucky Hit Chance | + Ranks to Sever | Damage Reduction to Close Enemies |
| Pants | Damage Reduction | Damage Reduction to Close Enemies | Maximum LIfe | +Ranks to Blood Mist | + Damage Reduction to Distant Enemies |
| Boots | + Movement Speed | + Essence Cost Reduction | +Intellegence | +Movement Speed for X seconds After Killing an Elite | + All Stat |
| Amulet | + Cooldown Reduction | + Movement Speed | + Ranks to Gloom Passive | + Essence Cost Reduction | + Ranks of the Terror Passive |
| Ring x 2 | Crit Chance | Crit Damage | Vulnerable Damage | Lucky HIt Chance | +Damage to Close Enemies |
| Weapon 1H | Crit Damage | Vulnerable Damage | +Damage to Close Enemies | Core Skill Damage | + Intelligence |
| Off Hand | Cooldown Reduction | Crit Chance | Lucky Hit | Essence Cost Reduction | Lucky Hit with Barrier (sorc) |
Legendary Aspects
Below is a list of Aspects we use and recommend for this build. The Aspects are in order starting from the most to least important.
Build Defining
- Ultimate Shadow Aspect (Offensive) – Converts Blood Storm to Shadow Damage
- Blighted Aspect (Offensive) – Up to 180%(Amulet) with 10x Shadowblight Key Passive hits.
- Damned Aspect (Offensive – Up to 40%x Damage to Cursed Enemies
- Aspect of the Shielding Storm (Defensive) – Ensures constant Barrier Generation with Bone Storm.
- Disobedience (Defensive) – Best in Slot Defensive Aspect, will help keep us at Armor Cap (85%) due to the builds hit frequency
Recommended
- Aspect of Decay (Offensive) – Extra Damage from Shadowblight Passive
- Aspect of Gale (Offensive) – Extends the duration of Bone Storm by consuming Corpses
- Aspect of the Blood Soaked (Offensive) – Removes reduced Movement speed from the mist and adds a trail of DOT shadow damage
- Aspect of Explosive Mist (Defensive) – Blood Mist Explodes Corpses
Aspect Slots
You can use Aspect in any slot you can fit it in, aside from the Amulet Aspect which needs to be used on the Blighted Aspect. Here is a reminder of the slot limitations for Legendary Aspects:
- Offensive – Amulets, Gloves, Ring, Weapons, Off-Hands
- Defensive – Amulets, Chest, Helm, Legs, Shield
- Mobility – Amulets, Boots
- Resource – Rings
- Utility – Amulets, Boots, Chest, Gloves, Helm, Shield
Unique Items
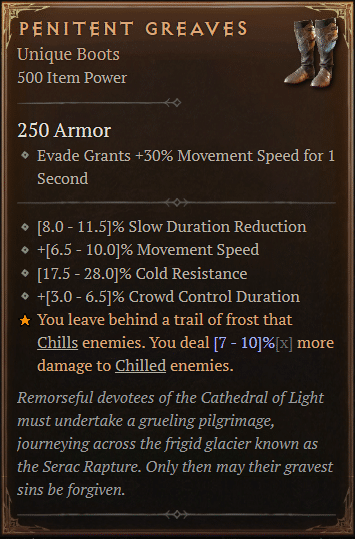
This build only has one recommended Unique Item and it is not required to use the build.
- Penitent Greaves – One of the most powerful Uniques in Diablo 4, Penitent Greaves allows you to obtain a significant amount of damage increase you can’t usually find in the Boots Slot. Since Shadow Necromancer has access to X Damage to Slowed enemies with the Terror Passive and has weak Affixes in the Boots slot Pentitent Greaves is a no-brainer for the build.
Season 1: Malignant Hearts
Malignant Hearts, a new addition to Diablo 4 through the first Seasonal experience act as a huge boost to your build capabilities. As a result, we recommend using the following Malignant Hearts for this build:
Recommended
- The Malignant Pact (Wrathful, Super): Cycle through a Malignant bonus every 20 kills:
- Vicious: Gain 20% Attack Speed.
- Devious: Core and Basic Skills have a 15% chance to fully restore your Primary Resource.
- Brutal: Every 21 seconds, gain a Barrier absorbing 85-102 damage.
- The Decrepit Aura (Brutal, Defensive): When at least 5 enemies are near you, gain an aura that automatically curses surrounding enemies with Decrepify for 5-15 seconds.
- The Sacrilegious (Vicious, Offensive): Walking near a Corpse automatically activates an equipped Corpse Skill every second, dealing 40-30% reduced damage.
Alternative Choices
- The Dark Dance (Vicious, Offensive-World Tier III): Every 5 seconds while above 60% Life, Core Skills cost 68-51 Life instead of your Primary Resource. Skills that consume Life deal 10-20% increased damage.
- The Calculated (Devious, Utility-World Tier III): After spending 150-200 of your Primary Resource, your next attack Stuns enemies hit for 2 seconds.
How to Play Shadow Necromancer
The Shadow Necromancer utilizes the Shadowblight Key Passive with the Blighted Aspect to open up burst windows for Sever. Stacking the Blighted Aspect perk comes easy with Bone Storm and Blood Mist. In large mob, groups, the Blighted Aspect should be up almost all the time, allowing you to mow through Nightmare Dungeons with Ease.
Bone Storm and Blood Mist also play into the defensive strategy of the build. Using the Aspect of Shielding Storm, while stacking Cooldown Reduction and Lucky HIt, you should have either Blood Mist or Bone Storm active at all times, making you almost invincible.
The last piece of the build is our 2 curses and Reap. Iron Maiden and Decrepify are used in tandem to provide the following benefits.
- 40%X bonus increase (Aspect of the Damned)
- 9%X damage to Cursed Enemies
- 20% damage reduction
- Cooldown Reduction on Lucky HIt
- Chance to Stun on Lucky Hit
- Apply Slow
- Gain 5 Essence Per Hit
- 5% of Max Life when an Enemy Dies
Reap is used to Weave in between attacks during Pack Mobs for increased Attack Speed, and is used for Essence Regen and Corpse Generation on Bosses. We will cover more on this below
Vs Trash and Elite mobs
The Shadow Necromancer blasts trash mobs and Elites with easy by maintaining max stacks of Shadowblight while utilizing the 180% damage increase from the blighted aspect. This is done by Keeping High Bone Storm uptime and utilizing the Blood-Soaked and Explosive Mist Aspects of Blood Mist. Make sure to CURSE ALL ENEMIES with both Iron Maiden and Decripfy as it keeps our damage high and our cooldowns low. Below is a general rotation while pulling mob packs and Elites
- Apply Iron Maiden and Decrpify
- Cast Bone Storm
- Cast Sever Until Out of Essence – Make sure to weave in a Reap to get increased attack Speed
- Blood Mist to Regen Essence and reset Bone Storm Cooldown while applying more Shadow Damage
Its important to note that you should NOT USE BLOOD MIST OFFENIVELY. Never open a fight with Blood Mist as you will need to use it defensively to remove CC and to reset your Bone Storm Cooldown.
Vs Bosses
On bosses, the goal is to get to 10 Shadowblight stacks with the Blighted Aspect and dump Essence with the Sever. This is much more difficult in a single-target fight, but can be done with the right rotation
Boss Skill Rotation
- Apply Iron Maden and Decrepify
- Cast Bone Storm
- Sever until Out of Essence
- Reap X 1 for Corpse generation
- Cast Blood Mist to regen Essence and apply more shadow damage with Blood-Soaked and Exploding Corpse Aspect
- Cast Reap if necessary until 10 stacks of Blighted Aspect Stacks
- Sever til Out of Essence
This Rotation should down most bosses pretty quickly. Some Bosses can be killed with just the first 3 steps while other Bosses (ones that move around a lot) might require a Second rotation.
Shadow Necromancer Build Conclusion
That completes our Diablo 4 Shadow Necromancer Guide! For help with leveling your necromancer, check out our 1-50 Necromancer guide!