
Introduction
Our Blood Necromancer Build utilizes Infinite amounts of Blood Wave, MIst, Lance, and Orbs to drown our Enemies to Death IN BLOOD. Learn how to harness the power of blood and shadow in Diablo 4 to destroy your enemies in our Blood Necromancer Build.
PROS
- Elite AOE DPS with Blood Wave
- Great Defense that plays into the Builds DPS (Max Life)
- Fun to cast Ultimate ability without a cooldown
CON
- Single Target DPS is lacking compared to Bone Spear
- High legendary Aspect and Lucky Hit requirement
Skill Tree and Paragon Board
NOTE – Weapon ASPECT is the Aspect of Gore Quills that can be unlocked in the Season 1 Codex
Paragon Board Order
Starting > Blood Begets Blood > Scent of Death > Blood Bath > Flesh Eater
Glyph Leveling Priority
- Dominate
- Blood-Drinker
- Sacrificial
- Control
Class Mechanic (Book of the Dead)
For the Blood Necromancer, we will sacrifice all Minions. Below is the perks you will get from each sacrifice:
- Skeletal Soldiers (Reapers) – 15% X Shadow Damage
- Skeletal Mages (Bone) – 40% X Overpower
- Golem (Blood) – 10% X Max Life
Legendary Aspects
Below is a list of Aspects we use and recommend for this build. The Aspects are in order starting from the most to least important.
Build Defining
- Aspect of Gore Quills – blood Lance will consume Blood Orbs to also conjure lances from them. Each additional Blood Lance deals X% of normal damage and prioritizes targeting un-lanced enemies.
- Tidal Aspect – Blood Wave fires two additional waves, each dealing X% less damage than the previous
- Fastblood Aspect – Blood Orbs reduce your Ultimate Cooldown by X seconds
- Blighted Aspect – You deal X% increased damage for X seconds after the Shadowblight Key Passive damages enemies X times
- Ultimate Shadow – Bone Storm and Blood Wave are also Darkness Skills, deal Shadow damage, and gain additional effects: Enemies damaged by Bone Storm take X Shadow damage over X seconds and Blood Wave desecrates the ground it travels over, dealing X Shadow damage over X seconds
- Aspect of Rathma’s Chosen – Whenever your Blood Skills Overpower you gain X%+ Attack Speed for X seconds
Recommended
- Aspect of Explosive Mist – Blood Mist triggers Corpse Explosion on surrounding Corpses. When Blood Mist detonates a Corpse, its Cooldown is reduced by X seconds
- Blood Soaked Aspect – Blood Mist leaves a trail that lasts for X seconds and deals X Shadow damage per second to enemies who stand in it. Your Movement Speed is no longer reduced while Blood Mist is active
- Aspect of Disobedience – You gain X% increased Armor for X seconds when you deal any form of damage, stacking up to X%
- Aspect of the Embalmer – Consuming a Corpse has an X% chance to spawn a Blood Orb
Optional
If you’re having trouble finding one of the other Offensive Aspects, you can slot in the Splintering Aspect.
- Aspect of Hungry Blood – When Blood Lance hits an enemy that is already lanced, it has a X% chance to fire a Blood Lance at a Nearby enemy
Aspect Slots
You can use Aspect in any slot you can fit it in, aside from the Amulet Aspect which needs to be used on the Blighted Aspect. Here is a reminder of the slot limitations for Legendary Aspects:
- Offensive – Amulets, Gloves, Ring, Weapons, Off-Hands
- Defensive – Amulets, Chest, Helm, Legs, Shield
- Mobility – Amulets, Boots
- Resource – Rings
- Utility – Amulets, Boots, Chest, Gloves, Helm, Shield
UNIQUES
Recommended
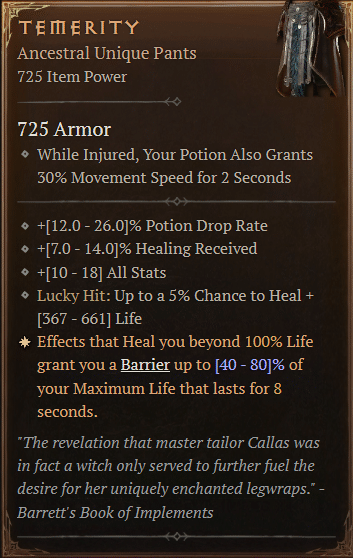
For this build, we highly recommend Temerity. The Blood Necromancer already has high amounts of life gain and, coupled with the Lucky Hit
- Temerity – Effects that Heal you beyond 100% Life grant you a Barrier up to [40-80%] of your Maximum Life that lasts for 8 seconds.
Optional
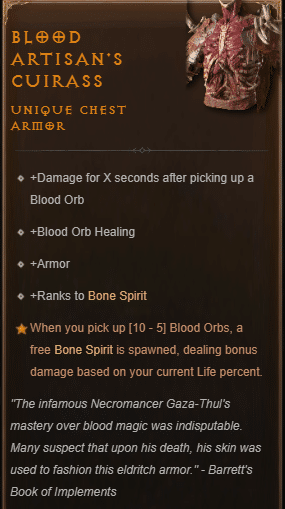
Since we are creating a ton of Blood Orbs, Blood Artisan’s Cuirass can be a passive way to increase our DPS while also increasing Self Healing. If you choose to run this in the chest piece, drop the Embalmer Aspect and run Disobience Aspect on your helm
- Blood Artisan’s Cuirass – When you pick up [10-5] Blood Orbs, a free Bone Spirit is spawned, dealing bonus damage based on your current Life percent.
Item Affix Priority
| Item | 1 | 2 | 3 | 4 | 5 |
| Helm | + Maximum LIfe | + X% Cooldown Reduction | Life + Lucky HIt Chance with Barrier | +% Damage for X Seconds After Picking Up a Blood Orb | + X% Total Armor |
| Chest | + Maximum Life | + X% Total Armor | Damage Reduction while Fortified | + X Damage Reduction | + Willpower |
| Glove | + Overpower Damage | + Lucky HIt Chance | + % Attack Speed | Lucky Hit: Up to 5% chance to Restore X Resource | + Willpower |
| Pants | + Maximum Life | + X Damage Reduction | Damage Reduction while Fortified | Ranks to BloodMist | + X% Total Armor |
| Boots | + X Movement Speed | + X Essence Cost Reduction | +Blood Orb Healing | +(*) Willpower | + X Movement Speed for X Seconds After Killing an Elite |
| Amulet | + Maximum Life | + X% Cooldown Reduction | + X Movement Speed | + Maximum Life | + X Damage Reduction |
| Ring x 2 | Max Health | + Overpower Damage | + Lucky HIt Chance | +% Damage for X Seconds After Picking Up a Blood Orb | + X Resource Generation |
| Weapon 1H | + Overpower Damage | +X% Core Skill Damage | +X% Ultimate Skill Damage | +(*) Willpower | +(*) All Stat |
| Off Hand | + Lucky HIt Chance | + Lucky HIt Chance with Barrier | + X% Cooldown Reduction | Lucky Hit: Up to 5% chance to Restore X Resource | + X Essence Cost Reduction |
Season 1: Malignant Heart – Recommended Cage Hearts
Malignant Hearts, a new addition to Diablo 4 through the first Seasonal experience act as a huge boost to your build capabilities. As a result, we recommend using the following Malignant Hearts for this build:
Recommended
- The Barber (Wrathful, Super-World Tier III): Critical Strikes and all subsequent damage within 2.0-4.0 seconds is absorbed by your target. Then, the absorbed damage erupts onto surrounding enemies. Stored damage is increased by 10% per second.
- The Sacrilegious (Vicious, Offensive): Walking near a Corpse automatically activates an equipped Corpse Skill every second, dealing 40-30% reduced damage.
- The Decrepit Aura (Brutal, Defensive): When at least 5 enemies are near you, gain an aura that automatically curses surrounding enemies with Decrepify for 5-15 seconds.
Alternative Choices
- The Lionheart (Brutal, Defensive): You gain 10% Barrier Generation. You Heal 3-7 Life per second while you have an active Barrier.
- The Malignant Pact (Wrathful, Super): Cycle through a Malignant bonus every 20 kills:
- Vicious: Gain 20% Attack Speed.
- Devious: Core and Basic Skills have a 15% chance to fully restore your Primary Resource.
- Brutal: Every 21 seconds, gain a Barrier absorbing 85-102 damage.
How To Play Blood Wave Necromancer
The Blood Necromancer build utilizes Blood Wave to deal MASSIVE amounts of AOE damage while utilizing the new Aspect of the Gore Quill to reset the Blood Wave Passive with the Fast Blood Aspect and Lucky Hit.
Overall the most important stats to the build are Max Life and Overpower. Most of our DPS scales around
Offense
Below is the basic breakdown of the offensive rotation for the build:
- Decrepify ALL targets
- Blood Wave
- Cast Blood Lance to absorb Blood Orbs and finish off elites
This should leave the pack as a massive pile. If your lucky hit is high enough, Blood Wave should be ready to cast again with a full pull of essence to cast Corpse Tendrils to group the remaining mobs, apply Decrepify and Blood Lance the remaining Enemies
Defense
The Defense of the build is centered around Blood Mist, Max Life, and Fortify. Since we’re running Overpower, this also plays into our offensive strategy. We’ll, be stacking Armor, Damage Reduction, and Damage Reduction while fortified to further strengthen our Defense.
The Blood Necromancer Maintains Max Life and the “Fortified” status by utilizing the Blood-Drinker Glyph in our paragon board, Blood Orb Healing, and the Temerity Unique.
Blood Mist should have almost 100% uptime and is our LAST and BEST line of defense.
Conclusion
That concludes our Blood Necromancer Guide! For more End-game Necromancer builds, check out our Shadow and Bone Spear builds.