
Introduction
This is a complete Wayfinder beginner guide. This guide covers everything you need to know to get started in Wayfinder. It includes things like the progression systems in the game, how combat works, the echo system, the weapon system, some tips and tricks, and more.

Gameplay Loop
Wayfinder is an MMO lite. This means you will be seeing and interacting with other players in the game, however it’s not yet a full blown MMO experience. The core gameplay loop revolves around running expeditions or dungeons in order to level up your wayfinder and your weapons. You will be searching for specific loot to craft certain items, and basically rinse and repeat.
So, the game is very much an item chase. Any Wayfinder can equip any weapon in the game, so you’ll be looking for different varieties of weapons and items to equip and level up. There is a targeted looting system, so you’ll be able to farm specific dungeons or bosses in order to obtain what you’re looking for.
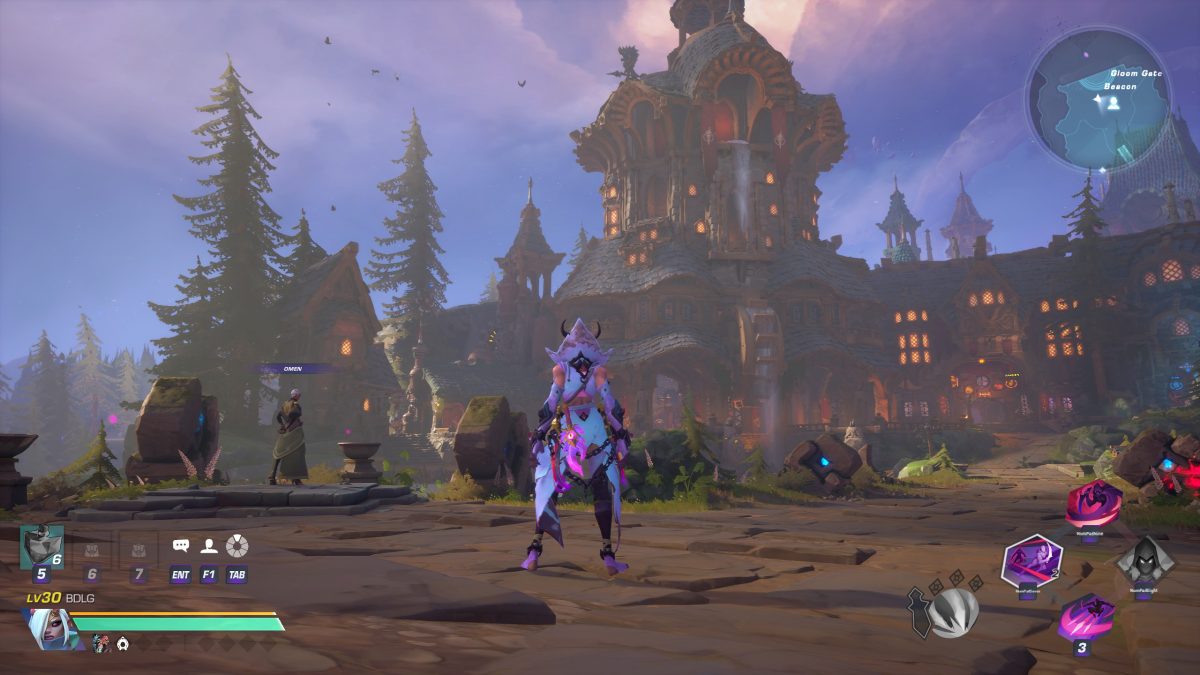
Along with the core gameplay loop there are also open world areas to explore, quests to complete, stories to dive into, a very well put together housing system and a whole lot more.
Getting Started
When you first jump into the game it’s recommended that you begin with running the main story quest. This is going to familiarize you with a lot of the systems in the game, and unlock some much-needed items to progress your gameplay. As you work your way though some of the quests you will begin to level up your wayfinder and your weapon.
Character Progression
Character progression in Wayfinder consists of several different systems. The two main ways to progress is by leveling up your Wayfinder, and leveling up your weapons. So, once you’re in the game you can open up your character loadout by pressing the default key of “C”. Here you will see your currently equipped Wayfinder and currently equipped weapon. The max level for both a Wayfinder and a weapon is level 30.
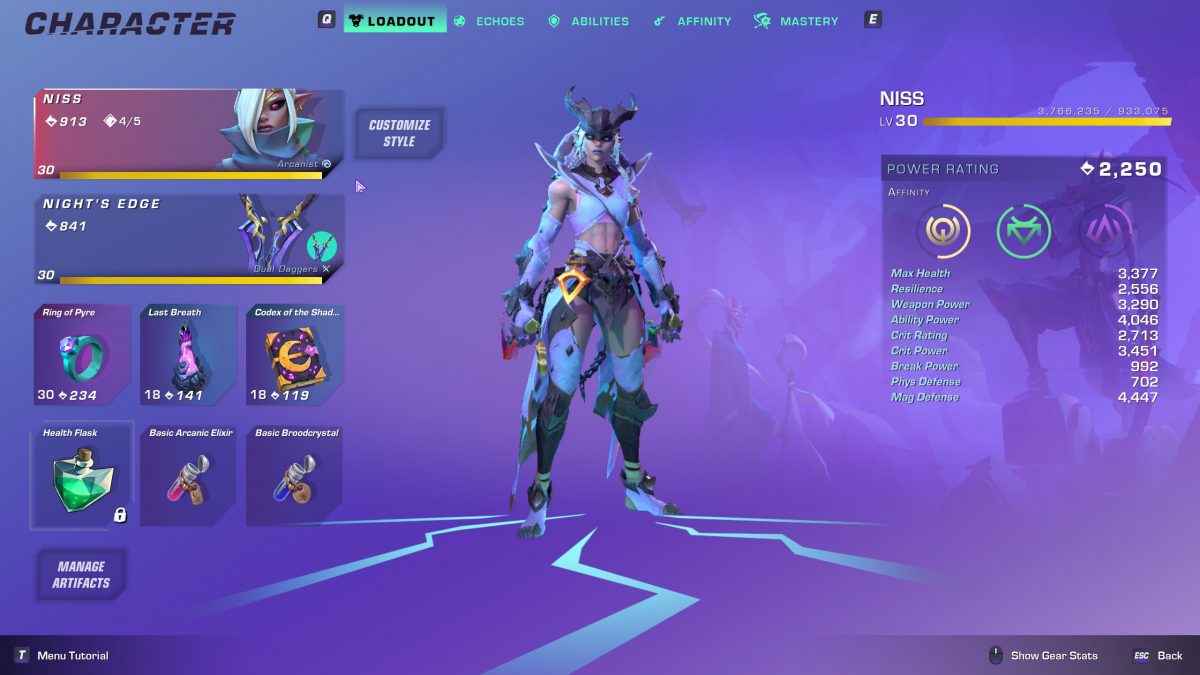
Your Wayfinder and weapon will level up separately from one another, and leveling one Wayfinder to 30 does not carry over to the other Wayfinders. Same for weapons. You will need to level up each Wayfinder individually, and each weapon in the game can be leveled individually to max level as well.
As you level up your wayfinder, your power rating will increase. This will increase your overall stats for that particular wayfinder, making them more powerful. If you click on your Wayfinder from the loadout screen, this will take you to your character screen. From here, if you have acquired any other Wayfinders, you can switch to them. Selecting a wayfinder will show you their current stats. If you select a wayfinder and press the middle mouse button you will also see their abilities, and you can see their currently equipped echoes from here as well.
If you go back to your loadout screen and click on your weapon it works the same way. You will then see a list of all of the other weapons you have acquired and can equip one at any time, unless you are currently in an instanced dungeon. Your loadout can’t be changed if you’re in an instance.
You can also utilize the middle mouse to cycle through the pages of information here to see which wayfinder currently has that weapon equipped, the echo’s equipped to that weapon, and the stats of the weapon.
Affinity System
Another method of character progression is the Affinity system. You can access the Affinity menu in your character screen. Once there you can spend affinity points to gain additional bonuses. You can also gain additional perks by hitting a certain affinity level.
As you level up, you will earn Affinity Points. These points can be used to upgrade your affinity. There are three different types of affinity:
- Instinct
- Discipline
- Focus
Each of the different types of affinity will increase the power of your currently equipped items with specific stats.
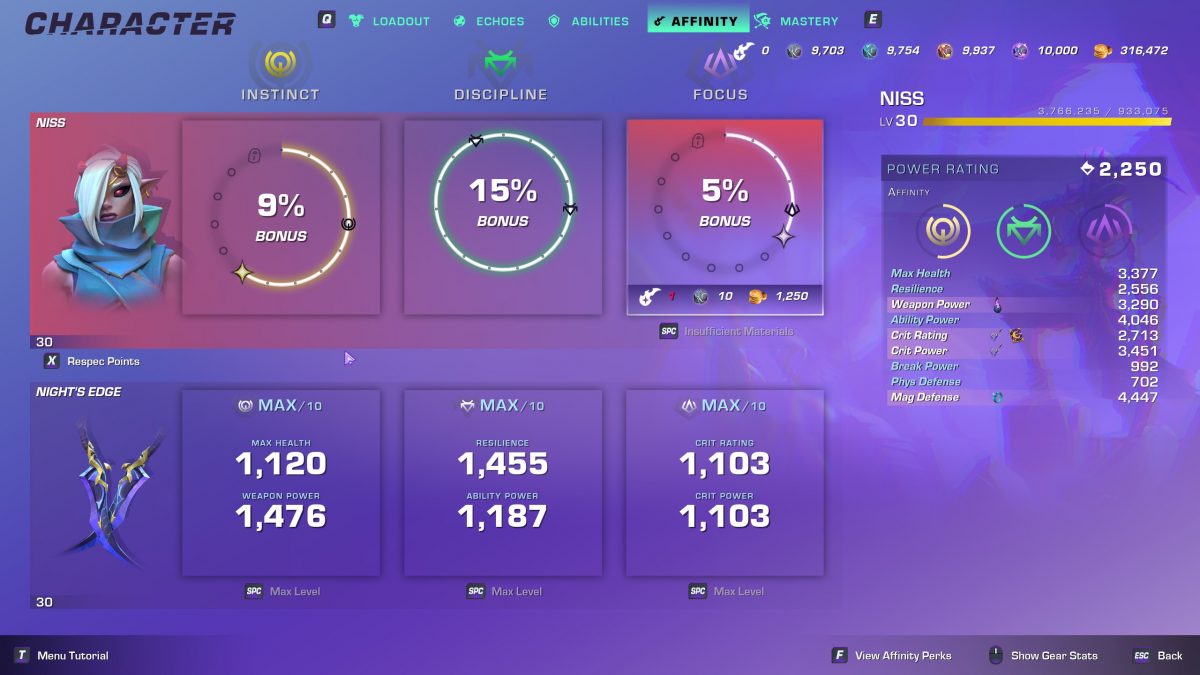
It’s very important to point out that you will only receive these increases in power on the specific items you have equipped that have those stats. This is not an overall passive buff as you increase your affinity.
You can see which equipped items the affinity is affecting whenever you hover over the applicable affinity. So, just to reiterate by upgrading an affinity the associated stats on the equipped weapon and accessories will be increased by a bonus multiplier. This bonus multiplier will be applied to any affinity aligned base stats coming from the current equipped loadout.
You can check out our Affinity guide for a full explanation of the system.
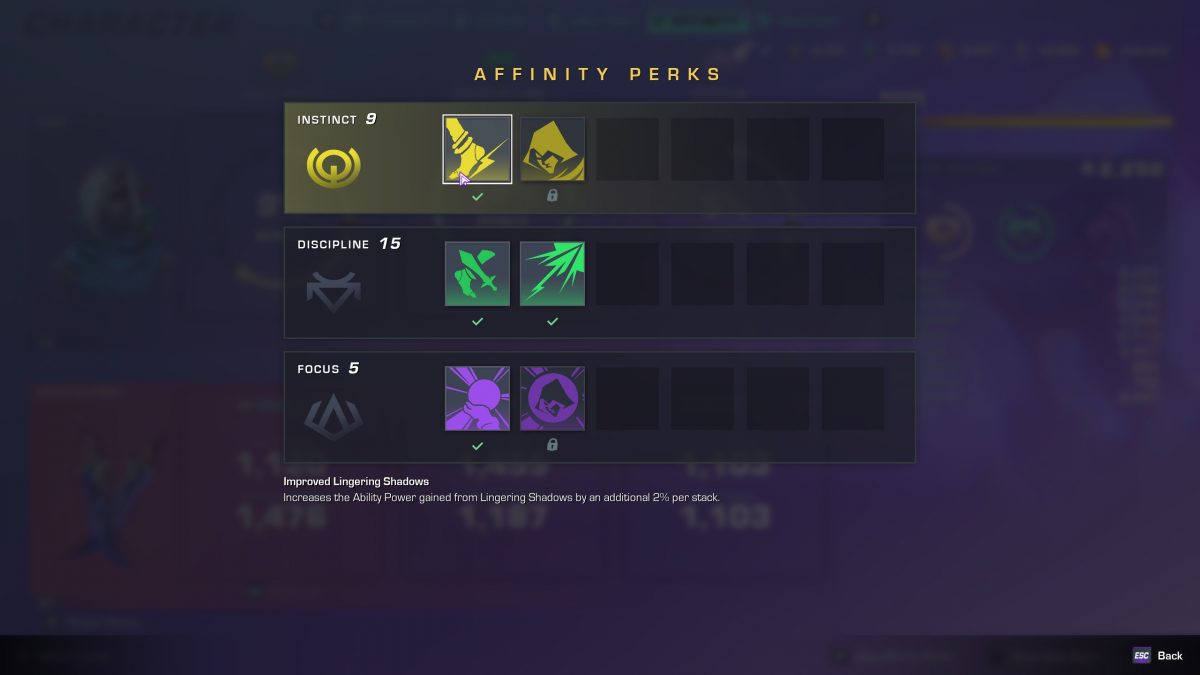
Affinity Perks
Each of the character affinities also includes a collection of passive perks that are unlocked at key affinity levels. You can view these perk details and unlock requirements via the affinity perk submenu. Each Wayfinder has different perks associated with the affinity upgrade milestones.
For example, while on the affinity menu for Niss, if you press the default key of “F” you can view the affinity perks, and which level the perk unlocks.
Weapon Affinity Upgrades
Just like each Wayfinder, each weapon has affinities associated with it as well. Weapons have three sets of affinity-aligned stat groupings that can be upgraded at any time using Gloomstones.
When upgraded, the included stats will permanently increase their values. Each affinity-aligned stat group affords a maximum number of upgrades, which is currently set at 10. However these can be further increased when a weapon has achieved max level. This can be achieved through a process called Weapon Reinforcement. You simply need to visit the Weapon Master in Skylight to start the process.
The stats that are increased on your weapon via the affinity system will depend on the weapon that you are upgrading. It’s important to point out that these upgrades are associated with that particular weapon. For instance, if you were to upgrade the Focus affinity of Night’s Edge you will receive an increase in max health and weapon power. If you were to equip a different weapon you would no longer receive that benefit from upgrading Night’s Edge.
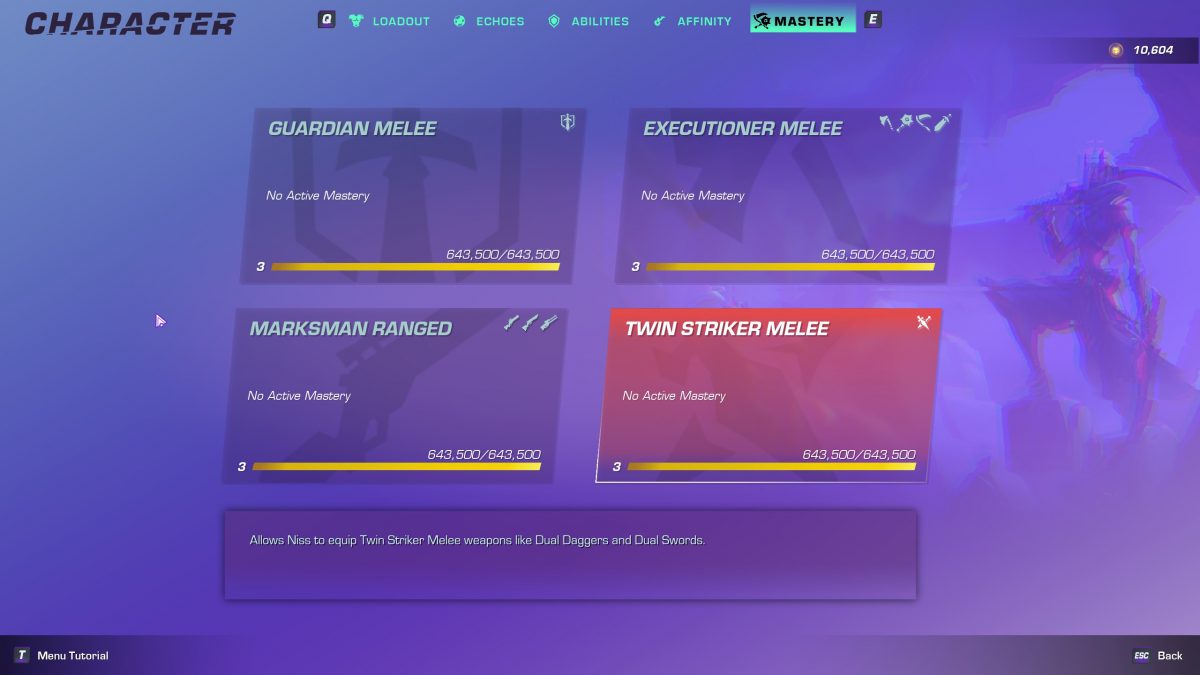
Weapon Mastery
Another form of progression is the weapon mastery system. You can upgrade your weapon mastery by navigating to the ‘Mastery’ section in the character screen. Once there, you can select the mastery you are wanting to upgrade. Upon hitting certain milestones with your upgrades you will be able to activate a passive that will enhance your weapon mastery. This can also help determine how you want to build out your Wayfinder.
You can check out our weapon mastertery guide for a full breakdown of the weapon mastery system.
Echoes
Another way to increase your power and to customize your Wayfinder to your liking is through the echo system. You can view the echo system via the character menu. Echoes are items that have a chance to drop from almost every enemy in Wayfinder. Each echo will have a stat, multiple stats, or a passive associated with it. You can then slot that echo into your Wayfinder, weapon and accessories in order to increase your power rating.
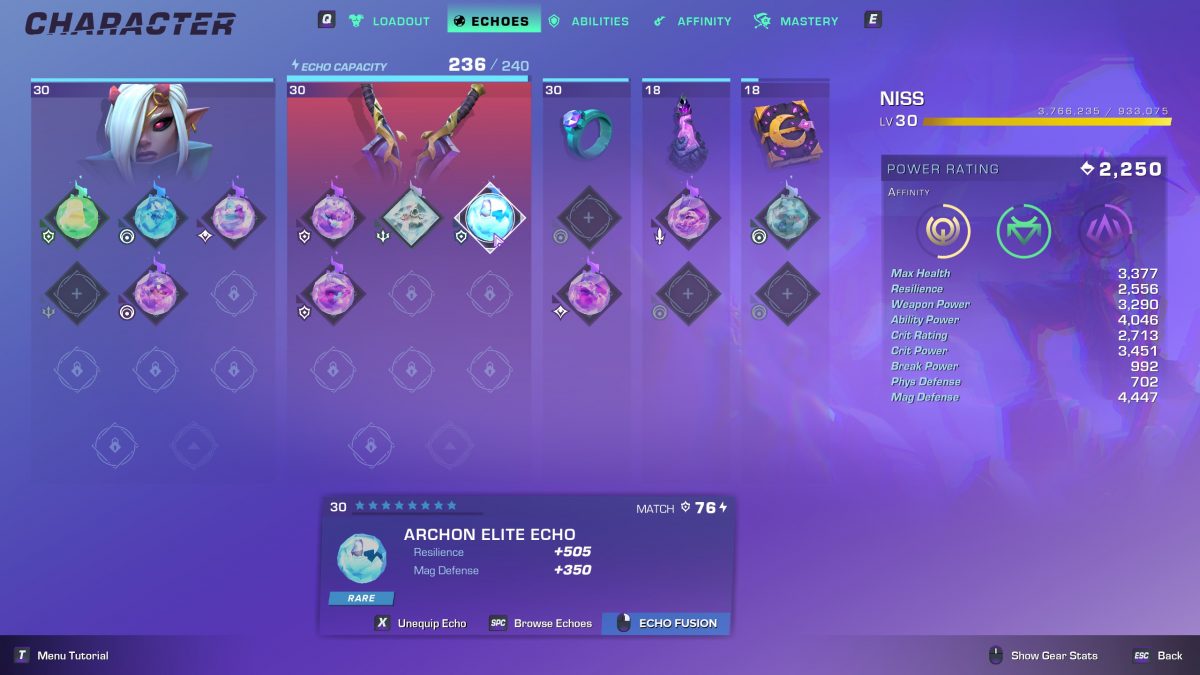
There are several different categories of echoes, and slotting an echo of a particular category into the matching slot will reduce the cost of slotting that echo. Your Wayfinder, weapon, and accessories all have an echo capacity associated with them. This means you can only slot echoes up to a certain echo cost. You can see the cost of each echo on the right side of the echo menu when you’re browsing through them.
You can also fuse echoes together in order to make a particular echo stronger. So, if you have multiple of a particular echo that you aren’t utilizing you can fuse them into an echo that you are using in order to upgrade it.
The echo system is one of the primary methods of building out your character in Wayfinder. Through this method you can customize your Wayfinder to have the stats and build that fits your playstyle.
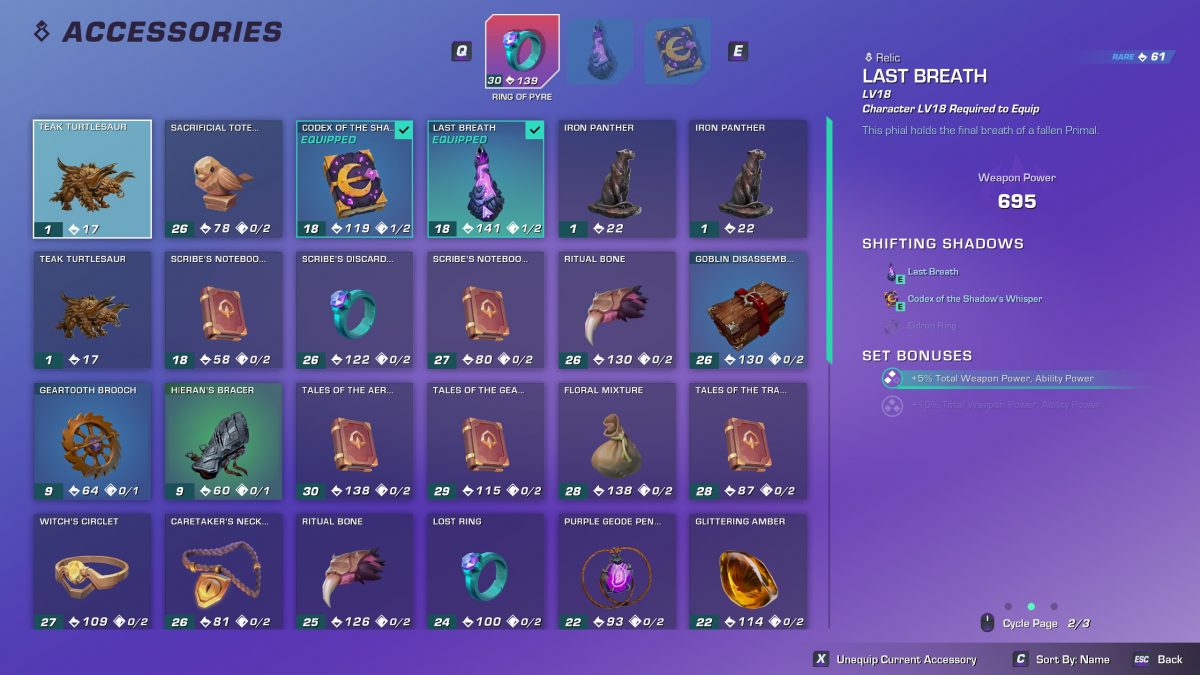
Accessories
As you play you are also going to collect accessories. Each accessory has a set of stats associated with it. This is another method of customizing your Wayfinder with the stats that you want. Accessories can also come equipped with Echo slots. The lower level accessories oftentimes will not have echo slots, but as you progress you will find some that do.
Some accessories are also a part of a set. This means if you equip all 3 of the accessories out of that set you will receive a set bonus. An example of a set bonus is 10% to total ability power, magical defense, and crit rating. You can see detailed information about each accessory you own by clicking on an accessory slot in your character menu.
Once there you can hover over an accessory and utilize the middle mouse button to see it’s stats, if it has a set bonus, the other accessories needed for the bonus, and it’s echo slots.
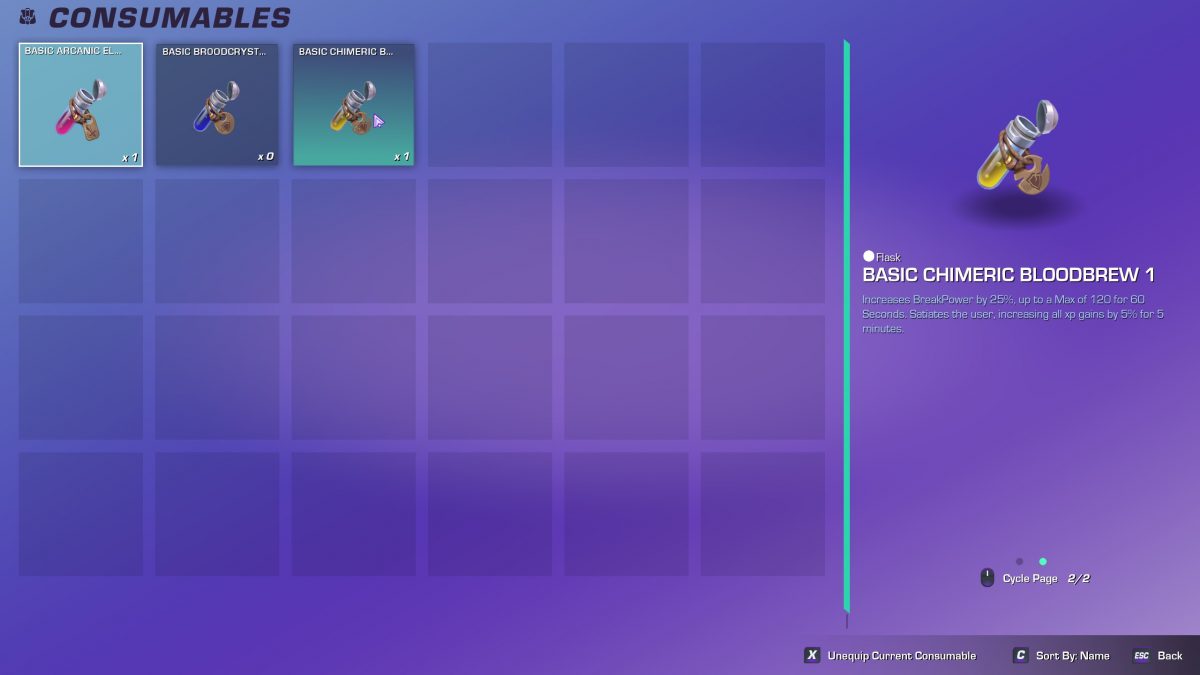
Consumables
You also have 3 available consumable slots. Your first slot consists of a health flask that you can utilize. It comes with several charges. This means you can only utilize it a certain amount of times before it needs refilling. Whenever you use all of a consumable you don’t need to craft anymore, you simply need to refill them at a refill shrine.
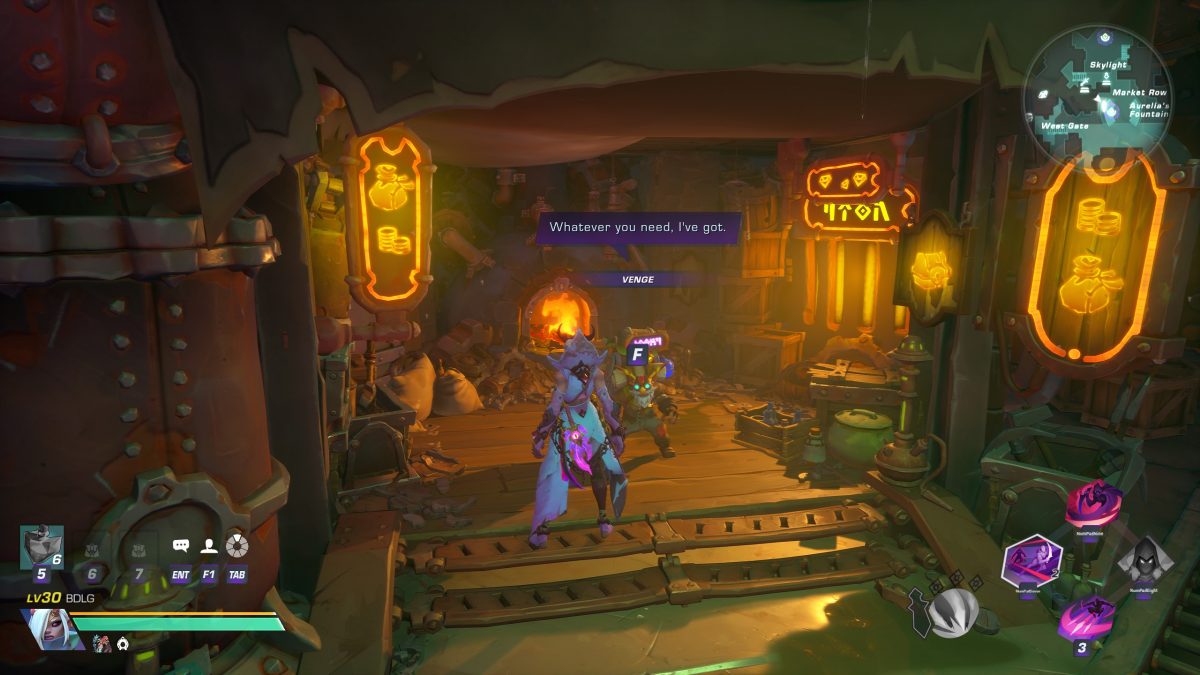
In order to obtain additional consumables you will need to craft them. This can be done in Skylight by talking to Venge and selecting craft consumables. Each consumable you craft is going to require certain ingredients, gold, and a recipe.
You can see where to find all of the ingredients by selecting the potion you want to craft and pressing the default key of “F”. Once you have acquired all of the ingredients you can select the potion and hold space to craft it.
Once crafted you do not need to craft it again. You simply need to navigate to your character screen and select a potion slot to equip your potion of choice. Once you run out of the potion it just needs to be refilled at the refilling shrine.
Selling Unwanted Items
If you have unwanted accessories or other items, or just need to make some gold you can sell those items to the same NPC that you utilize to craft consumables. His name is Venge and he’s located in Market Row in Skylight.
Housing
Playing through the main story will unlock your housing. You will get this option fairly soon in the game. The first iteration of housing in Wayfinder is an apartment. In order to enter your apartment you will need to be in Skylight. There is a building with a water wheel on the front of it. The building can be seen very easily by standing with your back to the Gloom Gate in Skylight.
Once in the Water Wheel building make your way up the stairs. Only go up one flight of stairs and enter the door in the middle of the second flight to enter your apartment. Your apartment is an instanced home that you have full control to decorate as you please.
You can also acquire trophies that you can interact with once a day to gain some items. There are also artifacts that you can obtain that will give you a global buff when you place them in your house.
You can access the artifact menu and change your active buff at any time by pressing “C” and entering the character menu. At the bottom of your screen there will be a manage artifacts option. From there you can select the artifacts you wish to have active. You have a limited amount of artifact power, and activating an artifact will cost a predetermined amount of that power. So, you can only have so many active at one time.

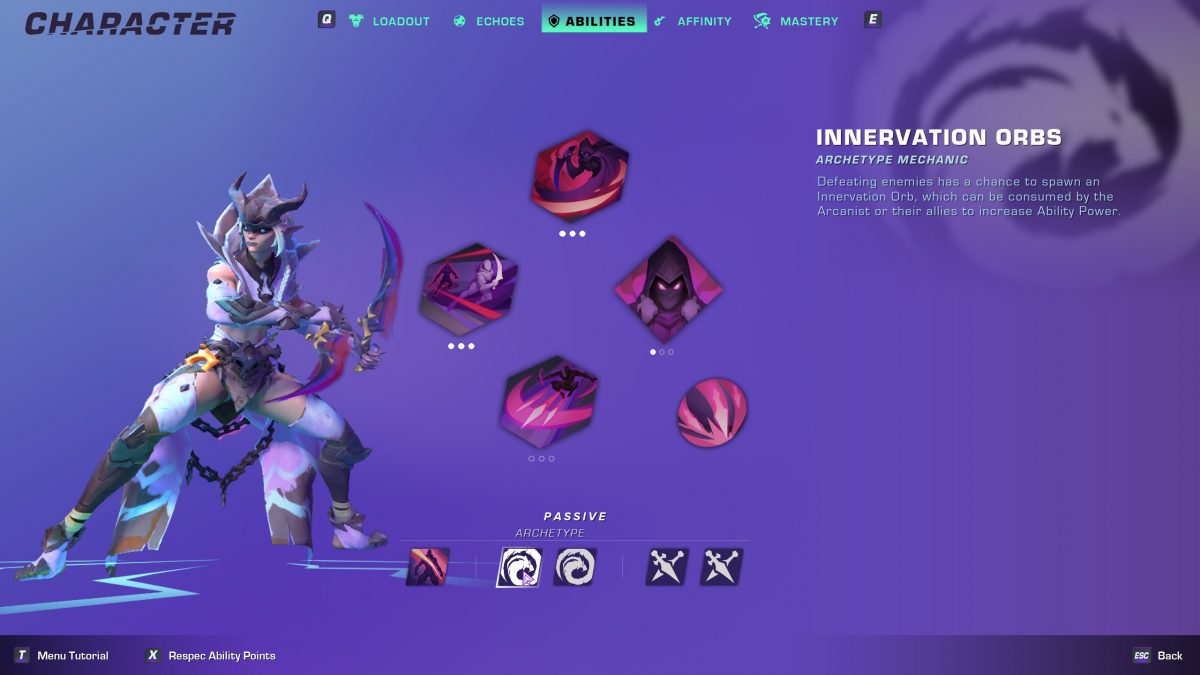
Archetypes
Every Wayfinder belongs a certain Archetype or group. The Archetype of a Wayfinder determines a set of passives that the Wayfinder will receive. You can see these passives by entering the character menu, default key of “C”, and selecting abilities.
At the bottom of the screen you will see two icons in the middle. Hovering over the icons will give you the full description of the archetype passives that your Wayfinder has. There are currently 3 archetypes that include the Warmaster, Arcanists, and Survivalists.
Warmasters are typically your traditional tanky or frontline class. Currently the 2 warmasters are Wingrave and Senja. Arcanists are the damage dealers. They include Kyross and Niss. The Survivalists are more of a support based class centered around controlling the battlefield. These currently include Silo and Venomess.
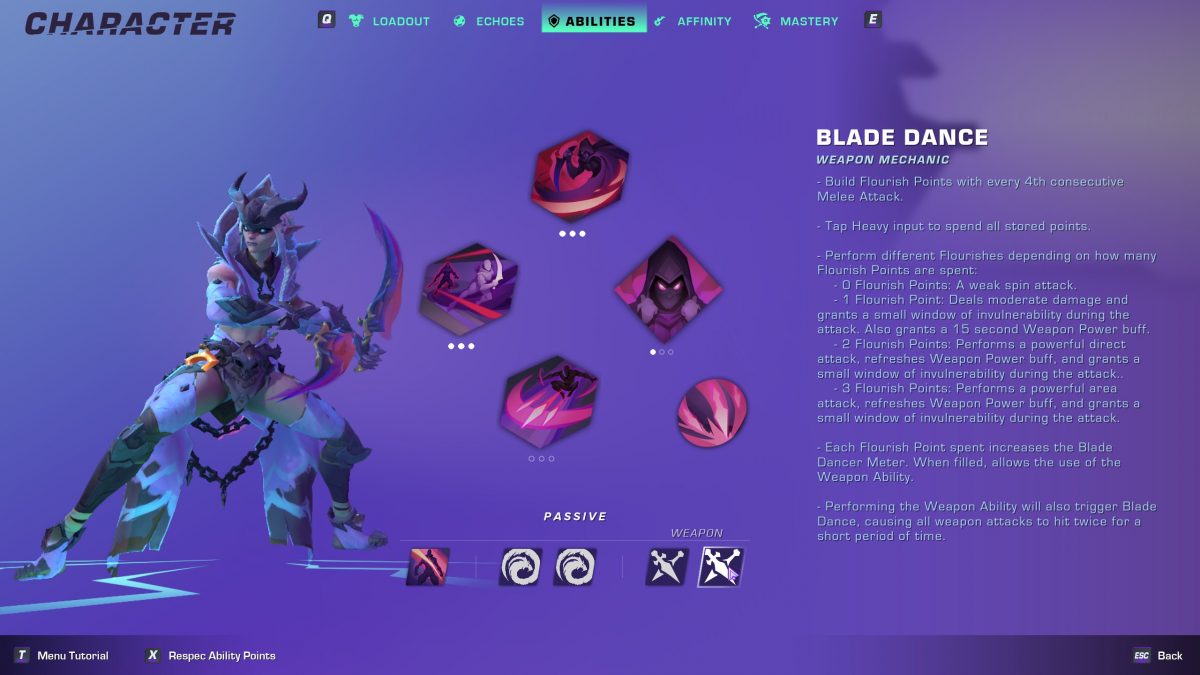
Weapon Passives
Along with the archetype passive you also have weapon passives. In Wayfinder, any character can equip any weapon in the game. When you equip a specific weapon you will change your weapon class and weapon mechanic.
You will also receive a weapon ability. The weapon ability is tied to the specific weapon and not the weapon category. Every weapon in Wayfinder has its own unique ability.
Currently there are four categories of weapons in the game that include Sword and Shield, Two Handed, Daggers, and Ranged. There can be several different weapons that fall into one of the categories. The category of weapon is what determines which weapon passives you will receive.
Combat
The combat in Wayfinder is action based, and consists of a total of 5 abilities. You will receive 4 Wayfinder specific abilities and 1 weapon specific ability.
Even though the combat is action based, you can lock on to a certain target if you choose.You can see your target lock on key bind by pressing esc and navigating to the key bindings section.
The Wayfinder abilities you receive will vary greatly depending on which Wayfinder you choose to play. You can view all of those abilities and how they function within the character screen. The power of those abilities and other attacks is determined by your attributes, and the gear that you have equipped that increase those attributes. You can see what each attribute in the game does by checking out How Damage is Calculated guide.
You can also perform heavy attacks by pressing the default key of “E”, and can perform jumping heavy attacks by jumping and pressing “E” as you land. Combos can be achieved as well by performing a full series of light attacks.
Every weapon ability has different qualifications for it to be activated. These tie into your weapon passives. When you look at your ability screen you can see how each weapon ability is activated by reading the weapon passive mechanics.
For example, if you’re using daggers you will earn what’s called flourish points. You earn these by landing a 4th consecutive melee attack. So you have to land a full combo of light attacks to earn a flourish point. You then spend a flourish point by pressing the default key of “E”. The more flourish points you have the more damage you will deal.
Every time you spend a flourish point you will fill up your weapon ability meter. Once it’s full you can then utilize the weapon ability.
Each weapon class has varying requirements for utilizing the weapon ability.

Movement
In Wayfinder you have the ability to double Jump, sprint, and dash. You can also dash while in the air. In order to jump the default key is space bar. In order to double jump you simply press space bar again while you’re in the air.
You also have a dash, or dodge that can be performed. You can see you dodge key binding within the settings.
Bear in mind that dodging costs stamina. If you exhaust you stamina you will move slower. Jumping does not cost any stamina.
Fast Traveling
Fast traveling in Wayfinder is done via signal fires. There are signal fires located throughout Skylight and in the open world. Typically a signal fire can be found near the entrance of a lost zone or at key locations.
Once you discover and activate a signal fire you can then open your map by pressing the default key of “M”. You can locate a signal fire, select it, and travel to it. It is not necessary to be at another signal fire to fast travel. You can simply click on one on your map and travel to that location.
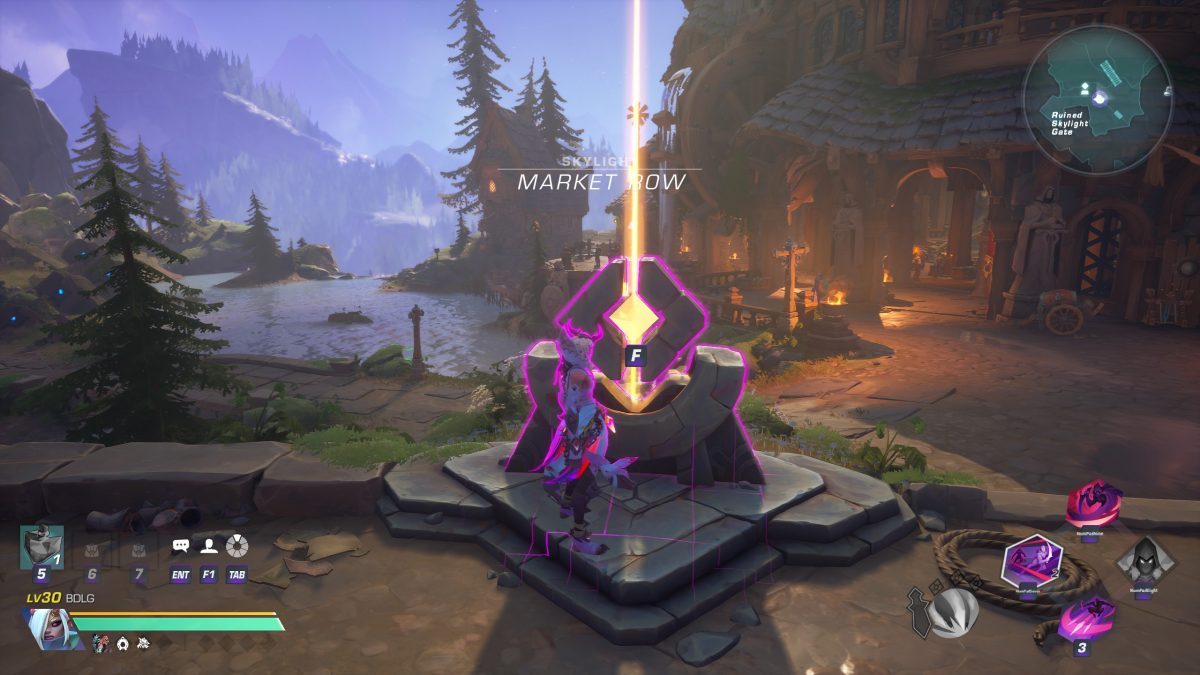
It’s also very important to note that once you locate a lost zone you unlock that zone at the Gloom Gate in Skylight. This means you don’t have to go back to that specific lost zone entrance to enter the dungeon. You can simply travel to skylight and go to the Gloom Gate and enter from there.
Social
You can access the social menu to add friends and group up with friends by pressing the default key of “o”. In order to add someone as a friend you will need their friend code. Your friend code can be located in the top right hand corner of the screen when accessing the social menu.
You can also add nearby players to your group by selecting “zone” and clicking on that player’s name.